
Font of choice - I'm using Abagail Jackson here
WSL – Mark 167 here
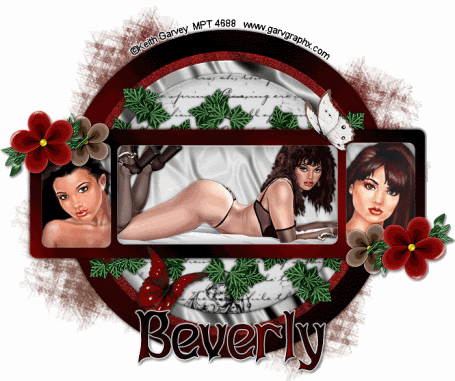
Template by RebelChick here
DSB Flux – Bright Noise - optional
Animation Shop - optional
"Colors of Love" FTU tagger kit by RebelChick which can be found here.
WSL – Mark 167 here
Template by RebelChick here
DSB Flux – Bright Noise - optional
Animation Shop - optional
"Colors of Love" FTU tagger kit by RebelChick which can be found here.
Please leave a Thank You when downloading. It's a small gesture for hard work given freely.
The possibilities with this template and kit are endless!
Thanks so much, RebelChick!
This tutorial was written assuming you have working knowledge of PSP.
~♥~ Let’s get started ~♥~
This will be a fairly quick and easy tut.
Open up the template. Duplicate. Close out the original. Delete Raster 2.
Highlight Circle 4. Selections/Float/Defloat. You can do one of the following two things:
Copy and paste a paper of choice as a new layer. Invert. Hit the delete key. Delete the template layer and rename your new circle layer as Circle 4.
Or
Make a new raster layer, create a gradient that will be compliment to your tag, flood fill, deselect, delete the template layer.
Repeat the above step for Circles 3,2, and 1. Once you’re done, if you want to animate your tag, then go back and highlight Circle 3 layer. Duplicate 2 times for a total of 3. Rename them Circle 3a, 3b, 3c. Highlight Circle 3a and apply DSB Flux/Bright Noise with the following setting:
Intensity 43
Ok
Highlight 3b – apply the same accept hit the mix button twice.
Highlight 3c – apply the same accept his the mix button 3 times.
Close out layers 3b & 3c, open up 3a.
Highlight Bottom Rectangle Layer. Select All/Float/Defloat. Copy and paste a paper of choice. Invert. Hit the delete button. Deselect. Delete the template layer. OR If you chose to use a gradient before you can use it again on this layer instead of a paper choice.
Highlight the left rectangle layer. Select All/Float/Defloat. Copy and paste a paper of choice. Invert. Hit the delete button. Copy and paste your tube as a new layer. Deselect. Delete the template layer.
Repeat the above with the remainder of the rectangles.
Add any embellishments you choose. I used:
Ivy 2
Flower with Leaves 2 – resize 50%
Flower 1 – 40%
Highlight your white canvas. New Raster Layer. Flood fill with your gradient. Apply the mask. Merge Group.
Add your copyrights.
Add your name.
I hope you enjoyed this tutorial.
I would love to see your results and put them into my gallery!
Email me!
Hugs,
Bev
No comments:
Post a Comment