
Font of choice - I'm using Cricket here
WSL – Mask 84 here
Template by Charlii here. Check out her fabulous PSP group Time 4 Tags.
Thank you so much for an awesome template, Charlii!
DSB Flux – Bright Noise - optional
Eyecandy 5 – Impact - optional
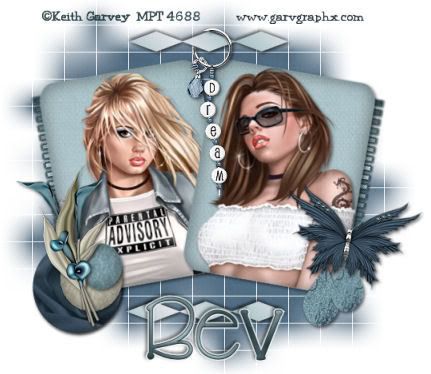
"Dream" PTU tagger kit by Krissy’s Scraps which can be found here. You can visit her blog here.
This tutorial was written assuming you have working knowledge of PSP.
~♥~ Let’s get started ~♥~
Open up your template. Shift + D. Close out the original. Delete Raster 2. Close out all your layers accept for the rectangle layer. Free rotate left 10 degrees. Duplicate/Mirror. Position them on your canvas.
Highlight one of the rectangle layers. Selections/Float/Defloat. Copy and paste a paper of choice as a new layer. Selections/Invert. Hit the delete key. Delete the template layer. Highlight the rectangle layer again. New Raster Layer. Effects/3D Effects/Cutout and apply the following:
Horizontal and Vertical: 5
Opacity & Blur: 25
Shadow Color: black
Ok
Repeat accept change the Horizontal and Vertical to -5.
Copy and paste your tube as a new layer just above your rectangle layer. Close out your white canvas. Merge visible.
Repeat the above steps again with the other rectangle.
Highlight Circle One layer. . Selections/Float/Defloat. Copy and paste a paper of choice as a new layer. Selections/Invert. Hit the delete key. Delete the template layer. Highlight the Circle One layer again. Apply the cutout effects just as you did for the rectangle layers. Close out all your layers accept for the circle, paper, and cutout layers. Merge visible.
Repeat the above step for Circle layers 2 & 3.
Highlight the Teardrop layer. Selections/Float/Defloat. Copy and paste a paper of choice as a new layer. Selections/Invert. Hit the delete key. Delete the template layer. Apply the DSB Flux/Bright noise with the following:
Intensity: 22
Mix
Ok
Resize 70%. Duplicate. Resize 90%.
Highlight the Triangles layer. Select All/Float/Defloat. New Raster layer. Flood fill with a gradient that has colors from your tube. Delete the template layer. Duplicate/Flip.
Highlight the Boxes layer. Select All/Float/Defloat. New Raster layer. Flood fill with a dark color from your tubes. Selections/Modify/Contract by 2. Flood fill with your gradient. Select none. Delete the template layer. Free Rotate right 77 degrees. Position just behind your rectangle. Duplicate/Mirror.
Time to add your elements. I used the following:
Dream Hanger – resize 50%.
Calla Lilly – resize 50% and 90%. Free rotate left 35 degrees.
Fantasy Butterfly – resize 50%. Free rotate right 15 degrees.
Highlight your white canvas. New Raster Layer. Select All. Copy and paste a paper of choice Into Selection. Deselect. Apply the mask. Merge Group.
Add your copyrights.
Add your name. I used Eyecandy 5/Impact with the following settings:
Basic Tab:
Outside Glow
Mask Selection checked
Glow Radius: 5
Soft corners: 0
Overall Opacity: 100
Distortion amount: 0
Distortion Lump size: 100
Smoothness: 46
Opacity: white
Random Seed: 9446
Ok
I hope you enjoyed this tutorial.
I would very much love to see your results!
Email me!
Hugs,
WSL – Mask 84 here
Template by Charlii here. Check out her fabulous PSP group Time 4 Tags.
Thank you so much for an awesome template, Charlii!
DSB Flux – Bright Noise - optional
Eyecandy 5 – Impact - optional
"Dream" PTU tagger kit by Krissy’s Scraps which can be found here. You can visit her blog here.
This tutorial was written assuming you have working knowledge of PSP.
~♥~ Let’s get started ~♥~
Open up your template. Shift + D. Close out the original. Delete Raster 2. Close out all your layers accept for the rectangle layer. Free rotate left 10 degrees. Duplicate/Mirror. Position them on your canvas.
Highlight one of the rectangle layers. Selections/Float/Defloat. Copy and paste a paper of choice as a new layer. Selections/Invert. Hit the delete key. Delete the template layer. Highlight the rectangle layer again. New Raster Layer. Effects/3D Effects/Cutout and apply the following:
Horizontal and Vertical: 5
Opacity & Blur: 25
Shadow Color: black
Ok
Repeat accept change the Horizontal and Vertical to -5.
Copy and paste your tube as a new layer just above your rectangle layer. Close out your white canvas. Merge visible.
Repeat the above steps again with the other rectangle.
Highlight Circle One layer. . Selections/Float/Defloat. Copy and paste a paper of choice as a new layer. Selections/Invert. Hit the delete key. Delete the template layer. Highlight the Circle One layer again. Apply the cutout effects just as you did for the rectangle layers. Close out all your layers accept for the circle, paper, and cutout layers. Merge visible.
Repeat the above step for Circle layers 2 & 3.
Highlight the Teardrop layer. Selections/Float/Defloat. Copy and paste a paper of choice as a new layer. Selections/Invert. Hit the delete key. Delete the template layer. Apply the DSB Flux/Bright noise with the following:
Intensity: 22
Mix
Ok
Resize 70%. Duplicate. Resize 90%.
Highlight the Triangles layer. Select All/Float/Defloat. New Raster layer. Flood fill with a gradient that has colors from your tube. Delete the template layer. Duplicate/Flip.
Highlight the Boxes layer. Select All/Float/Defloat. New Raster layer. Flood fill with a dark color from your tubes. Selections/Modify/Contract by 2. Flood fill with your gradient. Select none. Delete the template layer. Free Rotate right 77 degrees. Position just behind your rectangle. Duplicate/Mirror.
Time to add your elements. I used the following:
Dream Hanger – resize 50%.
Calla Lilly – resize 50% and 90%. Free rotate left 35 degrees.
Fantasy Butterfly – resize 50%. Free rotate right 15 degrees.
Highlight your white canvas. New Raster Layer. Select All. Copy and paste a paper of choice Into Selection. Deselect. Apply the mask. Merge Group.
Add your copyrights.
Add your name. I used Eyecandy 5/Impact with the following settings:
Basic Tab:
Outside Glow
Mask Selection checked
Glow Radius: 5
Soft corners: 0
Overall Opacity: 100
Distortion amount: 0
Distortion Lump size: 100
Smoothness: 46
Opacity: white
Random Seed: 9446
Ok
I hope you enjoyed this tutorial.
I would very much love to see your results!
Email me!
Hugs,
Bev
No comments:
Post a Comment