
 Clicking on the image above will enlarge to full view.
Supplies
1 tube of choice - I’m using the artwork of Cane Hoyer which you can purchase here
Font of Choice - I’m using Abagail Jackson
Creative Desires Mask 31
I’ve supplied both the font and mask here
If you know who this mask belongs to will you please email me so that I can give proper credit? Thank you!
Alien Skin Xenofex 2: Lightning
Animation Shop
“Bloody Night” is a FTU full size scrap kit by Seachell Scrapz and can be downloaded from her blog here. Please leave a thank you when downloading. It’s a small gesture for hard work given freely.
Thank you Seachell for sharing such spooky talent!
This tutorial was written assuming you have a working knowledge of PSP.
~♥~ Let’s get started ~♥~
Open up a 700 X 700 transparent image.
Flood Fill white.
Copy and paste Element 13 as a new layer.
Resize 25% and 85%.
Use your Magic Wand and click inside of it.
Selections/Modify/Expand by 4.
Copy and paste a Paper 4 as a new layer.
Resize 25% and 65%.
Selections/Invert
Tap the delete key.
Deselect.
Duplicate the paper 4 times for a total of 5 paper layers.
Rename them Lightning 1, 2, 3, 4, and 5.
Highlight Lightning 1 and apply Xenofex 2 - Lightning: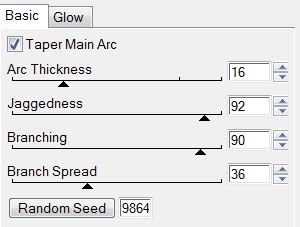
Repeat the above step with Lightning 2, 3, and 4 accept each time hit the Random Seed button once.
Close out Lightning layers 2, 3, 4, and 5.
Copy and paste your tube as a new layer.
Add your embellishments. I used:
Element 5: Resize 25% and 50%
Element 11: Resize 25% and 40%
Element 3: Resize 25% and 40%. Free rotate left 85 degrees
Element 23: Resize 25% and 70%
Highlight your white canvas.
New Raster Layer.
Select All.
Copy and paste Paper for as a new layer.
Copy and paste Element 19 as a new layer.
Resize 25% and 80%
Duplicate/Merge Down
Duplicate/Merge Down again
Merge the wire down to the paper.
Apply the mask.
Merge Group.
Add your copyrights.
Add your name.
Resize all layers 85%.
Time to Animate:
Copy Merge and carry into Animation Shop.
Edit/Paste/As New Animation
Go back into PSP
Close out Lightning 1. Open up Lightning 2
Copy Merge and Carry into AS.
Edit/Paste/After Current Frame.
Go back into PSP
Close out Lightning 2. Open up Lightning 3
Copy Merge and Carry into AS.
Go back into PSP
Close out Lightning 3. Open up Lightning 4
Copy Merge and Carry into AS.
Go back into PSP
Close out Lightning 4. Open up Lightning 5
Copy Merge and Carry into AS.
Edit/Paste/After Current Frame.
Ctrl + A to highlight all frames
Animations/Frame Properties:
Change the display time to 25.
Highlight the last frame.
Animation/Frame Properties:
Change the display time to 150.
Edit/Copy
(Because it should’ve been the only frame you had highlighted ONLY THIS FRAME will have been copied)
Click on Frame 2.
Edit/Paste/After Current Frame.
Click on Frame 4.
Edit/Paste/After Current Frame
.
You should now have 7 frames.
View your animation.
If you’re happy with it then save.
I hope you enjoyed this tutorial.
I’d love to see your results and show it off in my Show Arena.
Email me!
Hugs,
Bev
No comments:
Post a Comment