
 Clicking on the image will enlarge to full view
and show the animation.
Supplies
1 tube of choice - I’m using the artwork of Michael Calandra which you can purchase here
Font of Choice - I’m using Haunt here
Weescotlass Mask 254 here
Greg’s Factory Output Vol. II - Pool Shadow
Eyecandy 5: Nature - Fire
Animation Shop
“Halloween Night” is a PTU tagger size scrap kit created by Seachell’s Scrapz and can be purchased at Exquisite Scraps. You can visit Seachell’s blog here.
Thank you Seachell for a stunning Halloween kit!
This tutorial was written assuming you have a working knowledge of PSP.
~♥~ Let’s get started ~♥~
Open up a 700 X 700 transparent image.
Flood Fill white.
First we’ll make the layer for the mask.
New Raster layer.
Select All.
Copy and paste a paper of choice Into Selection.
Deselect.
Copy and paste Elem 18 as a new layer.
Resize 90% - give it a glowing drop shadow.
Copy and paste Elem 11
Resize 60% - move to upper right corner.
Close out your white canvas.
Merge Visible.
Apply the mask.
Merge Group.
Copy and paste Element 64 as a new layer.
Resize 70%.
Click inside of each square with your Magic Wand.
New Layer below the frame.
Copy and paste a paper of choice Into Selection.
DO NOT DESELECT.
New Raster layer just below the frame.
Effects/3D Effects/Cutout
Repeat the above step accept change the Horizontal and Vertical numbers to -10.
Deselect.
Use your Magic Wand and click inside the middle frame.
Copy and paste Element 26 as a new layer.
Resize 70%
Move this beneath the Cutout Layers.
Selections/Modify/Feather
Number of Pixels: 53
Selections/Invert
Tap the delete key until you like the feathered look.
Deselect.
Copy and paste Element 27 as a new layer.
Resize 50%. Move below the bottom frame, below the cutout layers.
Free rotate left 3 degrees
Click inside the bottom frame with your Magic Wand.
Selections/Modify/Expand by 3.
Tap the delete key.
Deselect.
Tap the delete key.
Deselect.
Add your embellishments. I used:
Elem 10: Resize 50%
Elem 21: Resize 35%
Elem 26: Resize 50%
Elem 45: Resize 85%
Elem 60: Resize 70%
Copy and paste your tube as a new layer.
Highlight Element 45 (the candles)
Duplicate twice for a total of 3 layers.
Rename them Candle 1, 2, and 3.
Using your Freehand Selection Tool, zoom in and outline each candle tip where you want the flame.
Highlight Candle 1
Apply Eyecandy 5: Nature - Fire:

Highlight Candle 2 and apply the fire again accept hit the random seed button once.
Repeat the above with Candle 3.
Deselect.
Close out Candle layers 2 & 3.
Add your copyrights.
Add your name.
Color Pallet:
Foreground: Black
Background: Set to Patten/Paper of choice from kit.
Stroke: 1.5
Type out your name.
Select All/Float/Defloat
Selections/Modify/Contract by 2
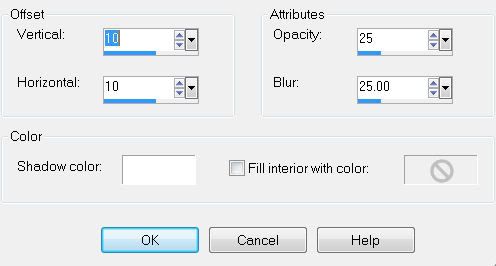
Apply Greg’s Factory Output Vol. II
Default settings.
Deselect.
Resize all layers 85%.
Time to Animate:
Carry into Animation Shop.
Edit/Paste/As New animation.
Back into PSP.
Close out Candle 1.
Open Candle 2.
Copy Merge
Carry into AS
Edit/Paste/After Current Frame
Back into PSP.
Close out Candle 2.
Open Candle 3.
Copy Merge
Carry into AS
Edit/Paste/After Current Frame
Ctrl + A to highlight all the frames.
Animation/Frame Properties
Change the number to 20
View your animation.
If you’re happy then save.
I hope you enjoyed this tutorial.
I’d love to see your results and show it off in my Show Arena.
Email me!
Hugs,
Bev
No comments:
Post a Comment