
 Clicking on the image will enlarge to full view
Supplies
Font of Choice - Xoxoxa here
Weescotlass Mask 249 here
My Template 19 here
DSB Flux - Bright Noise
Animation Shop - optional
“Love in the Forest” is a PTU tagger size scrap kit created by Mim of Contraste Scrap and can be purchased at Butterfly Blush Designs.
Thank you Mim for another amazing scrap kit!
This tutorial was written assuming you have a working knowledge of PSP.
~♥~ Let’s get started ~♥~
Open up my template.
Delete the merged layer.
Highlight the background layer.
Image/Canvas Size
700 x 700
Flood fill white.
Highlight the Vertical Rectangle layer.
Select All/Float/Defloat
Copy and paste a paper of choice as a new layer.
Selections/Invert
Tap the delete key.
Deselect.
Delete the template layer.
Repeat the above step with - Oh my word!
I just realized I named the vertical and horizontal layers wrong…lol!!
We all know Vertical is up and down.
Horizontal is across…. So….
As I was saying…(insert red face)….
Repeat the above step with what I named as the Horizontal layer.
Lol!!
Highlight Large Heart layer.
Select All/Float/Defloat
Copy and paste paper a paper of choice as a new layer.
Selections/Invert
Tap the delete key.
Copy and paste LF 71 as a new layer.
Move into position.
Tap the delete key.
Deselect.
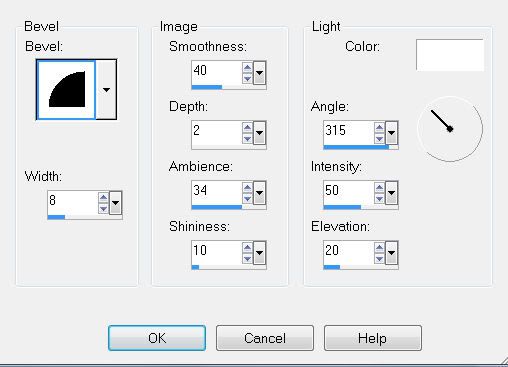
Highlight the heart layer and give it a slight inner bevel:
Highlight Big Heart Barbed Wire.
Select All/Float/Defloat
Copy and paste paper a paper of choice as a new layer.
Selections/Invert
Tap the delete key.
Deselect.
Delete the template layer.
Give it the same slight inner bevel.
Select All/Float/Defloat
Copy and paste paper a paper of choice as a new layer.
Selections/Invert
Tap the delete key.
Deselect.
Delete the template layer.
Give it the same slight inner bevel.
Duplicate twice for a total of 3 layers.
Rename them BHBW 1, 2, and 3
Highlight BHBW 1 and apply DSB Flux Bright Noise:
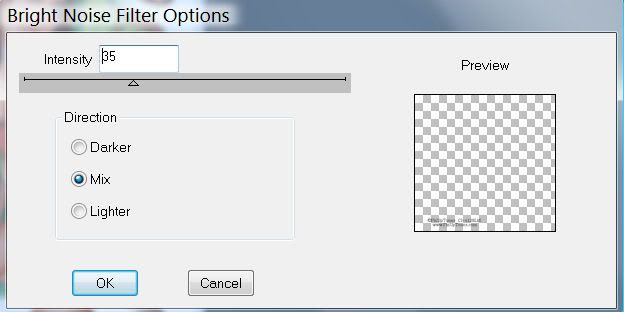
Repeat the above step accept for BHBW 2 hit the mix button twice, and for BHBW hit the mix button 3 times.
Close out BHBW 2 and 3.
Highlight Small Heart layer.
Select All/Float/Defloat
Copy and paste a paper of choice as a new layer.
Selections/Invert
Tap the delete key.
Copy and paste LF 50 as a new layer.
Resize 60%
Move into position.
Tap the delete key.
Copy and paste LF3 as a new layer.
Resize 30%
Move into position.
Tap the delete key.
Deselect.
Delete the template layer.
Highlight the small heart.
Give it the same inner bevel.
Highlight Small Heart Barbed Wire.
Select All/Float/Defloat
Copy and paste paper a paper of choice as a new layer.
Selections/Invert
Tap the delete key.
Deselect.
Delete the template layer.
Give it the same slight inner bevel.
Duplicate twice for a total of 3 layers.
Rename them SHBW 1, 2, and 3
Apply the DSB Flux in the same manner as you did for the BHBW layers.
Close out SHBW 2 and 3.
Add your embellishments. I used:
LF 16: Resize 70%
LF 35: Resize 60%
LF 41
LF6: Resize 25%
LF11: Resize 50%
LF5
LF27: Resize 60%
LF28: Resize 50%
LF1
LF53
Highlight your white canvas.
New Raster layer.
Select All
Copy and paste a paper of choice Into Selection.
Deselect.
Apply the mask.
Merge Group.
Add your copyrights if you used a PTU tube.
If not, please give credit to the designer of the kit.
Add your name.
Crop your Image.
Resize all layers 85%
If you’re not going to animate then save your tag.
Time to Animate:
Copy Merge and carry into Animation Shop.
Edit/Paste as New animation.
Back into PSP.
Close out BHBW 1 and open BHBW 2
Close out SBHW 1 and open SHBW 2
Copy Merge and carry into AS
Edit/Paste/After Current Frame
Back into PSP.
Close out BHBW 2 and open BHBW 3
Close out SBHW 2 and open SHBW 3
View your animation.
If you’re happy then save and show off your awesome work!!
I hope you enjoyed this tutorial.
I’d love to see your results and show it off in my Show Arena.
Email me!
Hugs,
Bev
No comments:
Post a Comment