

Clicking on the image will enlarge to full view.
Supplies
1 tube of choice - I’m using the artwork of Zindy S.D. Nielsen which you can purchase here.
Font of Choice - I’m using Arctic 2 here.
Designs by Ali Template 115 here.
Becky Mask 22 here
“A Secret Place” is a PTU tagger size scrap kit created by Tamara of Just a Girl Designs and can be purchased at Twilight Scraps. You can visit her blog here.
This kit is truly beautiful!
This tutorial was written assuming you have a working knowledge of PSP.
~♥~ Let’s get started ~♥~
Open up the template.
Shift + D.
Close out the original.
Image/Canvas Size
700 X 700
Delete Raster 6.
New Raster layer,
Flood fill white
Send to bottom.
Highlight Raster 1 layer.
Select All/Float/Defloat
Copy and paste a paper of choice as a new layer.
Selections/Invert
Tap the delete key.
Deselect.
Delete template layer.
Highlight Raster 2 layer.
Select All/Float/Defloat
New Raster layer.
Copy and paste a paper of choice Into Selection.
Deselect.
Delete template layer.
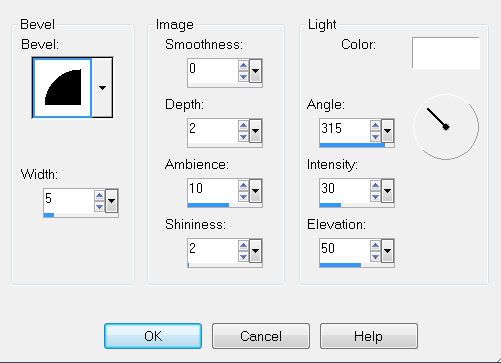
Give it a slight inner bevel:
Highlight Raster 3.
Select All/Float/Defloat
Copy and paste a paper of choice as a new layer.
Selections/Invert
Tap the delete key.
New Raster layer.
Copy and paste the clock element Into Selection.
Deselect.
Delete template layer.
Highlight Raster 4.
Select All/Float/Defloat
New Raster layer.
Copy and paste a paper of choice Into Selection.
Deselect.
Delete template layer.
Give it the same slight inner bevel.
Highlight the merged layer.
Select All/Float/Defloat
Copy and paste a paper of choice as a new layer.
Selections/Invert
Tap the delete key.
Deselect.
Delete the template layer.
Give it the same slight inner bevel.
Copy and paste your tube as a new layer.
Add your embellishments. I used:
Bubbles
Butterflies 1 & 2: Resize 25% Free rotate 30 degrees
Feathers 1 & 2: Resize 25%
Doves: Resize 50% and 90%
Flowers 2
Flowers
Cloud 2
Highlight your white background.
New Raster layer.
Select All.
Copy and paste a paper of choice Into Selection.
Deselect.
Apply the mask.
Merge Group.
Duplicate.
Merge Down.
Copy and paste Wooden Bridge just above the mask as a new layer.
Resize 120%
Apply the mask.
Merge Group.
Add your copyrights.
Add your name.
Resize all layers 80%.
I hope you enjoyed this tutorial.
I’d love to see your results and show it off in my Show Arena.
Email me!
Hugs,
Bev
No comments:
Post a Comment