
 Clicking on the image will enlarge to full view.
Supplies
3 tubes of choice - I used the beautiful artwork of Jennifer Janesko here
Font of choice - I used Aquarelle here
Chica’s Designz Template 9 here
Xenofex 1: Shatter
“14K Christmas” is a PTU tagger size scrap kit created by Kesha of KnC Scrapz and can be purchased at Lollipops 'n Gumdrops. You can visit her blog here.
Thank you, Kesha for such a ritzy rich kit!
This tutorial was written assuming you have a working knowledge of PSP.
~♥~ Let’s get started ~♥~
Open up the template.
Shift + D.
Close out the original.
Delete the watermark layer, Word Art layers 1 & 2, and Doddle layers 1 & 2.
New Raster layer.
Flood fill white and send to bottom.
Shift + D.
Close out the original.
Delete the watermark layer, Word Art layers 1 & 2, and Doddle layers 1 & 2.
New Raster layer.
Flood fill white and send to bottom.
Highlight Frame 1 layer.
Select All/Float/Defloat
New Raster layer.
Copy and paste Paper 8 as a new layer.
Resize 70% and 90%
Selections/Invert
Tap the delete key.
Deselect.
Delete the template layer.
Select All/Float/Defloat
New Raster layer.
Copy and paste Paper 8 as a new layer.
Resize 70% and 90%
Selections/Invert
Tap the delete key.
Deselect.
Delete the template layer.
Highlight Frame Back 1 layer.
Select All/Float/Defloat
New Raster layer.
Copy and paste Paper 7 Into Selection.
Deselect.
Delete the template layer.
Select All/Float/Defloat
New Raster layer.
Copy and paste Paper 7 Into Selection.
Deselect.
Delete the template layer.
Make Paper 8 from the kit active.
Using your Selection Tool, section off a small portion of it.
Set your color pallet to Pattern and find the portion of the paper.
Highlight Circle Frame 1 layer.
Select All/Float/Defloat
New Raster layer.
Flood fill with your pattern.
Deselect.
Delete the template layer.
Repeat the above step with Frame 2 & Frame 3 layers.
Highlight Circle Back layer.
Select All/Float/Defloat
New Raster layer.
Copy and paste Paper 6 Into Selection.
Copy and paste a tube as a new layer.
Resize as needed.
Selections/Invert
Tap the delete key.
Deselect.
Delete the template layer.
Select All/Float/Defloat
New Raster layer.
Copy and paste Paper 6 Into Selection.
Copy and paste a tube as a new layer.
Resize as needed.
Selections/Invert
Tap the delete key.
Deselect.
Delete the template layer.
Repeat the above step with Frame Back 2 & 3 layers.
Open up the Gold Apple element.
Using your Selection Tool, choose a portion of it.
Set the color pallet to pattern with the portion you chose.
Highlight Ribbon 1 layer.
Select All/Float/Defloat
New Raster layer.
Flood fill with the gold pattern.
Deselect.
Delete the template layer.
Repeat the above step with Ribbon 2 layer.
Add your embellishments. I used:
Bow: Resize 25% and 70% Free rotate right 10 degrees
Tree 1: Resize 60%
Feather: Resize 25% and 70%
Star String: Resize 40%
Bow: Resize 25% and 70% Free rotate right 10 degrees
Tree 1: Resize 60%
Feather: Resize 25% and 70%
Star String: Resize 40%
Close out your white background.
Merge Visible.
Resize 85%
Duplicate
Merge Visible.
Resize 85%
Duplicate
Highlight the Merged layer.
Adjust/Blur/Gaussian Blur
Radius: 20
Apply Xenofex 1: Shatter

Crop your image.
Add your copyrights.
Add your name.
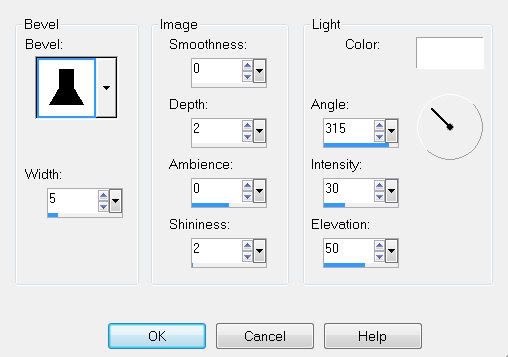
Give it an inner bevel:
I hope you enjoyed this tutorial.
I’d love to see your results.
Email me!
Hugs,
Bev
No comments:
Post a Comment