
 Clicking on the image will enlarge to full view.
Supplies
1 tube of choice - I used the beautiful artwork of Archie Dickens here
Font of choice - I used Fruitopia here
Weescotlass Mask 219 here
“Autumn Falls” is a PTU tagger size scrap kit created by Jo of Creationz by Jo and can be purchased at Aussie Scraps Designs. You can visit Jo’s blog here.
Thank you Jo for a beautiful kit!
The colors are amazing!
This tutorial was written assuming you have a working knowledge of PSP.
~♥~ Let’s get started ~♥~
Open up a 700 x 700 transparent image.
Flood fill white.
Copy and paste Stick Frame as a new layer.
Resize 50%
Use your Magic Wand and click inside of it.
Selections/Modify/Expand by 4.
You can either choose a color of choice and flood fill a new raster layer below the frame
Or
What I did was use my Selection Tool to section off a small portion of one of the papers, set my color pallet to Pattern and flood filled a new raster layer below the frame.
DO NOT DESELECT.
Copy and paste your tube as a new layer.
DO NOT DESELECT.
Copy and paste Flower Grass as a new layer.
Resize 30%
Move into position.
See my tag for reference.
Selections/Invert
Tap the delete key
Deselect.
Copy and paste Gerba Flower as a new layer.
Image/Mirror.
Move into position at the upper left side of the frame.
Duplicate/Flip
Move into position at the upper right side of the frame.
Duplicate/Mirror/Flip
Position at the lower left side of the frame.
Highlight the flowers that are positioned at the upper right side of the frame.
Duplicate and move lower just a bit.
I hope I didn’t lose you with all the duplicating and flipping!!
Add your embellishments. I used:
Hummingbird: Resize 45%
Flower 3: Resize 40%
Flower 2: Resize 35%
Beaut Glitter Bow: Resize 50%
Butterfly 4: Resize 10%
Butterfly 3: Resize 15%
Highlight your white background.
New Raster layer.
Select All.
Copy and paste a paper of choice Into Selection.
Deselect.
Apply the mask.
Resize 110%
Merge Group.
New Raster layer.
Select All.
Copy and paste a paper of choice Into Selection.
Deselect.
Apply the mask.
Resize 110%
Merge Group.
Add your copyrights.
Add your name.
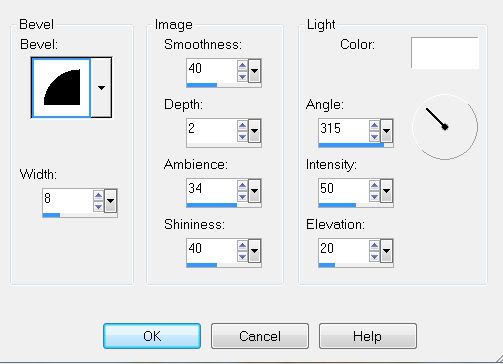
Give it an inner bevel:
Crop your image.
Resize all layers 85%
I hope you enjoyed this tutorial.
I’d love to see your results.
Email me!
Hugs,
Bev
No comments:
Post a Comment