

Supplies
1 tube of choice - I used the beautiful artwork of Zindy S. D. Nielsen here
Font of choice - I used Curly Cue here
Becky Mask 22 here
DSB Flux - Bright Noise
Animation Shop
“Winter Love” is a PTU tagger size scrap kit created by Valerie of Baby V Dezign and can be purchased at TKO Scraps. You can visit her site here.
Thank you Valerie for such an amazing kit!
This tutorial was written assuming you have a working knowledge of PSP.
~♥~ Let’s get started ~♥~
Open up a 700 X 700 blank canvas.
Flood fill white.
Copy and Paste Heartele 1 as a new layer.
Resize 140%
Resize 140%
Copy and Paste Heartele 2 as a new layer.
Resize 140%
Copy and Paste Heartele 3 as a new layer.
Resize 140%
Resize 140%
Choose which heart you’d like your tube on.
I chose Heartele 2.
Highlighting each of the other heart layers, use your Pick tool and turn each of the hearts just a little to give a fan effect.
(Move the hearts slightly to the left side of your canvas)
Position the hearts so that all the holes line up exactly.
I chose Heartele 2.
Highlighting each of the other heart layers, use your Pick tool and turn each of the hearts just a little to give a fan effect.
(Move the hearts slightly to the left side of your canvas)
Position the hearts so that all the holes line up exactly.
Highlight the heart you chose to have your tube on.
Select All/Float/Defloat
Copy and paste your tube as a new layer.
Move into position over the heart.
Selections/Modify/Feather
Number of Pixels:
53
OK
Selections/Invert
Tap the delete key until you have the feathered affect you want.
Deselect.
Merge Down.
Copy and paste Bells as a new layer.
Resize 70%
Use your Eraser tool and erase the ribbon that’s above the knot.
Move into position over the holes in the hearts.
Copy and paste Pine Tree as a new layer behind all the hearts.
Resize 120%.
Move to the left.
Duplicate/Mirror
Position at the right side
Duplicate/Resize 80%
Position in the middle of the two trees.
Resize 120%.
Move to the left.
Duplicate/Mirror
Position at the right side
Duplicate/Resize 80%
Position in the middle of the two trees.
Copy and paste Candy Cane 3 as a new layer.
Resize 40%
Free rotate left 25 degrees.
Resize 40%
Free rotate left 25 degrees.
Copy and paste Candy Cane 1 as a new layer.
Resize 40%
Mirror
Free rotate right 25 degrees.
Copy and paste Animal 2 as a new layer.
Resize 40%
Resize 40%
Copy and paste snowflakes of your choice.
Resize as you like.
Resize as you like.
Highlight your white background.
New Raster layer.
Select All.
Copy and paste a paper of choice Into Selection.
Deselect.
Apply the mask.
Merge Group.
Add your copyrights.
Add your name.
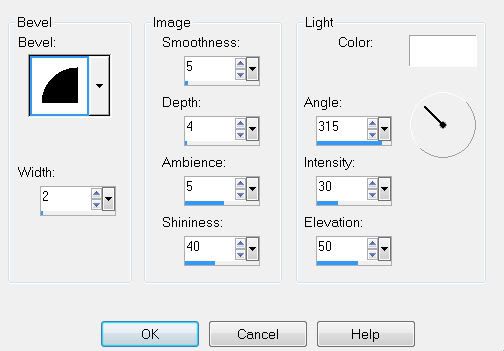
Give it a slight inner bevel:
Duplicate it 2 times for a total of 3.
Rename them Name 1, Name 2, and Name 3.
Rename them Name 1, Name 2, and Name 3.
Highlight Name 1.
Apply the DSB Flux-Bright Noise:
Highlight Name 2.
Apply the DSB Flux Bright Noise again accept click on the mix button twice.
Apply the DSB Flux Bright Noise again accept click on the mix button twice.
Highlight Name 3.
Apply the DSB Flux Bright Noise again accept click on the mix button 3 times.
Close out Name 2 and Name 3 layers.
Copy Merge
~Time to Animate~
Open up Animation Shop.
Copy/Paste/As New Animation.
Go back into PSP.
Close out Name 1
Open up Name 2
Copy Merge
Carry Into AS
Edit/Paste/After Current Frame.
Go back into PSP.
Close out Name 2.
Open up Name 3.
Copy Merge.
Carry into AS
Edit/Paste/After Current Frame.
View your animation. If you like then resize:
Animation/Resize Animation
Percentage of Original checked.
Width and Height 85%
OK
Now save your animation.
I hope you enjoyed this tutorial.
I’d love to see your results.
Email me!
Hugs,
Bev
No comments:
Post a Comment