
 Clicking on the above image will enlarge to full view.
The image below shows the animation
Supplies
1 tube of choice - I used the beautiful artwork of Cane Hoyer here
Font of choice - I used Oh Lara - I’m sorry, I can’t find a link
Weescotlass Mask 35 here
Designz by Ali Template 159 here
Eyecandy 4 Impact: Glass
Twinks which I’ve supplied here
Animation Shop
“Winter Fairytale” is a PTU tagger size scrap kit created by Gina of Gina’s Gems Scraps and can be purchased at Butterfly Blush Designs. You can visit her blog here.
This tutorial was written assuming you have a working knowledge of PSP.
~♥~ Let’s get started ~♥~
Open up the template.
Delete the credit layer.
Resize all layers 80%
Image/Canvas size 700 X 600
New Raster layer.
Send to bottom.
Flood fill white.
Highlight Copy of Raster 6 layer.
Merge Down.
Circle templates should be on one layer now.
Select All/Float/Defloat
Copy and paste a paper of choice as a new layer.
Selections/Invert
Tap the delete key.
Deselect.
Delete the template layer.
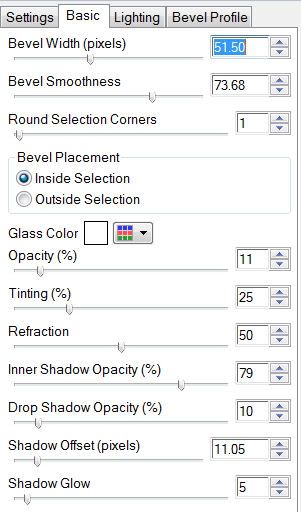
Apply Eyecandy 5 Impace - Glass
~♥~ Let’s get started ~♥~
Open up the template.
Delete the credit layer.
Resize all layers 80%
Image/Canvas size 700 X 600
New Raster layer.
Send to bottom.
Flood fill white.
Highlight Copy of Raster 6 layer.
Merge Down.
Circle templates should be on one layer now.
Select All/Float/Defloat
Copy and paste a paper of choice as a new layer.
Selections/Invert
Tap the delete key.
Deselect.
Delete the template layer.
Apply Eyecandy 5 Impace - Glass
Highlight Raster 3
Select All/Float/Defloat
New Raster layer.
Flood fill with a light color.
Deselect.
Delete the template layer.
Highlight Raster 4 layer.
Repeat the above step accept flood fill with a dark color.
Highlight Raster 1 layer.
Select All/Float/Defloat
Copy and paste a paper of choice as a new layer.
Resize 83%
Selections/Invert
Tap the delete key.
Delete the template layer.
DO NOT DESELECT
Copy and paste Christmas Tree 1 as a new layer
Resize 40%
Move into position
Tap the delete key.
Copy and paste Christmas Tree 2 as a new layer.
Resize 35%
Move into position
Tap the delete key.
Copy and paste Star Bling 1 as a new layer.
Resize 60%
Tap the delete key.
Deselect.
Highlight Raster 2 layer.
Select All/Float/Defloat
Copy and paste a paper of choice as a new layer.
Resize 83%
Selections/Invert
Tap the delete key.
Deselect.
Delete the template layer.
Highlight Raster 5 layer.
Select All/Float/Defloat
New Raster Layer.
Copy and paste a paper of choice Into Selection.
Deselect.
Delete the template layer.
Copy and paste your tube as a new layer.
Add your embellishments. I used:
Blossom 1: Resize 30%
Blossom 2: Resize 25%
Blossom 3: Resize 25% and 80%
Butterfly 2: Resize 25% Free rotate left 20 degrees
Butterfly 3: Resize 25% and 80% Free rotate right 20 degrees
Bauble Deco: Resize 70%
Leaves 1: Resize 50% Free rotate left 45 degrees
Shiny Bow 1: Resize 25%
Various snowflakes: Resize 40% and smaller
Highlight your white background.
New Raster layer.
Select All.
Copy and paste a paper of choice Into Selection.
Deselect.
Apply the mask.
Merge Group.
Use your Pick Tool to pull it out just a bit.
Duplicate
Merge Down.
Add your copyrights.
Add your name.
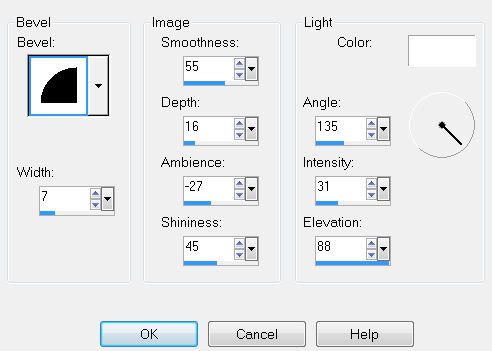
Give it a slight inner bevel:
Resize all layers 85%.
~Time to Animate~
Copy Merge and carry into Animation Shop.
Edit/Paste/As New Animation
Ctl + L and tap the L key until you have 16 frames.
Open up the twinks that I’ve supplied in AS.
Ctl + A to highlight all
Edit/Copy
Make your tag frames active.
Ctl + A
Ctl + E and place the twinks where you like.
View your animation.
If you’re happy then save.
I hope you enjoyed this tutorial.
I’d love to see your results.
Email me!
Hugs,
Bev
No comments:
Post a Comment