
 Clicking on the image will enlarge to full view.
Supplies
2 tubes of choice - I used the wonderful artwork of Jennifer Janesko which you can purchase here.
Font of choice - I used Papyrus which you can find here - check your PC to see if it came with it. Mine did.
Tracy’s Template #46 here . Look on the side bar under “Tracy’s Bulk Templates”
Weescotlass Mask 297 here
“Hearts and Roses” is a PTU tagger size scrap kit created by Terry of Treasure’s by Terry and can be purchased exclusively at MPT. You can visit Terry’s blog here.
Thank you Terry for such a beautiful kit!
This tutorial was written assuming you have a working knowledge of PSP.
~♥~ Let’s get started ~♥~
Open up the template.
Image/Canvas size
700 X 600
Delete the credit layer.
Image/Canvas size
700 X 600
Delete the credit layer.
New Raster layer.
Send to bottom.
Flood fill white.
In your layers pallet move Rectangle 2 layer so that it‘s just above Rectangle 1 layer.
Merge Down.
Select All/Float/Defloat
Copy and paste Paper 18 as a new layer.
Resize 75%.
Selections/Invert
Tap the delete key.
Deselect.
Delete the template layer.
Merge Down.
Select All/Float/Defloat
Copy and paste Paper 18 as a new layer.
Resize 75%.
Selections/Invert
Tap the delete key.
Deselect.
Delete the template layer.
In the layers pallet move Dotted Line 1 layer just above the merged rectangle layer.
Highlight Dotted Line 2 layer.
Merge Down.
New Rater layer above the merged dotted line layer.
Flood fill with a dark color from the paper you used.
Highlight the merged dotted line layer.
Select All/Float/Defloat
Selections/Invert
Tap the delete key.
Deselect.
Delete the template layer.
Highlight Dotted Line 2 layer.
Merge Down.
New Rater layer above the merged dotted line layer.
Flood fill with a dark color from the paper you used.
Highlight the merged dotted line layer.
Select All/Float/Defloat
Selections/Invert
Tap the delete key.
Deselect.
Delete the template layer.
Highlight Circle layer.
Select All/Float/Defloat
New Raster layer.
Copy and paste Paper 1 Into Selection.
Selections/Modify/Contract by 7.
Tap the delete key.
Selections/ Modify/Expand by 2.
New Raster layer below the new circle frame you just made.
Flood fill with a gradient of your choice.
Copy and paste your tube above the gradient layer.
Resize as needed.
Selections/Invert
Tap the delete key.
Deselect.
Delete the template layer.
Highlight the Dotted Circle layer.
Repeat the same steps you used for the dotted line accept flood fill with the gradient you just used.
Highlight Frame 1 layer.
Select All/Float/Defloat
New Rater layer.
Copy and paste Paper 1 Into Selection.
Deselect.
Delete the template layer.
Repeat the above step with Frame 2 layer.
Highlight Square layer.
Select All/Float/Defloat
Flood fill with the same gradient you’ve been using.
Deselect.
Repeat the above step with Square 2 layer.
Copy and paste your tube as a new layer.
Position in front of the two framed squares.
Position in front of the two framed squares.
Add your embellishments. I used:
Flower 6
Flower 5 - Duplicate/Mirror
Bow 4: Resize 50%
Flower 4: Resize 90% - position behind the circle. Duplicate/Mirror/Flip
Butterfly 4: Resize 70%
Highlight your white background.
New Raster layer.
Select All.
Copy and paste a paper of choice Into Selection.
Deselect
Apply the mask.
Merge Group.
New Raster layer.
Select All.
Copy and paste a paper of choice Into Selection.
Deselect
Apply the mask.
Merge Group.
Add your copyrights.
Add your name.
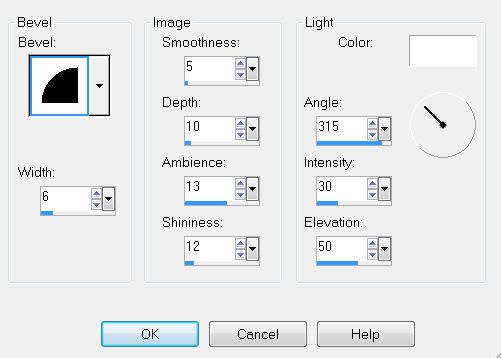
Give it a slight inner bevel:
Give it a slight inner bevel:
Resize all layers 85%.
I hope you enjoyed this tutorial.
I’d love to see your results.
Email me!
Hugs,
Bev
No comments:
Post a Comment