
 Clicking on the image will enlarge to full view.
Supplies
1 tube of choice - I used the gorgeous artwork of Elias Chatzoudis here
Font of choice - I used Chachie here.
Weescotlass Mask 297 here
“No Boys Allowed” is a PTU scrap kit created by Missy of Scraps with Attitude and can be purchased at her store Scraps with Attitude. You can visit her blog here.
Thank you Missy for a fabulous kit that I had so much fun using!
This tutorial was written assuming you have a working knowledge of PSP.
~♥~ Let’s get started ~♥~
Open up a 700 X 700 blank canvas.
Flood fill white.
Copy and Paste Frame 8 as a new layer.
Resize 65%
Use your Magic Wand and click inside the frame.
Selections/Modify/Expand by 15.
New Raster layer below the frame.
Copy and paste a paper of choice Into Selection.
Deselect.
Now highlight the frame.
Free rotate left 10 degrees.
Highlight the paper.
Free rotate left 10 degrees.
Use your Magic Wand again and click inside the frame.
Selections/Modify/Expand by 15
Copy and paste your tube as a new layer.
Selections/Invert
Tap the delete key.
Deselect.
Close out your white background.
Merge Visible.
Reopen your white background.
Center your merged layer on your white canvas.
Add your embellishments. I used:
Heart 1: Resize 25% and 80%
Heart 2: Resize 25% and 80%
Diamond Brad 5: Resize 25% and 70% Free rotate right 25%
Feathers 1, 2, 3, and 4: Resize 25%
Flowers 3, 4, 5, and 6: Resize anywhere between 70% and 30%
Word Art 1: Resize 25%
Heart 1: Resize 25% and 80%
Heart 2: Resize 25% and 80%
Diamond Brad 5: Resize 25% and 70% Free rotate right 25%
Feathers 1, 2, 3, and 4: Resize 25%
Flowers 3, 4, 5, and 6: Resize anywhere between 70% and 30%
Word Art 1: Resize 25%
Crop your image.
Highlight your white background.
New Raster Layer.
Select All.
Copy and paste a paper of choice Into Selection.
Deselect.
Apply the mask.
Merge Group.
New Raster Layer.
Select All.
Copy and paste a paper of choice Into Selection.
Deselect.
Apply the mask.
Merge Group.
Add your copyrights.
Add your name.
In your color pallet:
Background: #ffffff
Foreground: Pattern (a paper of choice)
Stroke set to 2.
Type out each letter of your name - each letter using a different color paper from the kit and on a layer of its own - and turn each layer into a raster layer.
Once you have all the letters to your name typed out, arrange them how you like.
Merge Visible all the letters.
Merge Visible all the letters.
Highlight the merged letter layer.
Select All/Float/Defloat
Selections/Modify/Contract by 2
Give it a slight inner bevel:
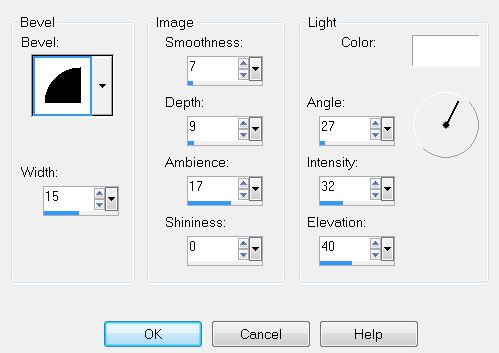
Deselect.
Resize all layers 80%.
I hope you enjoyed this tutorial.
I’d love to see your results.
Email me!
Hugs,
Bev
Bev
No comments:
Post a Comment