
 Clicking on the image will enlarge to full view.
Supplies
1 tube of choice - I used the fabulous artwork of Ted Hammond at CILM
Font of choice - I used Ferro Rosso here
Weescotlass Mask 297 here
Scrapity Scrap and More Template #22 here
DSB Flux - Bright Noise
Gregs Factory Output Vol. II - Pool Shadow
“Rock -N- Roll” is a PTU tagger size scrap kit created by Leaonna of Busy Scrappin’and can be purchased at Creative Scraps. You can visit her blog here.
Thank you Leaonna for a rockin’ kit!
This tutorial was written assuming you have a working knowledge of PSP.
~♥~ Let’s get started ~♥~
Open up the template.
Delete the credit layer.
Image/Canvas Size
650 X 550
OK
Highlight Bottom Thin Slats Layer.
Merge Down.
Now the Bottom and Top Slats should be on the same layer.
Select All/Float/Defloat
New Raster Layer.
Flood fill with a gradient of choice.
Deselect.
Delete the template layer.
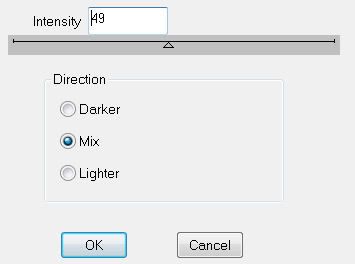
Apply DSB Flux - Bright Noise:
Merge Down.
Now the Bottom and Top Slats should be on the same layer.
Select All/Float/Defloat
New Raster Layer.
Flood fill with a gradient of choice.
Deselect.
Delete the template layer.
Apply DSB Flux - Bright Noise:
Highlight Circle layer.
Select All/Float/Defloat
New Raster Layer.
Copy and paste a paper of choice Into Selection.
(I used Paper 15)
Deselect.
Delete the template layer.
Highlight Circle Border Layer.
Select All/Float/Defloat
New Rater layer.
Copy and paste a paper of choice Into Selection.
Deselect.
Delete the template layer.
Repeat the above step with the following layers:
Border Middle Square
Border Bottom Square
Border Top Square.
Highlight Top Square layer.
Select All/Float/Defloat
Copy and paste a paper of choice as a new layer.
(I used Paper 15 again)
Move the paper around until you find a part you’d like in the square.
Selections/Invert
Tap the delete key.
Deselect.
Delete the template layer.
Repeat the above step with Middle Square and Bottom Square layers, but move the paper around so that you get a different area in each square.
Copy and paste your tube as a new layer.
Copy and paste Barbwire Border as a new layer.
Free rotate right 80 degrees
Position it under the frame of the bottom square.
Duplicate/Mirror
Position the duplicate in the same manner.
Merge Down.
Erase any that overhangs the frame.
Duplicate/Mirror
Position below the frame of the middle square.
Add your embellishments. I used:
Rockin Butterfly 1: Free rotate right 30 degrees
Pick Black 2
Pick Black 3
Star 4: Duplicate and resize as you like
Bongo Drum: Resize 140%
Music Notes: Duplicate and resize as you like
Highlight your white background.
New Raster layer.
Select All.
Copy and paste a paper of choice Into Selection.
Deselect.
Apply the mask.
Merge Group.
Add your copyrights.
Add your name.
Colors of your choice, but make the stroke 2.
Once you’ve got your name on your tag change it to a Raster layer.
Select All/Float/Defloat
Selections/Modify/Contract by 2
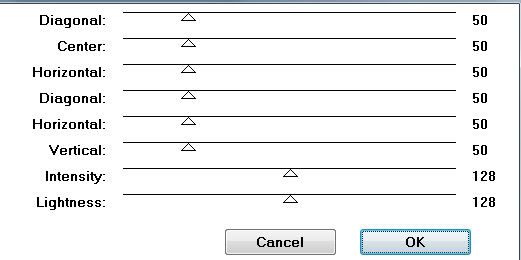
Apply Greg’s Factory Output Vol. II - Pool Shadow:
DO NOT DESELECT
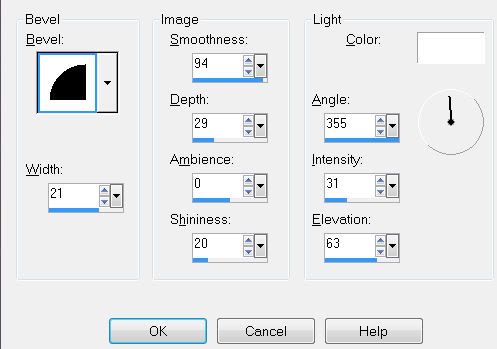
Give it a slight inner bevel.
Deselect.
Colors of your choice, but make the stroke 2.
Once you’ve got your name on your tag change it to a Raster layer.
Select All/Float/Defloat
Selections/Modify/Contract by 2
Apply Greg’s Factory Output Vol. II - Pool Shadow:
DO NOT DESELECT
Give it a slight inner bevel.
Deselect.
Resize all layers 85%.
I hope you enjoyed this tutorial.
I’d love to see your results.
Email me!
Hugs,
Bev
No comments:
Post a Comment