Supplies
2 tubes of choice - I’m using the wonderful artwork of Elias Chatzoudis here
Font of Choice - I’m using Piano Light here
Monti’s Circular Mask here
Divine Intentions Template 309 here
“Hoppit” is a PTU tagger size scrap kit created by Julie of Bits n Bobs and can be purchased at Exquisite Scraps. You can visit her blog here.
Thank you so much Julie for such an adorable kit!
This tutorial was written assuming you have a working knowledge of PSP.
~♥~ Let’s get started ~♥~
Open up the template.
Shift + D.
Close out the original.
Image/Canvas Size
700 X 600
OK
Flood fill the background layer white.
Delete By Missy layer and Word Art by Missy layer.
Highlight Oval layer.
Use your Magic Wand and click on it.
New Raster layer.
Copy and paste a paper of choice Into Selection.
Deselect.
Delete the template layer.
Highlight Circle layer.
Repeat the above step.
Highlight Rectangle 2 layer.
Use your Magic Wand and click on it.
New Raster layer.
Flood fill with a color of choice.
DO NOT DESELECT
Copy and paste one of your tubes as a new layer.
Move into position over the circle.
Duplicate - shut this layer off.
Highlight the original tube layer.
Selections/Modify/Feather
Number of Pixels:
43
OK
Selections/Invert
Tap the delete key until you have a nice feathered look.
Deselect.
Reopen the duplicate tubr layer.
Using your Eraser Tool erase any on the bottom of the tube that covers the feathered effect.
Highlight Hearts Layer.
Select All/Float/Defloat
New Raster layer.
Flood fill with a gradient of your choice.
Deselect.
Delete the template layer.
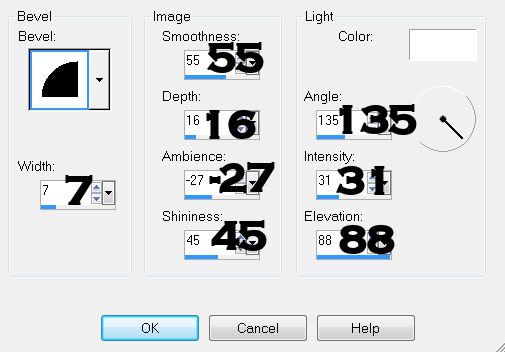
Give it a slight inner bevel:

Highlight Rectangle layer.
Using your Magic Wand click it.
New Raster layer.
Flood fill with a color of choice.
Deselect.
Delete the template layer.
Highlight Thin Rectangle 2 layer.
Using your Magic Wand click it.
New Raster layer.
Flood fill with a contrasting color of choice.
Deselect.
Delete the template layer.
Highlight Frame Background layer.
Select All/Float/Defloat
New Raster layer.
Flood fill with a gradient of choice.
Deselect.
Delete the template layer.
Highlight Frame layer.
Use your Magic Wand and click on it.
New Raster layer.
Flood fill with a contrasting color.
Deselect.
Delete the template layer.
Give it the same inner bevel.
Copy and paste Element 29 as a new layer.
Resize 50%
Free rotate right 90 degrees
Move into position at the top right corner of the thin rectangle.
See my tag for reference.
Duplicate,
Erase the bow off of the end.
Mirror.
Move it into alignment of the other stitched layer so that it creates a running cross stitch row.
Duplicate the original stitch layer and move toward the end.
Erase any that overhangs the side.
Add your embellishments. I used:
Element 2: Resize 60%
Element 1: Resize 50%
Element 3: Resize 40%
Element 42: Resize 40% Free rotate Left 10 degrees
Element 45: Resize 40% Free rotate right 15 degrees
Element 44: Resize 40% Free rotate right 80 degrees
Element 41: Resize 70%
Element 39
Element 47: Resize 50%
Element 22: Resize 80% Free rotate right 10 degrees. Duplicate/Mirror/Flip
Element 16: Resize 70%
Highlight your white background.
New Raster layer.
Select All.
Copy and paste a paper of choice Into Selection.
Deselect.
Apply the Mask
Resize 105%
Merge Group.
Add your copyrights.
Add your name.
Resize all layers 80%
I hope you enjoyed this tutorial.
I’d love to see your results and show it off in my gallery.
Email me!
Hugs,
Bev


No comments:
Post a Comment