
 Clicking on the image will enlarge to full view.
Supplies
2 tubes of choice - I’m using the beautiful artwork of Zindy S.D. Nielsen here
Font of Choice - I’m using Kingthings Wrote here
Gem’s Mask 22 here
“Antoinette” is a PTU art kit created by KatNKDA. It can be downloaded from her store NK Art Shop. You can visit Kat’s blog here.
Thank you so much for this elegantly beautiful kit, Kat!
This tutorial was written assuming you have a working knowledge of PSP.
~♥~ Let’s get started ~♥~
Open up a transparent 700 X 700 canvas.
Flood Fill white.
Flood Fill white.
Copy and paste Element 17 as a new layer.
Resize 25% and 70%
Use your Magic Wand and click inside of it. Be sure to click in the gaps in the leaves and glitter swirls.
Selections/Modify/Expand by 6.
New Rater layer below he frame.
Copy and paste a paper of choice Into Selection.
Copy and paste your tube as a new layer above the paper.
Selections/Invert
Tap the delete key.
Deselect.
Close out your white canvas.
Merge Visible.
Reopen your white canvas.
Close out your merged layer.
Copy and paste Element 42 as a new layer.
Resize 25% and 70%
Free rotate right 5 degrees
Use your Magic Wand and click inside of it.
Selections/Modify/Expand by 2.
New Raster layer below the frame.
Copy and paste a paper of choice Into Selection.
Copy and paste your tube as a new layer above the paper.
Selections/Invert
Tap the delete key.
Selections/Modify/Feather
Number of Pixels:
43
OK
Tap the delete key a couple of times.
Deselect.
Close out your white canvas.
Merge Visible.
Reopen both merged layers and move into position.
See my tag for reference.
Merge Visible.
Reopen both merged layers and move into position.
See my tag for reference.
Add your embellishments. I used:
Element 24: Resize 25% and 70%
Element 25: Resize 25% and 70%
Element 16: Resize 25% and 40%
Element 15: Resize 25% and 40%
Element 18: Resize 25% Mirror/Flip
Element 2: Resize 25% and 70% Mirror
Element 28: Resize 25% and 50% Mirror/Free rotate left 40 degrees Duplicate/Free rotate Left 20 degrees
Element 28 again: Resize 25% and 25% Flip
Element 47: Resize 25% and 50% Mirror
Crop your image.
Highlight your white background.
New Raster layer.
Select All.
Copy and paste a paper of choice Into Selection.
Deselect.
Apply the Mask.
Merge Group.
New Raster layer.
Select All.
Copy and paste a paper of choice Into Selection.
Deselect.
Apply the Mask.
Merge Group.
Add your copyrights.
Add your name.
Give it a slight inner bevel:
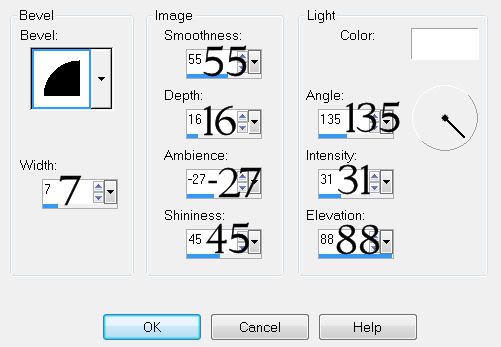
Resize all layers 80%.
I hope you enjoyed this tutorial.
I’d love to see your results and show it off in my gallery.
Email me!
Hugs,
Bev
Give it a slight inner bevel:
Resize all layers 80%.
I hope you enjoyed this tutorial.
I’d love to see your results and show it off in my gallery.
Email me!
Hugs,
Bev
No comments:
Post a Comment