Supplies
1 tube of choice - I’m using the beautiful artwork of Zindy S.D. Nielsen here
Font of Choice - I’m using Dragonfly here
Scrap Dimension mask 6 here
Dezigns by Ali Template 82 here
“Ice” is a PTU tagger size scrap kit created by Kelly of Angel’s Designz and can be purchased at Scraps with Attitude. You can visit Kelly’s blog here.
Thank you Kelly for an amazingly beautiful kit!
This tutorial was written assuming you have a working knowledge of PSP.
~♥~ Let’s get started ~♥~
Open up the template.
Shift +D.
Close out the original.
Delete DBA layer;
Image/Canvas Size
700 X 450
New Raster layer.
Send to bottom.
Flood fill white.
Highlight Rectangle 1 layer.
Use your Magic Wand and click on it.
New Raster layer.
Copy and paste a paper of choice Into Selection.
Deselect.
Delete the template layer.
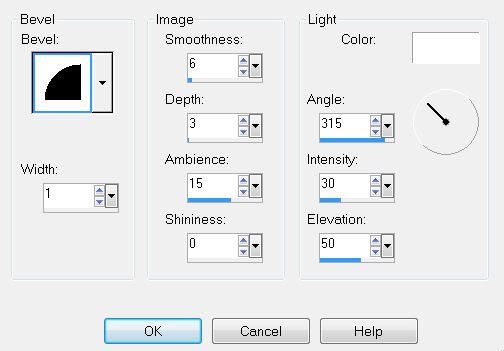
Give it a slight inner bevel:

Highlight Rectangle 2 layer.
Use your Magic Wand and click on it.
New Raster layer.
Flood fill with a gradient of choice.
Deselect.
Delete the template layer.
Highlight White Circle layer.
Use your Magic Wand and click on it.
New Raster layer.
Copy and paste a paper of choice Into Selection.
DO NOT DESELECT YET.
Copy and paste your tube below the frame.
Move into position.
Selections/Invert
Tap the delete key.
Deselect.
Delete the template layer.
Highlight Circle Frame layer.
Use your Magic Wand and click on it.
New Raster layer.
Copy and paste a paper of choice Into Selection.
Deselect.
Delete the template layer.
Give it the same inner bevel.
Add your embellishments. I used:
Clasp: Resize 50% Free rotate left 90 degrees Duplicate 3x and place at each corner
Doodle 1: Free rotate left 40 degrees. Duplicate as many times as you like/arranging them as you like
Flower with Ribbon: Resize 30% Duplicate/Mirror
Heart 2: Resize 25% and 80% Free rotate right 40 degrees
Fire Charm 2: Resize 50%
Element 2: Resize 25% and 50%
Butterfly: Resize 25% and 70%
Glitter Spill: Resize 80%
Highlight your white background.
New Raster layer.
Select All.
Copy and paste a paper of choice Into Selection.
Deselect.
Apply the Mask.
Merge Group.
Add your copyrights.
Add your name.
Convert to Raster layer.
Select All/Float/Defloat
Selections/Modify/Contract by 1
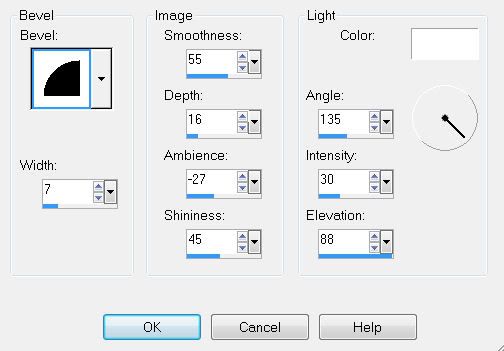
Give it an inner bevel:
Give it an inner bevel:

Add some noise.
I hope you enjoyed this tutorial.
I’d love to see your results and show it off in my gallery.
Email me!
Hugs,
Bev
I hope you enjoyed this tutorial.
I’d love to see your results and show it off in my gallery.
Email me!
Hugs,
Bev


No comments:
Post a Comment