Clicking on the image will enlarge to full view.
Supplies
Font of choice - I used Stonehenge Regular here
Weescotlass Mask 249 here
Jbs2Design Template 27 here
Alien Skin - Xenofex 2: Burnt Edges
“Magical Fantasy forest” is a PTU tagger size scrap kit created by Laney of Laney’s Scrappy Moments and can be purchased at Heartbeatz Creationz. You can visit her blog here.
Thank you Laney for a truly magical kit!
This tutorial was written assuming you have a working knowledge of PSP.
~♥~ Let’s get started ~♥~
Open up the template.
Shift + D.
Close out the original.
Delete Copyright Info layer.
Image/Canvas size
550 X 600
Flood fill Raster 1 layer white.
Highlight Shape layer.
Use your Magic Wand and click on it.
New Raster layer
Copy and paste a paper of choice Into Selection.
Deselect.
Delete the template layer.
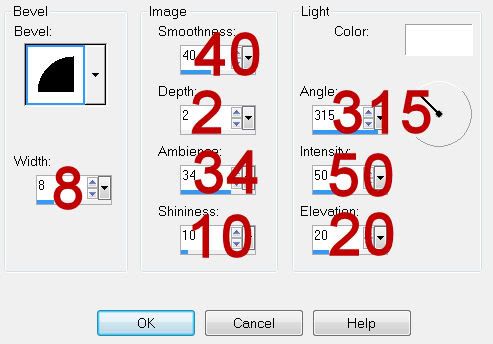
Give it a slight inner bevel:

Highlight Ribbon 1 layer.
Use your Magic Wand and click on it.
Copy and paste a paper of choice Into Selection.
Deselect.
Delete the template layer.
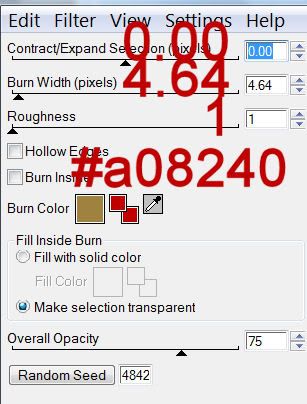
Apply Xenofex 2: Burnt Edges:

Repeat the above step with Ribbon 2 and Ribbon 3 layer - using a different paper of each layer.
Highlight Top Circle layer.
Use your Magic Wand and click on it.
Copy and paste a paper of choice Into Selection.
Copy and paste Cookie Fairy 2a as a new layer.
Resize 40%
Move into exact position where you want it.
Duplicate
Move the duplicated layer above Top Circle Frame layer.
Selections/Invert
Highlight the original fairy layer.
Tap the delete key.
Deselect.
Highlight the duplicated fairy layer.
Using your Eraser Tool erase any that you don’t want to be seen outside of the frame.
Highlight Top Circle Frame layer.
Use your Magic Wand and click on it.
Copy and paste a paper of choice Into Selection.
Deselect.
Delete the template layer.
Give it the same inner bevel.
Highlight Bottom Circle layer.
Repeat the procedure you used for the Top Circle Layer accept this time use Fairy 1a and resize it 50%
Highlight Bottom Circle Frame layer.
Repeat the same steps you used for Top Circle Frame layer.
Add your embellishments. I used:
Tree Trunk: Resize 50%
Boulder: Resize 50% Duplicate/Resize 70%
Grass 1: Resize 30% Duplicate and position as you like
Mushroom 1: Resize 25% and 70%
Mushroom 2: Resize 25% and 70% Mirror
Mushroom 3: Resize 25% and 50%
FD10 - DY: Resize 50%
Highlight your white background.
New Raster layer.
Select All.
Copy and paste a paper of choice Into Selection.
Deselect.
Apply the Mask.
Resize 120%
Merge Group.
Add your copyrights.
Add your name.
Give it the same bevel.
Hide it in the grass.
I hope you enjoyed this tutorial.
I’d love to see your results and show it off in my gallery.
Email me!
Hugs,
Bev

No comments:
Post a Comment