
 Clicking on the image will enlarge to full view.
Supplies
1 tube of choice - I used the wonderful artwork of Dean Yeagle here
Font of choice - I used Al Sandra here
Weescotlass Mask 220 here
Loving Miranda Template 11 here
Mura’s Meister - Cloud
“Blueand White Fav Colors” is a FTU scrap kit created by Lisa of Blue’s Tutorials and can be found here for download. Please leave a thank you when downloading. It’s a small gesture for hard work given freely.
Thank you Lisa for such a beautiful kit. You have lots of talent chickadee!
This tutorial was written assuming you have a working knowledge of PSP.
~♥~ Let’s get started ~♥~
Open up the template.
Shift + D.
Close out the original.
Resize all layers 120%
Image/Canvas size
650 X 600
Delete the watermark, Small Rectangle, and Smaller Diamonds layer.
Highlight Rectangle layer.
Use your Magic Wand and click on it.
New Raster layer
Copy and paste a paper of choice Into Selection.
Deselect.
Delete the template layer.
Highlight Half Circle layer.
Use your Magic Wand and click on it.
Create a new canvas:
700 X 700
In your color pallet:
Foreground: #b4d0e1
Background: #efefef
Make your new canvas active.
Effects/Mura’s Meister/Cloud
Click the reset button.
OK
Edit/Copy
Close the cloud image out - you don’t need it any more
Make your working canvas active.
Paste Into Selection.
Deselect.
Delete the template layer.
Highlight Right Diamond layer.
Use your Magic Wand and click on it.
New Raster layer.
Copy and paste a paper of choice Into Selection.
Selections/Modify/Contract by 10.
Tap the delete key.
Selections/Modify/Expand by 2.
New raster layer below the new diamond frame you just created.
Copy and paste a paper of choice Into Selection.
Copy and paste a tube as a new layer.
Selections/Invert
Tap the delete key.
Deselect.
Delete the template layer.
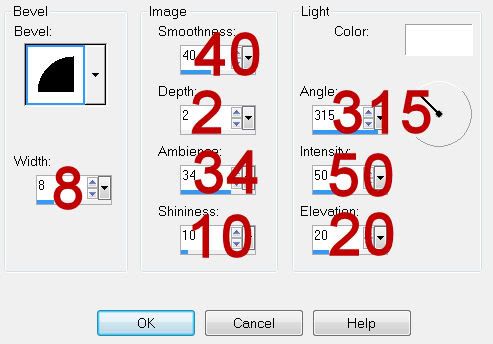
Give the Diamond Frame an inner bevel:
Highlight Left Diamond layer.
Repeat the above step using a different tube.
Highlight Center Diamond layer.
Repeat the same step as above accept do not put a tube inside the diamond.
Copy and paste your tube as a new layer.
Center it in front if the center diamond.
Add your embellishments. I used:
Image 14: Resize 25% and 50%
Image 34: Position in front of the half circle
Image 34: Resize 50% Duplicate/Mirror/Resize 80%
Image 20: Resize 25% and 80% Duplicate/Mirror/Resize 90%
Image 33: Resize 75% Free rotate left 25 degrees Duplicate/Mirror/Resize 90%
Highlight your white background.
New Raster layer.
Select All.
Copy and paste a paper of choice Into Selection.
Deselect.
Apply the Mask.
Merge Group.
Add your copyrights.
Add your name.
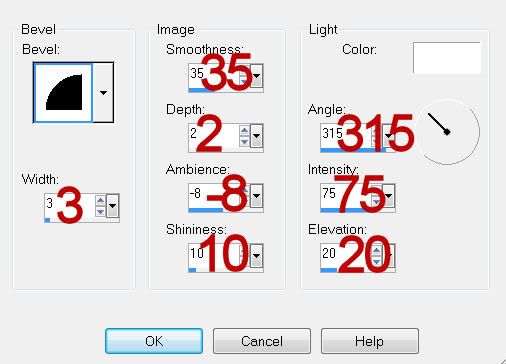
Give it an inner bevel:
Resize all layers 85%.
I hope you enjoyed this tutorial.
I’d love to see your results and show it off in my gallery.
Email me!
Hugs,
Bev
No comments:
Post a Comment