
 Clicking on the image above will enlarge to full view.
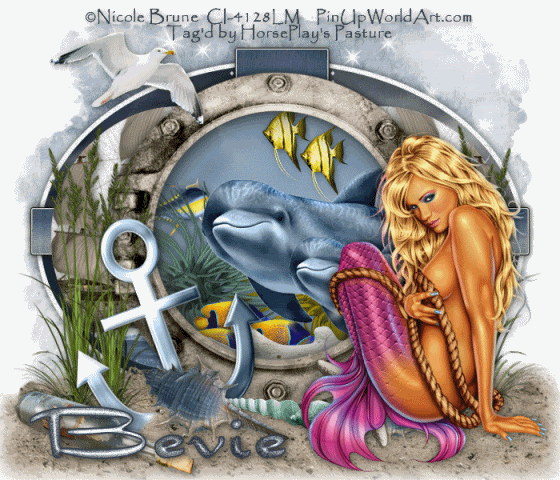
Supplies
1 tube of choice - I used the wonderful artwork of Nicole Brune here
Font of choice - I used Dragonfly here
Becky Mask 22 here
Divine Intentions Template 293 here
Animation Shop - Optional
“Out to Sea” is a PTU scrap kit created by Lori of P4DSDesignz and can be purchased from Lollipops n Gumdrops. You can visit her blog here.
Thank you Lori for such an amazing and stunning ocean themed kit!
This tutorial was written assuming you have a working knowledge of PSP.
This will be a long tutorial. Probably one of my longest yet, but I do hope you’ll stick with it to the end. Parts of it are monotonous but the end results are terrific and well worth it.
~♥~ Let’s get started ~♥~
Open up the template.
Shift + D.
Close out the original.
Resize all layers 90%
Image/Canvas Size
700 X 600
OK
Flood fill background layer white.
Delete the following layers:
By Missy, Dotted Line 3, Words, Pixel Words, Thin Rectangle, and Glittered Thin Rectangle.
Highlight Glittered Oval Half 2 layer.
Merge Down.
Select All/Float/Defloat
New Raster layer.
Flood fill white.
Adjust/Add Remove Noise/Add Noise
Uniform and Monochrome checked
Noise 30%
OK
Delete the template layer.
Highlight Oval layer.
Select All/Float/Defloat
New Raster layer.
Copy and paste Paper 6 Into Selection.
Deselect.
Delete the template layer.
Highlight Rectangle 1 layer.
Click on it with your Magic Wand.
New Raster layer
Copy and paste Paper 3 Into Selection.
Deselect.
Delete the template layer.
Highlight Rectangle 2 layer.
Repeat the above step using the same paper.
Highlight Circle 4 layer.
Use your Magic Wand and click on it.
New Raster layer.
Copy and paste Paper 1 Into Selection.
Deselect.
Delete the template layer.
Now we’re going to paste all the elements that go into the circle.
Don’t worry about them overhanging the circle…we’ll take care of that in a bit. For now…these are the elements I used:
Coral 1: Resize 30%
Juvenile: Resize 25% and 50% Duplicate twice - arrange how you like
Angel Fish: Resize 25% and 30% Duplicate
Tuna 2: Resize 25% and 40%
Ocean Elements 1 & 2: Resize 25%
Dolphin: Resize 40% Duplicate/Resize 70%
Highlight the Circle Paper.
Select All/Float/Defloat
Selections/Invert
Highlight each of the elements that are in the circle and tap the delete key.
Deselect.
Copy and paste Ocean as a new layer.
Don’t worry where it’s going for now.
Resize 30%
Copy and paste Ship as a new layer.
Resize 40%
Arrange the ship over the ocean layer and make it look as if the ship is sailing on the sea.
Merge down.
Highlight Circle 1 Layer.
Select All/Float/Defloat
Position the merged ocean/ship layer over the circle.
Selections/Invert
Tap the delete key.
Deselect.
Duplicate/Mirror
The image should go nicely over Circle 2 layer.
If not, move it into position.
Copy and paste Porthole as a new layer.
Resize 45%
Place it over the Merge layer of ocean elements.
Copy and paste Sea grass 2 as a new layer.
Resize 25% and 80%
Position at the right side of the port hole.
It’s alright if some of the sand is covering the hole…you can always erase whatever you don’t want later on.
Duplicate/Mirror
Merge down.
Copy and paste Beach Sand as a new layer.
Resize 25%
Position it over the merged sea grass layer. Some of the sand will cover the grass…it’s ok…use your eraser and erase the sand that covers the grass. At the same time you’ll give the sand a blended look.
Now use your Freehand Selection tool and outline the sand so that we can give it a feathered effect near the bottom.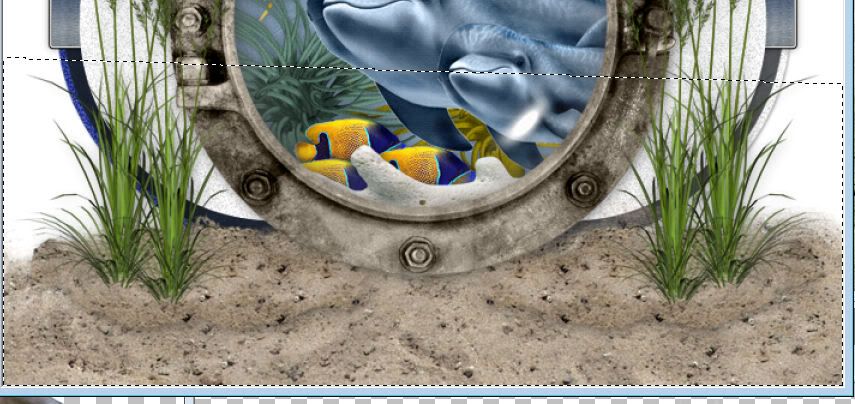
Selections/Modify/Feather
Number of Pixels: 43
OK
Selections/Invert
Tap the delete key a couple of times.
Highlight the merged sea grass layer and tap the delete key the same amount of times and then once more.
Deselect.
Copy and paste your tube as a new layer.
Add your embellishments. I used:
Shell 1: Resize 25% Duplicate/Mirror/Resize 70%
Starfish: Resize 25% and 50%
Seashell 2 & 3: Resize 25% and 25%
Anchor: Resize 25% Free rotate left 20 degrees
Seagull: Resize 50%
Ship in a Bottle: Resize 25% and 40%
Stars: Resize 50%
Highlight your white background.
New Raster layer.
Select All.
Copy and paste Paper 3 Into Selection.
Deselect.
Apply the Mask.
Use your Pick Tool and pull the sides and top out just a bit.
Merge Group.
Add your copyrights.
Add your name.
Choose your own colors/gradient you want just be sure the stroke is set to 2.
Convert to Raster layer.
Select All/Float/Defloat
Selections/Modify/Contract by 2
Give it a slight inner bevel: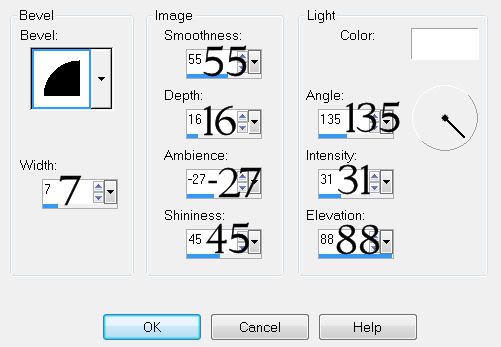
Add the same noise as you did before.
Deselect.
If you don’t want to continue with the animation the resize your tag 85% and save. If you do want to continue then DO NOT RESIZE ANYTHING!
You may want to refresh that cup of coffee you’ve been sipping on…
All settled again? Ok, lets continue.
~Now we’re going to create the water effect for your tag~
Highlight the Circle paper layer.
Copy
Open up Animation Shop
Edit/Paste as New Animation
Effects/Insert Image Effect
Move the Effect box over some so you can see the circle paper.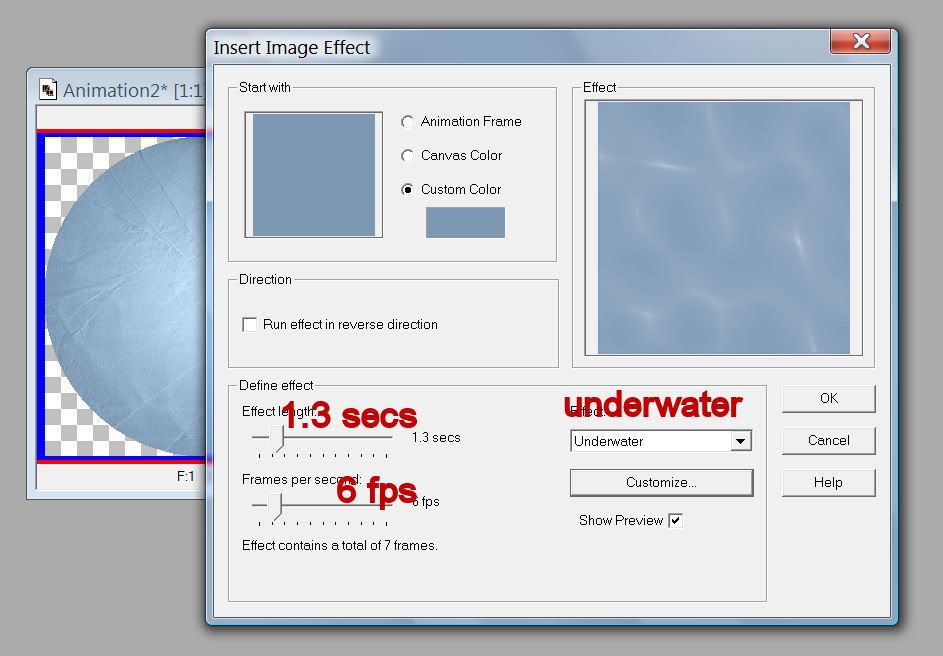
Click on the little box beneath the words “Custom Color”
Move your cursor over the circle paper and click to get the blue color in your layers pallet.
Click OK.
Now click on Customize: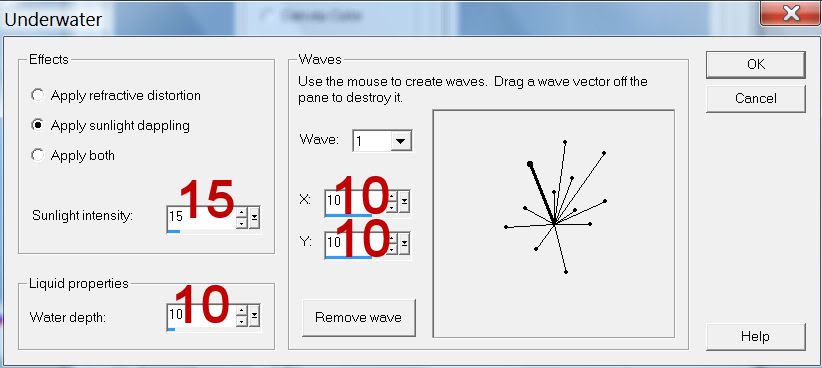
Use your Mouse on the lines and pull them in or out to change the wave settings. I used mine as they were when I opened it up…lazy of me, I know…lol
When you’re done click OK
The box will disappear.
Click OK on the Effect box.
You’ll end up with 8 frames.
Highlight the first frame.
Edit/Delete
Now you’ll have 7 frames.
We’ll leave Animation Shop for a bit.
Go back into PSP.
Highlight the Paper Circle layer.
Copy
Open up a new transparent image
500 X 500
Edit/Paste as new layer.
Select All/Float/Defloat
Selections/Invert
Go back into AS
Highlight Frame 1
Edit/Copy
Go back into PSP
Edit/Paste as new layer
Tap the delete key
.
Repeat the above step with the animated ocean frames 2, 3, 4, 5, 6, and 7.
Once you’ve completed the 7th frame in PSP then delete the very bottom 2 layers. Starting with the bottom layer we’re going to rename them Ocean 1, Ocean 2, and so on.
Once they’re all renamed highlight Ocean 1 layer.
Copy
Go back into AS
Edit/Paste as New Animation.
Go back into PSP.
Highlght Ocean 2 layer.
Copy.
Go back into AS
Edit/Paste After current frame.
Repeat this procedure until you have all 7 circle frames in AS.
You can now close out the blue square frames because you won’t be using them any more.
I promise you the most difficult part is over with…yay!
Go back into PSP.
You can now close out the ocean layers. You won’t be needing those any more either. The only thing you should have in your PSP right now is your tag.
Right click your mouse in the layers pallet - doesn’t matter which layer you’re on.
View/None
Starting at the very bottom layer (the background layer) work your way up opening up the layers all the way to the round circle paper layer - be sure the round circle paper layer is open.
Edit/Copy Merge.
Carry into AS.
Edit/Paste as New Animation.
Ctol + L - tap the L key until you have 7 frames.
Highlight your round ocean wave frames.
Ctrl + A to highlight them all.
Edit/Copy
Highlight your tag frames.
Ctrl + E
Line it up exactly over the round circle paper layer.
Click your mouse.
Go back into PSP.
Right click on any layers in your layers pallet.
View/None
Reopen all the frames from just above the circle paper layer to the top of the layers pallet.
Edit/Copy Merge.
Go back into AS.
Click on the Propagate Paste icon - it looks like 3 folders with the corners bent.
Ctrl + E
Position it exactly over the ocean circle.
Click your mouse.
Animation/Frame Properties
Change the number to 20.
OK
View your animation.
If you’re happy with it then resize:
Animation/Resize Animation
Percentage of Original checked.
80%
OK
I hope you enjoyed this tutorial.
I’d love to see your results and show it off in my gallery.
Email me!
Hugs,
Bev
No comments:
Post a Comment