
 Clicking on the image will enlarge to full view.
Supplies
1 tube of your choice - I used the beautiful poser that came with the kit
Font of Choice - I used Oh Lara a pay font
Weescotlass Mask 297 here
“Steam Punk” is a PTU tagger size scrap kit created by Jay of Bello Scarto and can be purchased at her store Heartbeatz Creationz. You can visit her blog here.
Thank you Jay for a really terrific kit!
This tutorial was written assuming you have a working knowledge of PSP.
~♥~ Let’s get started ~♥~
Open up a 700 X 700 blank canvas.
Flood fill white.
Copy and paste Element 12 as a new layer.
Resize 85%
Copy and paste Element 46 as a new layer.
Resize 60%
Free rotate left 90 degrees
Move to the left just a bit and move the clock face to the right just a bit.
See my tag for reference.
Highlight the frame layer.
Click inside with your Magic Wand.
Selections/Modify/Expand by 6.
New Raster layer below the frame.
Copy and paste a paper of choice Into Selection.
Deselect for now.
Copy and paste Element 49 as a new layer.
Resize 40%/Mirror
Move beneath the frame in your layers pallet - we’ll come back to this in a minute.
Paste the element again but above the frame in your layers pallet.
Resize 35%.
Move this tube exactly where you want it.
Highlight the tube that's below the frame and move it up and to the left just a bit - enough so that you can see it just over the shoulder of the other tube.
Lower the Opacity to about 28 or so.
Highlight the frame layer.
Click inside of it with your Magic Wand.
Selections/Modify/Expand by 6
Selections/Invert
Highlight the tube layer.
Tap the delete key.
Deselect.
TIP: You can Merge Visible the paper frame and tube if you would like to get the frame and clock face into better position.
Copy and paste Element 22 as a new layer.
Resize 50%
Move below the clock face in your layer’s pallet - see my tag for reference.
Copy and paste the top two clock hands as new layers.
Resize each 50%
Free rotate each hand however you like for the time.
Copy and paste Element 43 as a new layer.
Free rotate left 90 degrees.
Move into position - see my tag for reference.
Duplicate/Mirror
Note: You will see any elements through the clock face that you have below it in the layers pallet. It’s ok. We’ll take care of all of them near the end of the tutorial.
Copy and paste Element 3 as a new layer.
Move into position over the top of Element 43.
Duplicate/Mirror
Add your embellishments. I used:
Element 47: Resize 90%
Element 10: Resize 80%
Element 7: Resize 70%
Element 4: Resize 25% and 80%
Element 42: Resize 50%
Element 39: Resize 50%
Element 20: Resize 50%/Duplicate/Free rotate right 15 degrees
Element 28: Resize 35%/Mirror
Make your Magic Wand active.
In your layers pallet highlight the clock face layer.
Click anywhere on your white canvas with your Magic Wand.
Selections/Invert
Highlight every element layer that you see showing through the clock face and tap the delete key.
Deselect.
Highlight your white background.
Select All
New Raster layer.
Copy and paste a paper of choice Into Selection.
Deselect.
Apply the mask.
Merge Group.
Add your credits.
Add your name.
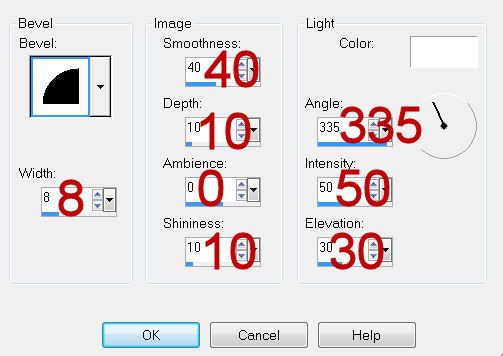
Give it a slight inner bevel:
Resize all layers 80%.
I hope you enjoyed this tutorial.
I’d love to see your results and show it off in my gallery.
Email me!
Hugs,
Bev
No comments:
Post a Comment