
 Clicking on the image will allow you to enlarge for bigger view.
Supplies
1 tube of choice - I’m using the artwork of Michael Calandra at MPT
Font of Choice - I’m using Chocolate Box here
Vix Mask 452 here
Creative by Nature Template 37 here
Greg’s Factory Output Vol. II - Pool Shadow
“A Bit Batty” is a PTU tagger size scrap kit created by Julie of Bits n Bobs and can be purchased at Exquisite Scraps. You can visit her blog here.
This tutorial was written assuming you have a working knowledge of PSP.
~♥~ Let’s get started ~♥~
Open up the template.
Shift + D.
Close out the original.
Image/Canvas Size
700 X 700
OK
Flood fill the background layer white.
Delete the top 6 layers, Copy of Vector 1 (the light pink circle just above Raster 5), and Raster 5.
Highlight Raster 2 layer.
Use your Magic Wand and click on it.
New Raster layer.
Copy and paste Paper 6 Into Selection.
Deselect.
Delete the template layer.
Highlight Copy of Vector 1 layer.
Use your Magic Wand and click on it.
New Raster layer.
Copy and paste Paper 10 Into Selection.
Deselect.
Delete the template layer.
Copy and paste ABB-50 as a new layer.
Resize 70%
Move into position over the oval paper.
NOTE: Don’t worry about anything that overhangs the oval. We’ll come back to that.
Copy and paste ABB-54 as a new layer.
Move into position behind the bench so that you can see sprigs of grass sticking up from the back of the bench. Move it off to the side a bit.
Duplicate/Mirror
Move both grass layers into the position you want.
Merge Down.
Highlight the Oval paper layer.
Click on it with your Magic Wand.
Selections/Invert
Highlight each of the element layers and tap the delete key.
Deselect.
Highlight Raster 6 Layer.
Copy and paste Paper 9 as a new layer.
Resize 80%
Move into position over the rectangle.
Selections/Invert
Tap the delete key.
Deselect.
Delete the template layer.
Highlight Raster 4 layer.
Repeat the above step.
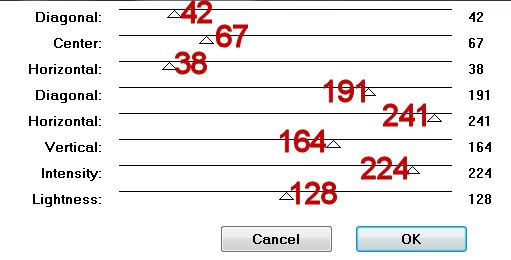
To this paper layer apply Greg’s Factory Output Vol. II - Pool Shadow:
Copy and paste your tube as a new layer.
Duplicate/Mirror
Click on the duplicate with your mouse. Use your arrow key to move the tube over the vertical rectangle. Once it’s in position highlight the rectangle layer. Use your Magic Wand and click anywhere outside of it.
Selections/Invert
Highlight the tube layer.
Tap the delete key.
Deselect.
Change the Properties to Luminance Legacy.
Add your embellishments. I used:
ABB 51: Resize 60%/Flip/Mirror
ABB 57: Resize 40%
ABB 1: Resize 40%
ABB 84: Resize 60%
ABB 4 & 6: Resize 25%
ABB 4: Resize 25% and 70%/Duplicate/Resize 70%
ABB 47: Resize 50%/Mirror
Highlight your white background.
New Raster layer.
Select All.
Copy and paste a paper of choice Into Selection.
Deselect.
Apply the Mask.
Merge Group.
Duplicate
Add your copyrights.
Add your name.
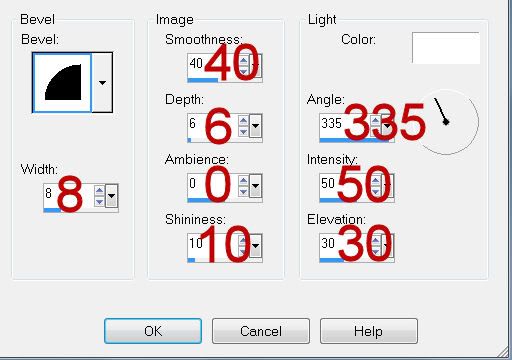
Give it a slight inner bevel:
Resize all layers 80%
I hope you enjoyed this tutorial.
I’d love to see your results and show it off in my gallery.
Email me!
Hugs,
Bev
No comments:
Post a Comment