
Clicking on the image will allow you to enlarge for a bigger view.
Supplies
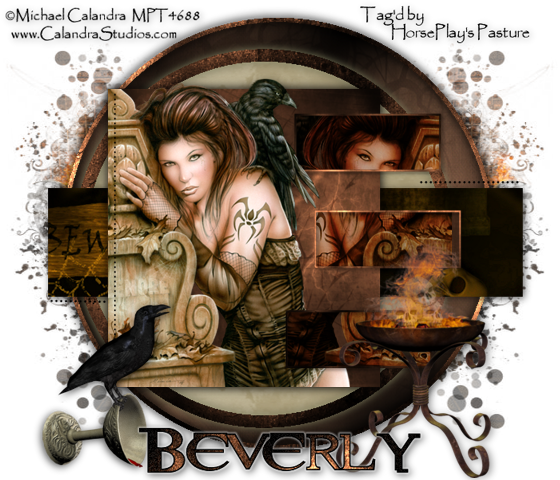
1 tube of your choice - I used the artwork of Michael Calandra at MPT
Font of Choice - I used Resident Evil here
Vix Mask 431 here
Scrapity Scrap and More Template 40 here
Eyecandy 4000 - Gradient Glow
Greg’s Factory Output Vol. II - Pool Shadow
DSB Flux - Bright Noise
“Dance of the Dead” is a PTU scrap kit created by Athena of Athena Designs and can be purchased from TKO Scraps. You can visit her blog here.
Thank you Athena for a terrific seasonal kit!
~♥~ Let’s get started ~♥~
Open up the template.
Shift + D.
Close out the original.
Delete the credit layer and Line Square layer.
Image/Canvas Size 700 X 600
OK
Flood fill the background layer white.
Highlight Big Circle layer.
Click on it with your Magic Wand.
New Raster layer.
Copy and paste Paper 13 Into Selection.
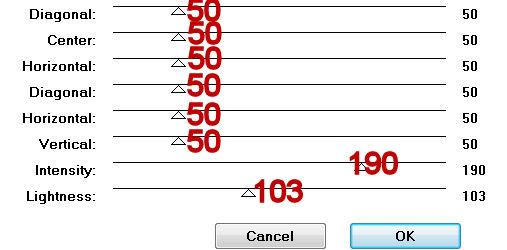
Apply Greg’s Factory Output Vol. II - Pool Shadow:
Deselect.
Delete the template layer.
Highlight Border Big Circle.
Click on it with your Magic Wand.
New Raster layer.
Copy and paste Paper 9 Into Selection.
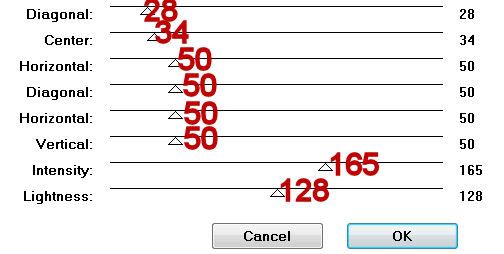
Apply Pool Shadow effect using these settings:
Apply it once again.
Deselect.
Delete the template layer.
Highlight Border Smaller Circle layer.
Repeat the above step.
Highlight Smaller Circle layer.
Click on it with your Magic Wand.
New Raster layer.
Copy and paste Paper 10 Into Selection.
Deselect.
Delete the template layer.
Highlight Big Rectangle layer.
Click on it with your Magic Wand.
Copy and paste Paper 7 as a new layer.
Move it into position however you choose.
Selections/Invert
Tap the delete key.
Apply Pool Shadow - same settings.
Deselect.
Delete the template layer.
Highlight Square layer.
Click on it with your Magic Wand.
New Raster layer.
Copy and paste Paper 9 Into Selection.
Apply the same Pool Shadow effect.
Copy and paste your tube as a new layer.
Selections/Invert
Tap the delete key.
Deselect.
Highlight Mid Rectangle layer.
Move it in your layers pallet so that it’s just above Top Rectangle layer.
Highlight Bottom Rectangle layer.
Move it in your layers pallet so that it’s just above Mid Rectangle layer.
Merge Down.
Merge Down.
All 3 rectangles should be on the same layer.
Click on each one with your Magic Wand.
New Raster layer.
Copy and paste Paper 9 Into Selection.
Deselect.
Highlight your tube layer.
Duplicate/Mirror
Move it into position over the merged 3 rectangles layer.
Highlight the merged rectangles layer.
Click on each one with your Magic Wand.
Selections/Invert
Highlight the tube layer.
Tap the delete key.
Deselect.
Change the Properties to Soft Light
Duplicate.
Delete the template layer.
Highlight Border Mid Rectangle layer.
Move it in your layers pallet so that it’s just above Border Top Rectangle layer.
Highlight Border Bottom Rectangle layer.
Move it in your layers pallet so that it’s just above Mid Rectangle layer.
Merge down.
Merge down again.
All 3 should be on one layer now.
Select All/Float/Defloat
New Raster layer.
Copy and paste paper 9 Into Selection.
Apply Pool Shadow effect.
Apply the effect once more.
Deselect.
Delete the template layer.
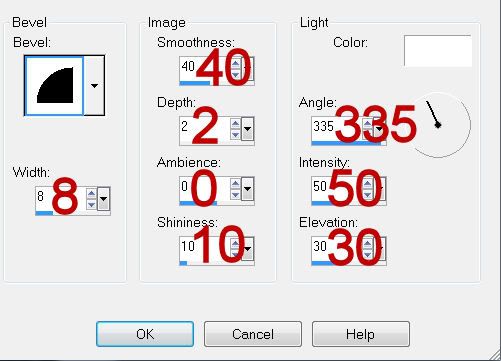
Give all border layers a slight Inner Bevel:
Add your embellishments. I used:
Fire Stand 1: Resize 80%
Chalice: Resize 40%
Crow 2: Resize 40%
Skull 2: Resize 25% and 70%/Lower the Opacity to about 38 or so
Highlight your white background.
Select All
New Raster layer.
Copy and paste Paper 1 Into Selection.
Deselect.
Apply the mask.
Merge Group.
Add your credits.
Add your name.
In your color pallet:
Foreground: Black
Background: color or paper of your choice
Stroke set to 1.5
Type out your name.
Convert to Raster layer.
Selections All/Float/Defloat
Selections/Modify/Contract by 1
OK
Apply Pool Shadow effect twice.
Apply DSB Flux - Bright Noise:
Intensity: 21
Mix
OK
Deselect.
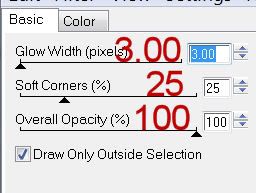
Apply Eyecandy 4000 - Gradient Glow
Resize all layers 80%.
I hope you enjoyed this tutorial.
I’d love to see your results and show it off in my gallery.
Email me!
Hugs,
Bev
Supplies
1 tube of your choice - I used the artwork of Michael Calandra at MPT
Font of Choice - I used Resident Evil here
Vix Mask 431 here
Scrapity Scrap and More Template 40 here
Eyecandy 4000 - Gradient Glow
Greg’s Factory Output Vol. II - Pool Shadow
DSB Flux - Bright Noise
“Dance of the Dead” is a PTU scrap kit created by Athena of Athena Designs and can be purchased from TKO Scraps. You can visit her blog here.
Thank you Athena for a terrific seasonal kit!
~♥~ Let’s get started ~♥~
Open up the template.
Shift + D.
Close out the original.
Delete the credit layer and Line Square layer.
Image/Canvas Size 700 X 600
OK
Flood fill the background layer white.
Highlight Big Circle layer.
Click on it with your Magic Wand.
New Raster layer.
Copy and paste Paper 13 Into Selection.
Apply Greg’s Factory Output Vol. II - Pool Shadow:
Deselect.
Delete the template layer.
Highlight Border Big Circle.
Click on it with your Magic Wand.
New Raster layer.
Copy and paste Paper 9 Into Selection.
Apply Pool Shadow effect using these settings:
Apply it once again.
Deselect.
Delete the template layer.
Highlight Border Smaller Circle layer.
Repeat the above step.
Highlight Smaller Circle layer.
Click on it with your Magic Wand.
New Raster layer.
Copy and paste Paper 10 Into Selection.
Deselect.
Delete the template layer.
Highlight Big Rectangle layer.
Click on it with your Magic Wand.
Copy and paste Paper 7 as a new layer.
Move it into position however you choose.
Selections/Invert
Tap the delete key.
Apply Pool Shadow - same settings.
Deselect.
Delete the template layer.
Highlight Square layer.
Click on it with your Magic Wand.
New Raster layer.
Copy and paste Paper 9 Into Selection.
Apply the same Pool Shadow effect.
Copy and paste your tube as a new layer.
Selections/Invert
Tap the delete key.
Deselect.
Highlight Mid Rectangle layer.
Move it in your layers pallet so that it’s just above Top Rectangle layer.
Highlight Bottom Rectangle layer.
Move it in your layers pallet so that it’s just above Mid Rectangle layer.
Merge Down.
Merge Down.
All 3 rectangles should be on the same layer.
Click on each one with your Magic Wand.
New Raster layer.
Copy and paste Paper 9 Into Selection.
Deselect.
Highlight your tube layer.
Duplicate/Mirror
Move it into position over the merged 3 rectangles layer.
Highlight the merged rectangles layer.
Click on each one with your Magic Wand.
Selections/Invert
Highlight the tube layer.
Tap the delete key.
Deselect.
Change the Properties to Soft Light
Duplicate.
Delete the template layer.
Highlight Border Mid Rectangle layer.
Move it in your layers pallet so that it’s just above Border Top Rectangle layer.
Highlight Border Bottom Rectangle layer.
Move it in your layers pallet so that it’s just above Mid Rectangle layer.
Merge down.
Merge down again.
All 3 should be on one layer now.
Select All/Float/Defloat
New Raster layer.
Copy and paste paper 9 Into Selection.
Apply Pool Shadow effect.
Apply the effect once more.
Deselect.
Delete the template layer.
Give all border layers a slight Inner Bevel:
Add your embellishments. I used:
Fire Stand 1: Resize 80%
Chalice: Resize 40%
Crow 2: Resize 40%
Skull 2: Resize 25% and 70%/Lower the Opacity to about 38 or so
Highlight your white background.
Select All
New Raster layer.
Copy and paste Paper 1 Into Selection.
Deselect.
Apply the mask.
Merge Group.
Add your credits.
Add your name.
In your color pallet:
Foreground: Black
Background: color or paper of your choice
Stroke set to 1.5
Type out your name.
Convert to Raster layer.
Selections All/Float/Defloat
Selections/Modify/Contract by 1
OK
Apply Pool Shadow effect twice.
Apply DSB Flux - Bright Noise:
Intensity: 21
Mix
OK
Deselect.
Apply Eyecandy 4000 - Gradient Glow
Resize all layers 80%.
I hope you enjoyed this tutorial.
I’d love to see your results and show it off in my gallery.
Email me!
Hugs,
Bev
No comments:
Post a Comment