

Clicking on the image will allow you to enlarge for bigger view.
Supplies
1 tube of choice - I used the artwork of PinUpToons at CILM
Font of Choice - I used Chocolate Box here and Billy Argel here
Essence of Creativity Twilight Template 3 here
Greg’s Factory Output Vol. II - Pool Shadow
Mura’s Meister - Copies
Eyecandy 4000 - Gradient Glow
Vix Mask 452 here
“Happy Autumn” is a PTU tagger size scrap kit created by Sweet Occasions Designs and can be purchased from Lollipops n Gumdrops. You can visit her blog here.
Thank you Karen for a very beautiful kit!
This tutorial was written assuming you have a working knowledge of PSP.
~♥~ Let’s get started ~♥~
Open up the template.
Shift + D.
Close out the original.
Delete the top 2 layers, Circle 1 & 2 layers.
Image/Canvas Size:
650 x 450
OK
If your background layer doesn‘t stay white then flood fill white.
Highlight Large Rectangle layer.
Click on it with your Magic Wand.
New Raster layer.
Copy and paste Paper 4 Into Selection.
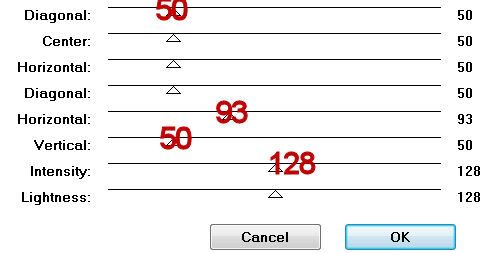
Apply Greg’s Factory Output Vol. II - Pool Shadow:
Deselect.
Delete the template layer.
Highlight Rectangle 1 layer.
Click on it with your Magic Wand.
New Raster layer.
Copy and paste Paper 2 Into Selection.
Deselect.
Delete the template layer.
Highlight Slats layer.
Click on each one with your Magic Wand.
Copy and paste Paper 6 as a new layer.
Resize 50% - Move into position
Selections/Invert
Tap the delete key.
Deselect.
Delete the template layer.
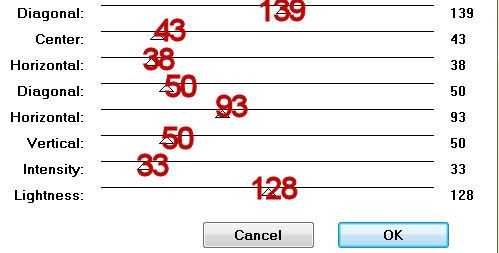
Apply Greg's Factory Output Vol. II - Pool Shadow:
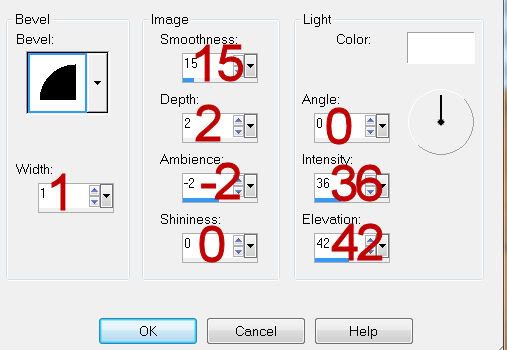
Give it a slight inner bevel:
Highlight Background layer (the square template layer)
Click on it with your Magic Wand.
Paste Paper 6 again.
Resize 50% - Move into position.
Selections/Invert
Tap the delete key.
Deselect.
Delete the template layer.
Highlight Frame layer.
Click on it with your Magic Wand.
New Raster layer.
Copy and paste Paper 4 Into Selection.
Deselect.
Delete the template layer.
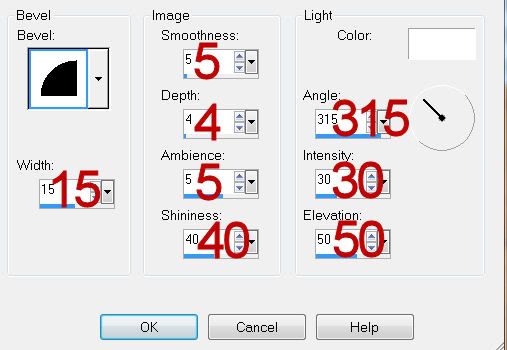
Give it a slight inner bevel:
Copy and paste Leaf 3 as a new layer.
Resize 25% and 70%
Copy and paste Leaf 5 as a new layer.
25% and 70%
Position them with about ¾ of an inch between them and move one slightly higher than the other.
Merge down so both leaves are on the same layer.
Apply Mura’s Meister - Copies:
Wallpaper (prospective)
Default settings.
OK.
Move this into position just below the frame.
Highlight the paper just below and click anywhere outside of it with your Magic Wand.
Highlight the prospective layer.
Tap the delete key.
Deselect.
Using the Chocolate Box font - type out the words
Autumns Perfect Pallet
Each words goes on it’s own layer.
Position the words over the slats.
Copy and paste your tube as a new layer.
If you’re using the same tube I did then copy and paste Image 4 as a new layer.
Resize 25% and 50%
Move into position over the easel.
Lower the Opacity until you can see through it and see your tube just fine.
Use your Freehand Selection Tool and outline the area that covers up the scarecrow image.
Highlight the Scarecrow layer.
Tap the delete key.
Deselect.
Open up the Opacity to 100%.
Add your embellishments. I used:
Wishingonastarr007: Resize 25% and 70%
Leave 3 Scraps and Tubes: Resize 25%
Leave 5 Scraps and Tubes: Resize 25%
Bow 6: Resize 25%
Leaf 3 & 4: Resize 25% and 70%
Delicate Fall Ornament Scraps and Tubes: Resize 60%
Highlight your white background.
New Raster layer.
Select All.
Copy and paste a paper of choice Into Selection.
Deselect.
Apply the mask.
Merge Group.
Add your credits.
Add your name.
Apply eye candy 4000 Gradient Glow:
Change the glow width to 3.00
Change the color to the yellow of the square paper.
Resize all layers 90%.
I hope you enjoyed this tutorial.
I’d love to see your results and show it off in my gallery.
Email me!
Hugs,
Bev
No comments:
Post a Comment