
Supplies
Font of Choice - I used Nashville Regular
Vaybs Mask 111 here
Divine Intentionz Template 381 here
Animation Shop
“Christmas Time” is a PTU tagger size scrap kit created by WackyWinnie Designz and can be purchased from Butterfly Blush Designs. You can visit her blog here.
Thank you Sue for such an adorable Christmas kit!!
This tutorial was written assuming you have a working knowledge of PSP.
~♥~ Let’s get started ~♥~
Open up the template.
Shift + D.
Close out the original.
Image/Canvas Size
700 x 600
OK
Open up the background layer and flood fill white.
Delete the top 9 layers.
Highlight Copy of Raster 2 layer.
Merge Down.
Select All/Float/Defloat
New Raster layer.
Copy and paste Paper 20 Into Selection.
Deselect.
Delete the template layer.
Highlight Rectangle layer.
Click on it with your Magic Wand.
New Raster layer.
Copy and paste Paper 17 Into Selection.
Deselect.
Delete the template layer.
Highlight Oval layer.
Click on it with your Magic Wand.
New Raster layer.
Copy and paste Paper 5 Into Selection.
Deselect.
Delete the template layer.
Highlight Circle layer.
Click on it with your Magic Wand.
New Raster layer.
Copy and paste Paper 18 Into Selection.
Deselect.
Delete the template layer.
Highlight Chrome Circle layer.
Click on it with your Magic Wand.
New Raster layer.
Copy and paste Paper 20 Into Selection.
Deselect.
Delete the template layer.
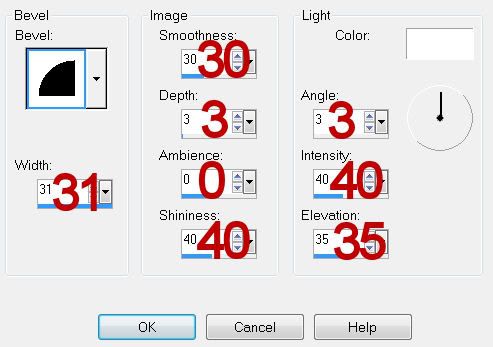
Give it a slight Inner Bevel:
Highlight Frame Back layer - The layer just above the circle frame you were just working on.
Click on it with your Magic Wand.
New Raster layer.
Copy and paste Paper 19 Into Selection.
Copy and paste Snowman 2 as a new layer just below the frame.
Resize 50%/Move into position
Selections/Invert
Tap the delete key.
Deselect.
Delete the template layer.
Highlight Frame Back template layer.
Repeat the above step using Snowman 3 and resizing it 45%
Highlight Frame 1 layer.
Click on it with your Magic Wand.
New Raster layer.
Copy and paste Paper 20 Into Selection.
Deselect.
Delete the template layer.
Highlight Frame 2 layer.
Repeat the above step.
Add your embellishments. I used:
Lamp 1: Resize 70%
NPSign: Resize 40%
TRBow 3: Resize 30%/Free rotate Right 8 degrees
Holly: Resize 25%
Ball 5: Resize 25%
Lights: Resize 75%
Polar Bear 2: Resize 50%
Candy Cane 1: Resize 35%
Candy Cane 2: Resize 35%/Mirror
Highlight your white background.
Select All.
New Raster layer.
Copy and paste Paper 2 Into Selection.
Deselect.
Apply the mask.
Merge Group.
Add your credits.
Add your name.
Choose your colors and have the stroke set to 2.
Convert to Raster layer.
Select All/Float/Defloat
Selections/Modify/Contract by 2
Give it the same slight Inner Bevel:
Apply Greg’s Factory Output Vol. II - Pool Shadow:
Use default settings accept change
Intensity to 142
Lightness to 152
OK
Deselect.
I tried to make animating this as simple and easy for you as possible and it will be as long as you take your time…honest!!
Highlight the lights layer.
Duplicate 3 times for a total of 4 light layers.
Rename them Lights 1, 2, 3, and 4.
Highlight Light 1 layer.
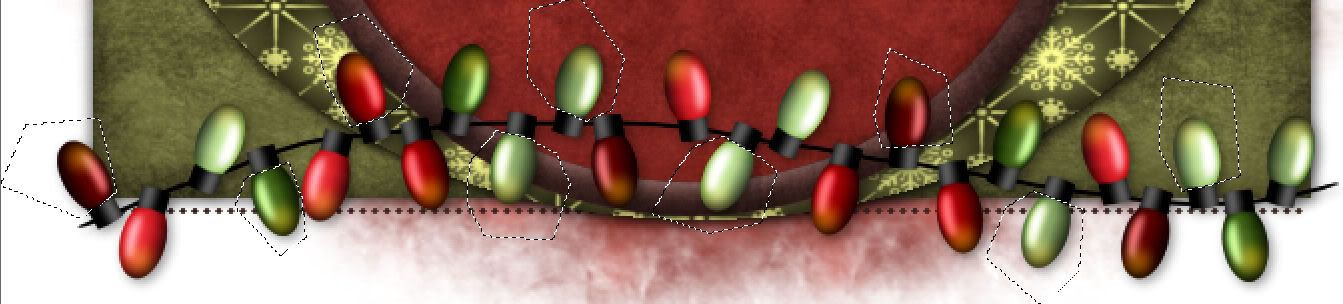
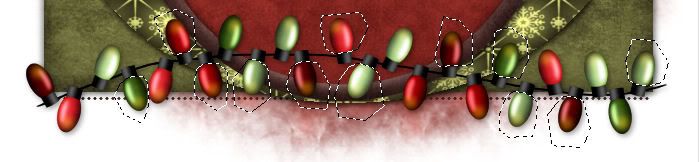
Use your Freehand Selection Tool and outline the following bulbs:
Adjust/Brightness Contrast/Brightness Contrast
Change the numbers to these:
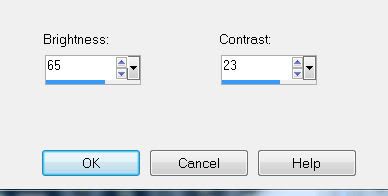
Deselect.
Highlight Light 2 layer.
Using your Freehand Selection Tool outline only the bulbs you DIDN’T outline in Light 1 one.
Repeat the Brightness Contrast effect - same settings.
Deselect.
Highlight Light 3 layer.
Outline the following bulbs and again, repeat the Brightness Contrast effect - same settings and then deselect.
Highlight Light 4 layer.
Repeat the above step outlining these bulbs:

Be sure to close out Light 2, 3, and 4.
Only leave Light 1 layer open.
Copy Merge.
~Time to Animate~
Open up AS
Edit/Paste/As New Animation
Back into PSP.
Close out Light 1 layer.
Open up Light 2 layer.
Copy Merge
Back into AS.
Edit/Paste/After Current Frame.
Back into PSP.
Close out Light 2 layer.
Open up Light 3 layer.
Copy Merge
Back into AS.
Edit/Paste/After Current Frame.
Back in PSP.
Close out Light 3 layer.
Open up Light 4 layer.
Copy Merge.
Back into AS.
Edit/Paste/After Current Frame.
Control + A to highlight all frames.
Animation/Frame Properties
Change the display time to 20
OK
View your Animation.
If you’re happy with it then save.
I hope you enjoyed this tutorial.
I’d love to see your results and show it off in my gallery.
Email me!
Hugs,
Bev
No comments:
Post a Comment