

Clicking on the image will allow you to enlarge for bigger view.
Supplies
1 tube of choice (a laying down one will work best) and 1 close up image - I used the artwork of Keith Garvey at MPT
Font of Choice - I used Aquarelle here
Becky Mask 22 here
DSB Flux - Bright Noise
Xero - Porcelain
This tutorial was created with Lynne of Baby Cakes Scraps portion of the New Beginnings store collaboration kit. This kit is available for FREE with an $8 purchase at the store.
It is available EXCLUSIVELY at Heartbeatz Creationz. You can visit Lynne’s blog here.
This tutorial was written assuming you have a working knowledge of PSP.
~♥~ Let’s get started ~♥~
This tutorial is working from Baby Cakes Scraps tagger folder.
Open up a 700 x 700 blank canvas.
Flood fill white.
Copy and paste Frame 2 as a new layer.
Resize 90%
Use your Magic Wand and click inside the frame - you’ll have to move in for a close up and also click the wand in between some of the leaves as well.
Selections/Modify/Expand by 1.
New Raster layer below the frame.
Copy and paste Paper 3 Into Selection.
Copy and paste your close up image as a new layer below the frame.
Resize as needed.
Selections/Invert
Tap the delete key.
Deselect.
Apply Xerox - Porcelain:
Use Default Settings
Change the Properties to Multiply and lower the Opacity to about 32.
Copy and paste your tube as a new layer.
Position in front of the frame.
Apply the Porcelaine Effect again accept move the Blue Channel Mixer to 0.
Copy and paste Ribbon Tail as a new layer.
Resize 70%
Crop your image being sure to leave a small bit of room at the top and bottom.
Type your name
In your color pallet:
Foreground: #5a1316
Background: #f1c2a9
Stroke: 1
Type your name.
Convert to Raster layer.
Select All/Float/Defloat
Selections/Modify/Contract by 1
OK
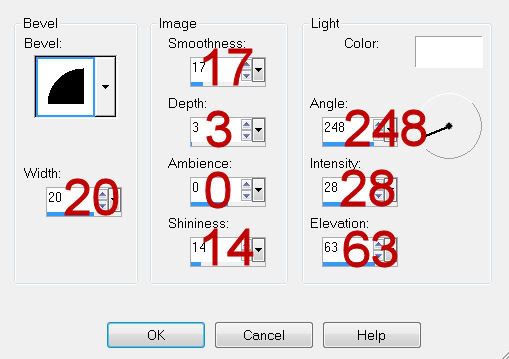
Give it a slight inner bevel 2x:
Apply DSB Flux - Bright Noise:
Intensity: 41
Mix checked.
OK
Deselect
Highlight your white background.
Select All.
Copy and paste Paper 2 Into Selection.
Deselect.
Apply the Mask.
Use your Pick Tool and pull the sides out just a little.
Merge Group
Add your credit.
Resize all layers 80%
I hope you enjoyed this tutorial.
I’d love to see your results and show it off in my gallery.
Email me!
Hugs,
Bev
Supplies
1 tube of choice (a laying down one will work best) and 1 close up image - I used the artwork of Keith Garvey at MPT
Font of Choice - I used Aquarelle here
Becky Mask 22 here
DSB Flux - Bright Noise
Xero - Porcelain
This tutorial was created with Lynne of Baby Cakes Scraps portion of the New Beginnings store collaboration kit. This kit is available for FREE with an $8 purchase at the store.
It is available EXCLUSIVELY at Heartbeatz Creationz. You can visit Lynne’s blog here.
This tutorial was written assuming you have a working knowledge of PSP.
~♥~ Let’s get started ~♥~
This tutorial is working from Baby Cakes Scraps tagger folder.
Open up a 700 x 700 blank canvas.
Flood fill white.
Copy and paste Frame 2 as a new layer.
Resize 90%
Use your Magic Wand and click inside the frame - you’ll have to move in for a close up and also click the wand in between some of the leaves as well.
Selections/Modify/Expand by 1.
New Raster layer below the frame.
Copy and paste Paper 3 Into Selection.
Copy and paste your close up image as a new layer below the frame.
Resize as needed.
Selections/Invert
Tap the delete key.
Deselect.
Apply Xerox - Porcelain:
Use Default Settings
Change the Properties to Multiply and lower the Opacity to about 32.
Copy and paste your tube as a new layer.
Position in front of the frame.
Apply the Porcelaine Effect again accept move the Blue Channel Mixer to 0.
Copy and paste Ribbon Tail as a new layer.
Resize 70%
Crop your image being sure to leave a small bit of room at the top and bottom.
Type your name
In your color pallet:
Foreground: #5a1316
Background: #f1c2a9
Stroke: 1
Type your name.
Convert to Raster layer.
Select All/Float/Defloat
Selections/Modify/Contract by 1
OK
Give it a slight inner bevel 2x:
Apply DSB Flux - Bright Noise:
Intensity: 41
Mix checked.
OK
Deselect
Highlight your white background.
Select All.
Copy and paste Paper 2 Into Selection.
Deselect.
Apply the Mask.
Use your Pick Tool and pull the sides out just a little.
Merge Group
Add your credit.
Resize all layers 80%
I hope you enjoyed this tutorial.
I’d love to see your results and show it off in my gallery.
Email me!
Hugs,
Bev
No comments:
Post a Comment