

Clicking on the image will allow you to enlarge for bigger view.
Supplies
1 tube of choice - I used the artwork of Ismael Rac here.
Font of Choice - I used Billy Argel here
Weescotlass Mask 297 here
Scrapity Scrap and More Template 16 here
Mura’s Meister - Copies
“A Pastel Christmas” is a PTU scrap kit created by Nette of Nette’s NightOwl Works and can be purchased from Stargazer Scraps. You can visit her blog here.
Thank you Nette for such a sweet Christmas kit!
This tutorial was written assuming you have a working knowledge of PSP.
~♥~ Let’s get started ~♥~
Open up the template.
Shift + D.
Close out the original.
Image/Canvas Size
650 x 475
OK
Highlight Raster 1 layer.
Flood fill white.
Delete the top 4 layers.
Highlight Raster 2 layer.
Click on it with your Magic Wand.
New Raster layer.
Copy and paste Paper 2 Into Selection.
Deselect.
Delete the template layer.
Highlight Copy of Vector 3 layer.
Adjust/Add Remove Noise/Add Noise
Uniform and Gaussian checked
Noise: 55%
OK
Repeat the above step with Copy of Vector 1 and Copy of Vector 2 layers.
Highlight Raster 3 layer.
Click on it with your Magic Wand.
Copy and paste Paper 3 as a new layer just above the template layer.
Resize 50%
Move it into position so the print that’s on the top of the page peeks out from the top of the frame - see my tag for reference.
Selection/Invert
Tap the delete key.
Paste the paper again and resize again.
This time move the print that’s at the bottom of the page to barely peek out from the bottom of the frame.
Tap the delete key.
DON’T PANIC….I know you can’t see the print at the top of the frame.
Deselect.
Use your Selection Tool set on Rectangle and section out the top half of the paper.
Tap the delete key.
Deselect.
Merge Down.
Delete the template layer.
Tad-da! You have print at the top and bottom of the rectangle.
Highlight Raster 4 layer.
Click on each strip with your Magic Wand.
New Raster layer.
Open up Paper 7.
Use your Selection Tool set on Rectangle and choose an area of green.
In your color pallet set your Pattern to it.
Scale 100
OK
Flood fill each strip with the pattern.
Deselect.
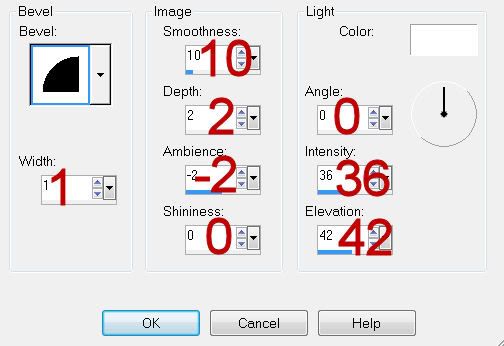
Give it a slight inner bevel:
Deselect.
Delete the template layer.
Highlight Raster 5 layer.
Click on it with your Magic Wand.
New Raster layer.
Copy and paste Paper 1 Into Selection.
Deselect for now.
Copy and paste your tube as a new layer.
Move it into exact position.
Duplicate - Move to the left and below the frame in your layers pallet.
Duplicate and move to the right.
Merge Visible both of these duplicated tube layers.
Highlight Template 5 layer.
Click anywhere outside of it with your Magic Wand.
Highlight the merge tube layer.
Tap the delete key.
Deselect.
Delete the template layer.
Change the Properties to Soft Light.
Duplicate.
Copy and paste Foliage as a new layer.
Resize 40%
Move it into position over the left side of the frame - see my tag for reference.
As you can see, it’s a little too short so duplicate it. Move the duplicate layer lower so that the bottom of the stem is near the bottom of the frame, yet at the same time trying to find a decent area where the original and duplicate and pretty much overlap nicely.
Use your eraser tool to erase the overlapping foliage.
Merge down.
Duplicate/Mirror/Position at the right side of the frame.
Add your embellishments. I used:
Tree 2: Resize 40%
Branch: Resize 25%/Duplicate/Mirror
Candy Cane: Resize 25% and 70%
Blue Orb: Resize 25%
Snowflake: Resize 25%, 25%, and 35% /Apply Mura’s Meister - Copies - Wallpaper (Perspective) - Use default settings.
Highlight your white background.
Select All.
New Raster layer.
Copy and paste Paper 8 Into Selection.
Deselect.
Apply the mask.
Merge Group.
Add your credits.
Add your name.
Give it the same slight inner bevel.
Give it just a touch of Noise.
Resize all layers 90%.
I hope you enjoyed this tutorial.
I’d love to see your results and show it off in my gallery.
Email me!
Hugs,
Bev
Supplies
1 tube of choice - I used the artwork of Ismael Rac here.
Font of Choice - I used Billy Argel here
Weescotlass Mask 297 here
Scrapity Scrap and More Template 16 here
Mura’s Meister - Copies
“A Pastel Christmas” is a PTU scrap kit created by Nette of Nette’s NightOwl Works and can be purchased from Stargazer Scraps. You can visit her blog here.
Thank you Nette for such a sweet Christmas kit!
This tutorial was written assuming you have a working knowledge of PSP.
~♥~ Let’s get started ~♥~
Open up the template.
Shift + D.
Close out the original.
Image/Canvas Size
650 x 475
OK
Highlight Raster 1 layer.
Flood fill white.
Delete the top 4 layers.
Highlight Raster 2 layer.
Click on it with your Magic Wand.
New Raster layer.
Copy and paste Paper 2 Into Selection.
Deselect.
Delete the template layer.
Highlight Copy of Vector 3 layer.
Adjust/Add Remove Noise/Add Noise
Uniform and Gaussian checked
Noise: 55%
OK
Repeat the above step with Copy of Vector 1 and Copy of Vector 2 layers.
Highlight Raster 3 layer.
Click on it with your Magic Wand.
Copy and paste Paper 3 as a new layer just above the template layer.
Resize 50%
Move it into position so the print that’s on the top of the page peeks out from the top of the frame - see my tag for reference.
Selection/Invert
Tap the delete key.
Paste the paper again and resize again.
This time move the print that’s at the bottom of the page to barely peek out from the bottom of the frame.
Tap the delete key.
DON’T PANIC….I know you can’t see the print at the top of the frame.
Deselect.
Use your Selection Tool set on Rectangle and section out the top half of the paper.
Tap the delete key.
Deselect.
Merge Down.
Delete the template layer.
Tad-da! You have print at the top and bottom of the rectangle.
Highlight Raster 4 layer.
Click on each strip with your Magic Wand.
New Raster layer.
Open up Paper 7.
Use your Selection Tool set on Rectangle and choose an area of green.
In your color pallet set your Pattern to it.
Scale 100
OK
Flood fill each strip with the pattern.
Deselect.
Give it a slight inner bevel:
Deselect.
Delete the template layer.
Highlight Raster 5 layer.
Click on it with your Magic Wand.
New Raster layer.
Copy and paste Paper 1 Into Selection.
Deselect for now.
Copy and paste your tube as a new layer.
Move it into exact position.
Duplicate - Move to the left and below the frame in your layers pallet.
Duplicate and move to the right.
Merge Visible both of these duplicated tube layers.
Highlight Template 5 layer.
Click anywhere outside of it with your Magic Wand.
Highlight the merge tube layer.
Tap the delete key.
Deselect.
Delete the template layer.
Change the Properties to Soft Light.
Duplicate.
Copy and paste Foliage as a new layer.
Resize 40%
Move it into position over the left side of the frame - see my tag for reference.
As you can see, it’s a little too short so duplicate it. Move the duplicate layer lower so that the bottom of the stem is near the bottom of the frame, yet at the same time trying to find a decent area where the original and duplicate and pretty much overlap nicely.
Use your eraser tool to erase the overlapping foliage.
Merge down.
Duplicate/Mirror/Position at the right side of the frame.
Add your embellishments. I used:
Tree 2: Resize 40%
Branch: Resize 25%/Duplicate/Mirror
Candy Cane: Resize 25% and 70%
Blue Orb: Resize 25%
Snowflake: Resize 25%, 25%, and 35% /Apply Mura’s Meister - Copies - Wallpaper (Perspective) - Use default settings.
Highlight your white background.
Select All.
New Raster layer.
Copy and paste Paper 8 Into Selection.
Deselect.
Apply the mask.
Merge Group.
Add your credits.
Add your name.
Give it the same slight inner bevel.
Give it just a touch of Noise.
Resize all layers 90%.
I hope you enjoyed this tutorial.
I’d love to see your results and show it off in my gallery.
Email me!
Hugs,
Bev
No comments:
Post a Comment