

Clicking on the image will allow you to enlarge for bigger view.
Supplies
2 tubes of choice - I used the artwork of Zindy S. D. Nielsen here
Font of Choice - I used Clive Barker here
Font Ding KR Christmas 2001 here
Weescotlass Mask 4 and 220 here
Xerox - Porcelain
Xenofex 2: Burnt Edges
This tutorial was created with Tammy Bunchies Sampler portion of the Stargazing collaboration kit. This kit is available for FREE with an $8 purchase at the store, or it may be purchased outright for the same price.
It is available EXCLUSIVELY at Stargazer Scraps. You can visit her blog here.
This tutorial was written assuming you have a working knowledge of PSP.
~♥~ Let’s get started ~♥~
Open up a 700 x 700 blank canvas.
Flood fill white.
Copy and paste Tag 5 as a new layer.
Resize 35%
Use your Freehand Selection Tool and outline the inner circle just inside the metal ring.
Copy and paste your tube as a new layer above the tag.
Resize as needed
Selection/Invert
Tap the delete key.
Selection/Modify/Inside Outside Feather:
Both checked
Feather Amount: 43
OK
Tap your delete key until you have the feathered look you want.
Deselect.
Apply Xerox - Porcelain
Default settings.
Merge visible the tag and tube layers.
Copy and paste Tag 5 again.
Repeat the above step using a different tube.
Arrange both merged tag layers on your canvas.
See my tag for reference.
In your color pallet:
Foreground: #000000
Background: Gradient/Metal Steel
Angle 32:
Repeat: 0
Invert checked
Linear Style
Stroke: 2
Make your Text Tool active.
Type out the letter “I” - or if you find a different letter ding you like better use it!
You’ll have to toy around with the size until you get the tree as large or small as you like.
Convert to Raster layer.
Select All/Float/Defloat
Selections/Modify/Contract by 2
OK
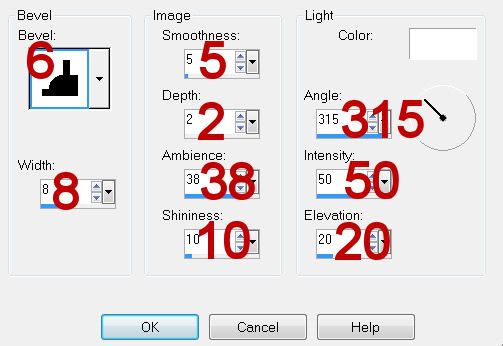
Give it a slight inner bevel:
Deselect
Move the tree into exact position.
Type out your name.
Convert to Raster layer.
Select All/Float/Defloat
Selections/Modify/Contract by 2
OK
Give it the same inner bevel.
Deselect
Highlight your white background.
Select All.
Copy and paste bg4 Into Selection.
Deselect.
Apply Weescotlass Mask 220
Merge Group
Edit Copy.
Open up a new blank 700 x 700 canvas.
Flood fill white.
Edit/Paste
Resize 70%
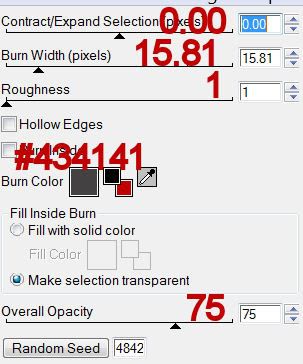
Apply Xenofex: Burnt Edges:
Duplicate
Free rotate Right 5 degrees.
Move below the original layer.
Copy and paste Frame 2 as a new layer.
Resize 30%.
Free rotate Left 90 degrees.
Move into position - see my tag for reference.
Highlight your white background.
New Raster Layer.
Select All.
Copy and paste bg6 Into Selection.
Deselect.
Apply Weescotlass Mask 4.
Merge Group.
Add your credit.
Resize all layers 80%
I hope you enjoyed this tutorial.
I’d love to see your results and show it off in my gallery.
Email me!
Hugs,
Bev
Supplies
2 tubes of choice - I used the artwork of Zindy S. D. Nielsen here
Font of Choice - I used Clive Barker here
Font Ding KR Christmas 2001 here
Weescotlass Mask 4 and 220 here
Xerox - Porcelain
Xenofex 2: Burnt Edges
This tutorial was created with Tammy Bunchies Sampler portion of the Stargazing collaboration kit. This kit is available for FREE with an $8 purchase at the store, or it may be purchased outright for the same price.
It is available EXCLUSIVELY at Stargazer Scraps. You can visit her blog here.
This tutorial was written assuming you have a working knowledge of PSP.
~♥~ Let’s get started ~♥~
Open up a 700 x 700 blank canvas.
Flood fill white.
Copy and paste Tag 5 as a new layer.
Resize 35%
Use your Freehand Selection Tool and outline the inner circle just inside the metal ring.
Copy and paste your tube as a new layer above the tag.
Resize as needed
Selection/Invert
Tap the delete key.
Selection/Modify/Inside Outside Feather:
Both checked
Feather Amount: 43
OK
Tap your delete key until you have the feathered look you want.
Deselect.
Apply Xerox - Porcelain
Default settings.
Merge visible the tag and tube layers.
Copy and paste Tag 5 again.
Repeat the above step using a different tube.
Arrange both merged tag layers on your canvas.
See my tag for reference.
In your color pallet:
Foreground: #000000
Background: Gradient/Metal Steel
Angle 32:
Repeat: 0
Invert checked
Linear Style
Stroke: 2
Make your Text Tool active.
Type out the letter “I” - or if you find a different letter ding you like better use it!
You’ll have to toy around with the size until you get the tree as large or small as you like.
Convert to Raster layer.
Select All/Float/Defloat
Selections/Modify/Contract by 2
OK
Give it a slight inner bevel:
Deselect
Move the tree into exact position.
Type out your name.
Convert to Raster layer.
Select All/Float/Defloat
Selections/Modify/Contract by 2
OK
Give it the same inner bevel.
Deselect
Highlight your white background.
Select All.
Copy and paste bg4 Into Selection.
Deselect.
Apply Weescotlass Mask 220
Merge Group
Edit Copy.
Open up a new blank 700 x 700 canvas.
Flood fill white.
Edit/Paste
Resize 70%
Apply Xenofex: Burnt Edges:
Duplicate
Free rotate Right 5 degrees.
Move below the original layer.
Copy and paste Frame 2 as a new layer.
Resize 30%.
Free rotate Left 90 degrees.
Move into position - see my tag for reference.
Highlight your white background.
New Raster Layer.
Select All.
Copy and paste bg6 Into Selection.
Deselect.
Apply Weescotlass Mask 4.
Merge Group.
Add your credit.
Resize all layers 80%
I hope you enjoyed this tutorial.
I’d love to see your results and show it off in my gallery.
Email me!
Hugs,
Bev
No comments:
Post a Comment