

Clicking on the image will allow you to enlarge for bigger view.
Supplies
1 tube of choice - I used the artwork of Rachael Anderson that can be purchased at CDO
Font of Choice - I used Cliver Barker here and Promocyja here
Gem Mask 21 here
Monti Circular Mask here
“La vie en mauve” is a PTU tagger size scrap kit created by Sky Scraps Designs and can be purchased from Stargazer Scraps. You can visit Sky’s blog here.
Thank you Sky for an amazing kit. You create such beautiful things.
This tutorial was written assuming you have a working knowledge of PSP.
~♥~ Let’s get started ~♥~
Open up a 700 x 700 blank canvas.
Flood fill white.
Copy and paste Frame F8 as a new layer.
Resize 85%
Click inside of it with your Magic Wand.
Selections/Modify/Expand by 6.
New Raster layer below the frame.
Copy and paste Paper PP2 Into Selection.
Copy and paste your tube as a new layer just below the frame.
Selections/Invert
Tap the delete key.
Copy and paste E13 as a new layer below the frame.
Resize 75%
Move into position.
Tap the delete key.
Deselect.
Copy and paste E63 as a new layer.
Resize 80%
Move into position - see my tag for reference.
Apply Monti Circular Mask.
Merge Group.
Copy and paste E55 as a new layer.
Resize 80%
Mirror
Move it into position in front of the frame.
Duplicate and move behind the frame.
Highlight the element in front of the frame.
Using your Eraser Tool erase the area that’s showing in front of the frame accept zoom in and be careful around the bow - you don’t want to erase any of that!
Add your embellishments. I used:
E35
E 16: Resize 40%/Duplicate/Mirror/Resize 70%
E 34: Resize 50%
E 22
Highlight your white background.
New Raster layer.
Copy and paste PP 1 Into Selection.
Deselect.
Apply the mask.
Merge Group.
Color pallet:
Foreground: Black
Background: doesn’t matter right now.
Stroke set to 3.
Make your Pen Tool active, set to Draw Freehand.
Make a wavy line across your canvas.
Color pallet:
Foreground: Null
Background: Black
Make your Text tool active using Promocyja font.
Be sure the alignment is set to center.
(Understand that the typing will be very light on the canvas and that’s ok. We’ll darken it up in a bit)
Move your curser along the center of the line until you see a Rocking A.
Click the mouse.
A text box should open.
Type out the words “ A rustle in the wind reminds us a fairy is near.” The typing will be very light on the canvas and that’s ok. We’ll darken it up in a bit.
Click Apply
In your layers pallet click on the plus sign.
Close out the eye on the New Path layer.
Highlight Vector 1 layer.
Convert to Raster layer.
Duplicate/Merge Down
Duplicate/Merge Down
Duplicate/Merge Down.
Add your credits.
Add your name.
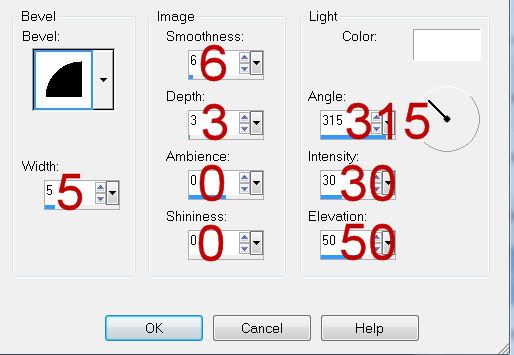
Give it a slight Inner Bevel:
I hope you enjoyed this tutorial.
I’d love to see your results and show it off in my gallery.
Email me!
Hugs,
Bev
Supplies
1 tube of choice - I used the artwork of Rachael Anderson that can be purchased at CDO
Font of Choice - I used Cliver Barker here and Promocyja here
Gem Mask 21 here
Monti Circular Mask here
“La vie en mauve” is a PTU tagger size scrap kit created by Sky Scraps Designs and can be purchased from Stargazer Scraps. You can visit Sky’s blog here.
Thank you Sky for an amazing kit. You create such beautiful things.
This tutorial was written assuming you have a working knowledge of PSP.
~♥~ Let’s get started ~♥~
Open up a 700 x 700 blank canvas.
Flood fill white.
Copy and paste Frame F8 as a new layer.
Resize 85%
Click inside of it with your Magic Wand.
Selections/Modify/Expand by 6.
New Raster layer below the frame.
Copy and paste Paper PP2 Into Selection.
Copy and paste your tube as a new layer just below the frame.
Selections/Invert
Tap the delete key.
Copy and paste E13 as a new layer below the frame.
Resize 75%
Move into position.
Tap the delete key.
Deselect.
Copy and paste E63 as a new layer.
Resize 80%
Move into position - see my tag for reference.
Apply Monti Circular Mask.
Merge Group.
Copy and paste E55 as a new layer.
Resize 80%
Mirror
Move it into position in front of the frame.
Duplicate and move behind the frame.
Highlight the element in front of the frame.
Using your Eraser Tool erase the area that’s showing in front of the frame accept zoom in and be careful around the bow - you don’t want to erase any of that!
Add your embellishments. I used:
E35
E 16: Resize 40%/Duplicate/Mirror/Resize 70%
E 34: Resize 50%
E 22
Highlight your white background.
New Raster layer.
Copy and paste PP 1 Into Selection.
Deselect.
Apply the mask.
Merge Group.
Color pallet:
Foreground: Black
Background: doesn’t matter right now.
Stroke set to 3.
Make your Pen Tool active, set to Draw Freehand.
Make a wavy line across your canvas.
Color pallet:
Foreground: Null
Background: Black
Make your Text tool active using Promocyja font.
Be sure the alignment is set to center.
(Understand that the typing will be very light on the canvas and that’s ok. We’ll darken it up in a bit)
Move your curser along the center of the line until you see a Rocking A.
Click the mouse.
A text box should open.
Type out the words “ A rustle in the wind reminds us a fairy is near.” The typing will be very light on the canvas and that’s ok. We’ll darken it up in a bit.
Click Apply
In your layers pallet click on the plus sign.
Close out the eye on the New Path layer.
Highlight Vector 1 layer.
Convert to Raster layer.
Duplicate/Merge Down
Duplicate/Merge Down
Duplicate/Merge Down.
Add your credits.
Add your name.
Give it a slight Inner Bevel:
I hope you enjoyed this tutorial.
I’d love to see your results and show it off in my gallery.
Email me!
Hugs,
Bev
No comments:
Post a Comment