

Clicking on the image will allow you to enlarge for bigger view.
Supplies
Font of Choice - I used ReklameScript Demo here. Just add the free one to your cart and check out.
Weescotlass mask 39 here
Divine Intentions Template 250 here
Eyecandy 3.1 - Glow
“Easter Greetings” is a PTU tagger size scrap kit created by Kesha of KnC Scrapz and can be purchased from her store Lollipops n Gumdrops. You can visit her blog here.
Thank you Kesha for such a beautiful Easter kit!!
This tutorial was written assuming you have a working knowledge of PSP.
~♥~ Let’s get started ~♥~
Open up the template.
Shift + D.
Close out the original.
Delete By Missy layer.
Image/Canvas Size
650 x 550
OK
Flood fill the background layer white.
Highlight Oval Shape Layer.
Click on it with your Magic Wand.
New Raster layer.
Copy and paste PP9 Into Selection.
Deselect.
Delete the template layer.
Apply Eyecandy 3.1 - Glow:
Width: 3
Opacity: 100
Opacity Dropoff: Fat
Color: white
Highlight Circle 1 layer.
Click on it with your Magic Wand.
New Raster layer.
Copy and paste PP2 Into Selection.
Deselect.
Delete the template layer.
Repeat the above step with Circle 2 layer.
Highlight Rectangle layer.
Click on it with your Magic Wand.
New Raster layer.
Copy and paste PP 2 Into Selection.
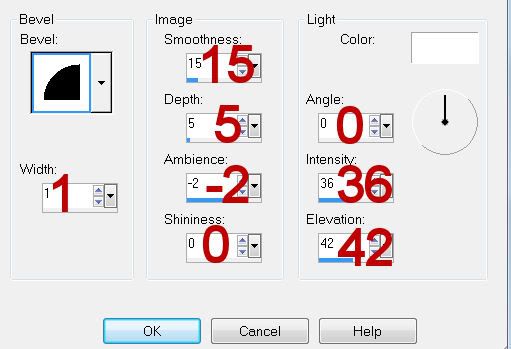
Give it a slight Inner Bevel:
Deselect.
Delete the template layer.
Highlight Copy of Line 1 layer.
Merge Down.
Select All/Float/Defloat
New Raster layer.
Flood fill with #654526
Deselect.
Delete the template layer.
Highlight Frame Background layer.
Click on it with your Magic Wand.
New Raster layer.
Copy and paste PP3 Into Selection.
Copy and paste Tree as a new layer above the paper.
Resize 60%
Move into position.
Selections/Invert
Tap the delete key.
Deselect.
Delete the template layer.
Highlight Frame layer.
Click on it with your Magic Wand.
New Raster layer.
Copy and paste PP5 Into Selection.
Deselect.
Delete the template layer.
Add your embellishments. I used:
Bow 2: Resize 25% and 70%/Duplicate/Mirror
Flower Branch: Resize 50%
Birds: Resize 25%/Mirror - erase the bird leg that sticks out
Rabbit Egg: Resize 30%
Stuffed Rabbit: Resize 30%/Mirror
Flower 4: Resize 25% and 70%. Each time you duplicate/resize 70%
Flower 4 again (to be placed at the outer edges of the oval): Resize 25% and 80%/Duplicate/Resize 70%
Leaves: Resize 40%/Free rotate Right 35 degrees
Floating Flowers: Resize 40%/Mirror/Duplicate/Lower the Opacity to about 46
Butterfly: Resize 25% and 70%/Free rotate Left 20/Duplicate/Mirror
Chick: Resize 25% and 30%/Duplicate/Mirror
Highlight your white background layer.
New Raster layer.
Select All.
Copy and paste Paper 6 Into Selection.
Deselect.
Apply the mask.
Resize 115%
Merge Group.
Duplicate
Add your copyrights.
Add your name.
Resize all layers 80%.
I hope you enjoyed this tutorial.
I’d love to see your results and show it off in my gallery.
Email me!
Hugs,
Bev
Supplies
Font of Choice - I used ReklameScript Demo here. Just add the free one to your cart and check out.
Weescotlass mask 39 here
Divine Intentions Template 250 here
Eyecandy 3.1 - Glow
“Easter Greetings” is a PTU tagger size scrap kit created by Kesha of KnC Scrapz and can be purchased from her store Lollipops n Gumdrops. You can visit her blog here.
Thank you Kesha for such a beautiful Easter kit!!
This tutorial was written assuming you have a working knowledge of PSP.
~♥~ Let’s get started ~♥~
Open up the template.
Shift + D.
Close out the original.
Delete By Missy layer.
Image/Canvas Size
650 x 550
OK
Flood fill the background layer white.
Highlight Oval Shape Layer.
Click on it with your Magic Wand.
New Raster layer.
Copy and paste PP9 Into Selection.
Deselect.
Delete the template layer.
Apply Eyecandy 3.1 - Glow:
Width: 3
Opacity: 100
Opacity Dropoff: Fat
Color: white
Highlight Circle 1 layer.
Click on it with your Magic Wand.
New Raster layer.
Copy and paste PP2 Into Selection.
Deselect.
Delete the template layer.
Repeat the above step with Circle 2 layer.
Highlight Rectangle layer.
Click on it with your Magic Wand.
New Raster layer.
Copy and paste PP 2 Into Selection.
Give it a slight Inner Bevel:
Deselect.
Delete the template layer.
Highlight Copy of Line 1 layer.
Merge Down.
Select All/Float/Defloat
New Raster layer.
Flood fill with #654526
Deselect.
Delete the template layer.
Highlight Frame Background layer.
Click on it with your Magic Wand.
New Raster layer.
Copy and paste PP3 Into Selection.
Copy and paste Tree as a new layer above the paper.
Resize 60%
Move into position.
Selections/Invert
Tap the delete key.
Deselect.
Delete the template layer.
Highlight Frame layer.
Click on it with your Magic Wand.
New Raster layer.
Copy and paste PP5 Into Selection.
Deselect.
Delete the template layer.
Add your embellishments. I used:
Bow 2: Resize 25% and 70%/Duplicate/Mirror
Flower Branch: Resize 50%
Birds: Resize 25%/Mirror - erase the bird leg that sticks out
Rabbit Egg: Resize 30%
Stuffed Rabbit: Resize 30%/Mirror
Flower 4: Resize 25% and 70%. Each time you duplicate/resize 70%
Flower 4 again (to be placed at the outer edges of the oval): Resize 25% and 80%/Duplicate/Resize 70%
Leaves: Resize 40%/Free rotate Right 35 degrees
Floating Flowers: Resize 40%/Mirror/Duplicate/Lower the Opacity to about 46
Butterfly: Resize 25% and 70%/Free rotate Left 20/Duplicate/Mirror
Chick: Resize 25% and 30%/Duplicate/Mirror
Highlight your white background layer.
New Raster layer.
Select All.
Copy and paste Paper 6 Into Selection.
Deselect.
Apply the mask.
Resize 115%
Merge Group.
Duplicate
Add your copyrights.
Add your name.
Resize all layers 80%.
I hope you enjoyed this tutorial.
I’d love to see your results and show it off in my gallery.
Email me!
Hugs,
Bev
No comments:
Post a Comment