

Clicking on the image will allow you to enlarge for bigger view.
Supplies
1 tube of choice and 1 image - I used the artwork of Joan Palaez and can be purchased from CDO.
Font of Choice - I used Dragonfly here
Gem 204 mask here
“Seasons” is a massive collaboration put together by many many designers in the scrapping and tagging community to help with the devastation in New Zealand caused by the tragic earthquake. This collaboration is FTU after a donation of $10 USD to the Salavation Army of NZ is made. Please visit Taggers Together for New Zealand to read more on how these talented designers are helping with this cause and to make your donation. This portion of the collaboration was created by Shellez Creations. Please visit her blog here.
This tutorial was written assuming you have a working knowledge of PSP.
~♥~ Let’s get started ~♥~
Open up a 700 x 700 blank canvas.
Flood fill white.
Copy and paste Element 24 as a new layer.
Resize 50%
Click inside of each frame with your Magic Wand.
Selections/Modify/Expand by 4.
New Raster layer below the frame.
Copy and paste Paper 6 Into Selection.
Deselect.
Copy and paste your image below the frame layer.
Highlight the frame layer.
Click inside the left square with your Magic Wand.
Selections/Modify/Expand by 4.
Position your image below the frame.
Selections/Invert
Tap the delete key.
Selections/Modify/Inside Outside Feather
Both checked
Feather amount: 23
Highlight the image layer.
Tap the delete key until you have a nice feathered effect.
Deselect.
Repeat the above step with the remaining 2 squares.
Copy and paste Element 13 as a new layer in front of the frame.
Move into position at the left side of the frame - see my tag for reference.
Once you have it in exact position/Duplicate/move just above your white canvas in your layers pallet.
Highlight the umbrella that’s at the top of your canvas.
Lower the Opacity and use your Freehand Selection tool to section out the part of the umbrella you don’t want so that you have the effect the umbrella is leaning on the frame.
Tap the delete key.
Deselect.
Copy and paste your tube as a new layer.
Position to the right of your canvas.
Add your embellishments. I used:
32: Resize 70%
15: Resize 60%
5: Resize 40%/Mirror
6, 7, 8, and 9: Resize 40%
Crop your image.
Highlight your white canvas.
New Raster layer.
Select All.
Copy and paste Paper 2 Into Selection.
Deselect.
Apply the mask.
Merge Group.
Add your copyrights.
Add your name.
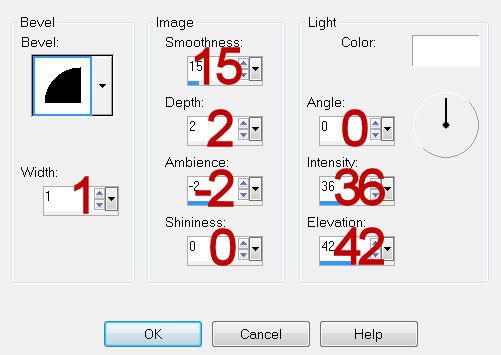
Give it a small Inner Bevel:
Resize all layers 80%.
I hope you enjoyed this tutorial.
I’d love to see your results and show it off in my gallery.
Email me!
Hugs,
Bev
No comments:
Post a Comment