

Clicking on the image will allow you to enlarge for bigger view.
Supplies
1 tube of choice - I used the beautiful artwork of Robin McQuay which can be purchased from Up Your Art. You must obtain a license to use.
Font of Choice - I used Clive Barker here
Becky Mask 22 here
Scrap Rebellion Template 39 here
Greg’s Factory Output Vol. II - Pool Shadow
“Delusional” is a tagger size scrap kit created by Jessica of Gothic Inspirations and can be purchased from her store Gothic Inspirations. You can visit her blog here. Thank you Jessica for another spectacular gothic kit!
This tutorial was written assuming you have a working knowledge of PSP.
~♥~ Let’s get started ~♥~
Open up the template.
Shift + D.
Close out the original.
Delete the top 5 layers and tag back layer.
Highlight and open up the background layer.
Open up Bow element.
Use your Selection Tool set on rectangle and section out a portion in the left side of the bow.
Set your foreground to Patten - look for the bow.
Set the scale to about 160 - or whatever you like.
Highlight L Glitter Square layer.
Select All/Float/Defloat.
New Raster layer.
Flood fill with the pattern.
Adjust/Add Remove Noise/Add Noise:
Uniform checked
Noise: 75%
OK
Deselect
Delete the template layer.
Repeat the above step with:
Glitter Circle layer and R Glitter Square layer
Highlight White Circle layer.
Click on it with your Magic Wand.
New Raster layer,
Flood fill with the same pattern.
Deselect.
Delete the template layer.
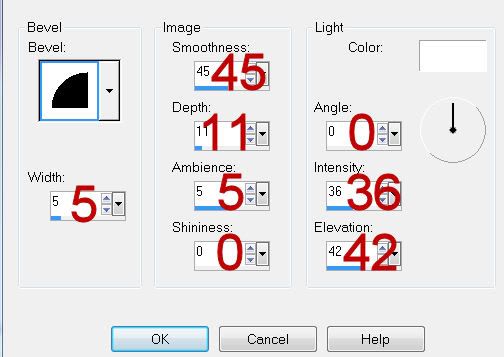
Give it a slight Inner Bevel:
Highlight R Square layer.
Click on it with your Magic Wand.
New Raster layer.
Copy and paste Paper 24 Into Selection.
Deselect.
Delete the template layer.
Highlight L Square layer.
Repeat the above step.
Be sure you’ve deselected.
Copy and paste Barbwire as a new layer.
Resize 60%/Free rotate Left 100 degrees.
Move into position over the paper.
Highlight the paper layer.
Click anywhere outside of it with your Magic Wand.
Highlight the element layer.
Tap the delete key.
Deselect.
Highlight Big Circle layer.
Select All/Float/Defloat
New Raster layer.
Copy and paste Paper 5 Into Selection.
Copy and paste your tube as a new layer over the circle.
Move into position.
Duplicate and move to the right a little.
Move the duplicate layer below the original.
Lower the Opacity to about 12
Selections/Invert
Highlight each tube layer and tap the delete key.
Deselect.
Delete the template layer.
Highlight Purple Circle layer.
Click on it with your Magic Wand.
New Raster layer.
Copy and paste Brad 2 Into Selection.
Deselect.
Delete the template layer.
Copy and paste Looking Globe as a new layer.
Click anywhere outside of it with your Magic Wand.
Copy and paste your tube as a new layer - position it over the glass part of the globe.
Tap the delete key.
Deselect.
Change the Properties to Soft Light
Use your Freehand Selection tool and section off the part of the tube that overlaps the base of the Looking Globe.
Tap the delete key.
Duplicate
Merge Visible the Looking Globe and both tube layers.
Resize 50%
Give it a drop shadow on it’s own layer.
At the top of the layers pallet click on Layer Link Toggle until it says None.
Move the drop shadow to the right a little to give a thrown shadow effect.
Reopen all layers.
Add your embellishments. I used:
Pinned Flower: Resize 50%/Free Rotate Left 100 degrees
Ribbon with Charm: Resize 40%
Ribbon: Resize 25%/Free rotate Right 10 degrees
Leaves: Resize 85%
Beads: Resize 40%
Candle: Resize 70%
Highlight your white background.
New Raster layer.
Select All.
Copy and paste Paper 7 Into Selection.
Deselect.
Apply the mask.
Merge Group.
Duplicate
Copy and paste Mesh as a new layer.
Resize 80%
Apply the mask.
Merge Group.
Duplicate.
Add your copyrights.
Add your name.
Apply Greg’s Factory Output Vol. II - Pool Shadow:
Default Settings.
Resize all layers 80%.
I hope you enjoyed this tutorial.
I’d love to see your results and show it off in my gallery.
Email me!
Hugs,
Bev
Supplies
1 tube of choice - I used the beautiful artwork of Robin McQuay which can be purchased from Up Your Art. You must obtain a license to use.
Font of Choice - I used Clive Barker here
Becky Mask 22 here
Scrap Rebellion Template 39 here
Greg’s Factory Output Vol. II - Pool Shadow
“Delusional” is a tagger size scrap kit created by Jessica of Gothic Inspirations and can be purchased from her store Gothic Inspirations. You can visit her blog here. Thank you Jessica for another spectacular gothic kit!
This tutorial was written assuming you have a working knowledge of PSP.
~♥~ Let’s get started ~♥~
Open up the template.
Shift + D.
Close out the original.
Delete the top 5 layers and tag back layer.
Highlight and open up the background layer.
Open up Bow element.
Use your Selection Tool set on rectangle and section out a portion in the left side of the bow.
Set your foreground to Patten - look for the bow.
Set the scale to about 160 - or whatever you like.
Highlight L Glitter Square layer.
Select All/Float/Defloat.
New Raster layer.
Flood fill with the pattern.
Adjust/Add Remove Noise/Add Noise:
Uniform checked
Noise: 75%
OK
Deselect
Delete the template layer.
Repeat the above step with:
Glitter Circle layer and R Glitter Square layer
Highlight White Circle layer.
Click on it with your Magic Wand.
New Raster layer,
Flood fill with the same pattern.
Deselect.
Delete the template layer.
Give it a slight Inner Bevel:
Highlight R Square layer.
Click on it with your Magic Wand.
New Raster layer.
Copy and paste Paper 24 Into Selection.
Deselect.
Delete the template layer.
Highlight L Square layer.
Repeat the above step.
Be sure you’ve deselected.
Copy and paste Barbwire as a new layer.
Resize 60%/Free rotate Left 100 degrees.
Move into position over the paper.
Highlight the paper layer.
Click anywhere outside of it with your Magic Wand.
Highlight the element layer.
Tap the delete key.
Deselect.
Highlight Big Circle layer.
Select All/Float/Defloat
New Raster layer.
Copy and paste Paper 5 Into Selection.
Copy and paste your tube as a new layer over the circle.
Move into position.
Duplicate and move to the right a little.
Move the duplicate layer below the original.
Lower the Opacity to about 12
Selections/Invert
Highlight each tube layer and tap the delete key.
Deselect.
Delete the template layer.
Highlight Purple Circle layer.
Click on it with your Magic Wand.
New Raster layer.
Copy and paste Brad 2 Into Selection.
Deselect.
Delete the template layer.
Copy and paste Looking Globe as a new layer.
Click anywhere outside of it with your Magic Wand.
Copy and paste your tube as a new layer - position it over the glass part of the globe.
Tap the delete key.
Deselect.
Change the Properties to Soft Light
Use your Freehand Selection tool and section off the part of the tube that overlaps the base of the Looking Globe.
Tap the delete key.
Duplicate
Merge Visible the Looking Globe and both tube layers.
Resize 50%
Give it a drop shadow on it’s own layer.
At the top of the layers pallet click on Layer Link Toggle until it says None.
Move the drop shadow to the right a little to give a thrown shadow effect.
Reopen all layers.
Add your embellishments. I used:
Pinned Flower: Resize 50%/Free Rotate Left 100 degrees
Ribbon with Charm: Resize 40%
Ribbon: Resize 25%/Free rotate Right 10 degrees
Leaves: Resize 85%
Beads: Resize 40%
Candle: Resize 70%
Highlight your white background.
New Raster layer.
Select All.
Copy and paste Paper 7 Into Selection.
Deselect.
Apply the mask.
Merge Group.
Duplicate
Copy and paste Mesh as a new layer.
Resize 80%
Apply the mask.
Merge Group.
Duplicate.
Add your copyrights.
Add your name.
Apply Greg’s Factory Output Vol. II - Pool Shadow:
Default Settings.
Resize all layers 80%.
I hope you enjoyed this tutorial.
I’d love to see your results and show it off in my gallery.
Email me!
Hugs,
Bev
No comments:
Post a Comment