Clicking on the image will allow you to enlarge for bigger view.
Supplies
1 tube of choice - I used the artwork of Anna Marine which can now be purchased at CDO. Please do not use unless you have a license to do so.
Font of Choice - I used Promocyja here
Weescotlass Mask 297 here
Mura’s Meister - Copies
My Supplies which contains word art made by me - here
“Seasons” is a massive collaboration put together by many many designers in the scrapping and tagging community to help with the devastation in New Zealand caused by the tragic earthquake. This collaboration is FTU after a donation of $10 USD to the Salavation Army of NZ is made. Please visit Taggers Together for New Zealand to read more on how these talented designers are helping with this cause and to make your donation. This portion of the collaboration was created by Laura‘s Designz. Please visit her blog here.
This tutorial was written assuming you have a working knowledge of PSP.
~♥~ Let’s get started ~♥~
Open up a 700 x 700 blank canvas.
Flood fill white.
Color Pallet:
Foreground: #ba430d
Background: #d5763e
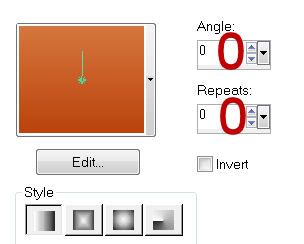
Set the gradient to match mine:

Copy and paste Element 28 as a new layer.
Click inside of it with your Magic Wand.
New Raster layer below the frame.
Selections/Modify/Expand by 4
Flood fill with the gradient.
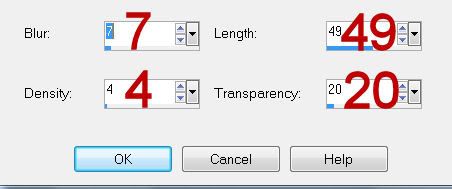
Effects/Text Effects/Fur:
Match your settings to mine

Deselect.
Highlight the bottom right frame.
Click inside of it with your Magic Wand.
Selections/Modify/Expand by 4
New Raster layer below the frame.
Apply Mura’s Mesiter - Copies:
Same settings
Copy and paste Lilly Candle 2 as a new layer below the frame.
Resize 40%
Move into position.
Selections/Invert
Tap the delete key.
Deselect.
Copy and paste you tube as a new layer above the frame.
Move into position at the left side - see my tag for reference.
Duplicate and move to the right.
In your layer’s pallet move the duplicate below the frame.
Don’t worry about what’s overhanging the frame…we’ll take care of that in a bit.
Copy and paste Element 10 as a new layer.
Resize 25%
Mura’s Meister - Copies:
Wallpaper (perspective):
Use default settings.
OK
Move the leaves below the your tube and into a position you like.
Highlight the gradient layer.
Click anywhere outside of it with your Magic Wand.
Highlight the duplicated tube layer and tap the layer.
Change the Properties to Luminance (Legacy)
Highlight the leaves layer.
Tap the delete key.
Change the Properties to Soft Light.
Deselect.
Add your embellishments. I used:
Element 6: Resize 70%/Mirror
Element 1: Resize 70%
Element 8: Resize 70%
Element 7: Resize 50%/Mirror
Highlight your white background.
New Raster layer.
Copy and paste Element 10 as a new layer.
Apply Mura’s Meister - Copies:
Wallpaper:
Use Default settings accept change Number to 56
OK
Apply the mask.
Merge Group.
Open up my word art that I supplied.
Copy and Paste as a new layer.
Move into position - see my tag for reference.
Add your copyrights.
Color Pallet:
Foreground: #c14428
Background: #d2ac2a
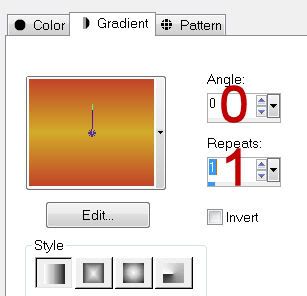
Change the gradient settings to match mine:

Type your name.
On your working canvas right click - choose Properties
Click on the color box below the word Stroke
When the Materials Pallet opens change the color to #1b180f
OK
Highlight the numbers in the Stroke Width box:
Change the numbers to 1.00
Click OK
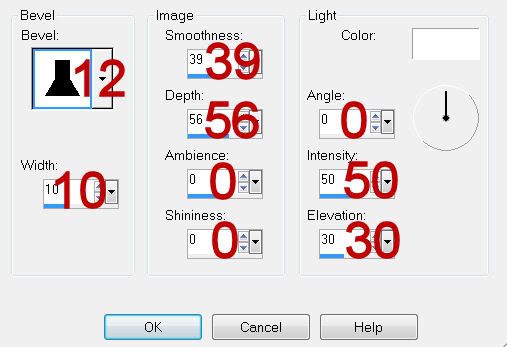
Give it a slight Inner Bevel:

Resize all layers 80%.
I hope you enjoyed this tutorial.
I’d love to see your results and show it off in my gallery.
Email me!
Hugs,
Bev

No comments:
Post a Comment