

Clicking on the image will allow you to enlarge for bigger view.
Supplies
Font of Choice - I used Aquarelle here
Monti Circular mask here
“Seasons” is a massive collaboration put together by many many designers in the scrapping and tagging community to help with the devastation in New Zealand caused by the tragic earthquake. This collaboration is FTU after a donation of $10 USD to the Salavation Army of NZ is made. Please visit Taggers Together for New Zealand to read more on how these talented designers are helping with this cause and to make your donation. This portion of the collaboration was created by Jay of Bello Scarto. Please visit her blog here.
To make your donation and receive the collaboration click on the link in the top right side bar of my blog.
This tutorial was written assuming you have a working knowledge of PSP.
~♥~ Let’s get started ~♥~
Open up a 700 x 700 blank canvas.
Flood fill white.
Use your Selection Tool active set on Circle.
Make a circle in the center of your canvas that’s approximately 500 x 500.
New Raster layer.
Copy and paste Paper 5 Into Selection.
Adjust/Add Remove Noise/Add Noise:
Uniform checked
Noise: 35%
OK
Selections/Modify/Contract by 10
New Raster layer.
Copy and paste Paper 11 Into Selection.
Deselect for now.
Copy and paste the following elements over the circle paper layer and don’t worry about what overhangs the edges after positioning them….we’ll take care of the mess in a little bit.
4: Resize 60%/Duplicate/Arrange both clouds over the circle.
33: Resize 50%
Highlight the paper layer.
Click anywhere outside of it with your Magic Wand.
Highlight each element layer and tap the delete key.
Deselect.
Add your embellishments. I used:
36: Resize 85%/Mirror/Duplicate/Flip/Mirror
38: Resize 85%/Mirror/Duplicate/Mirror/Resize 50%
37: Resize 90%
35: Resize 50%
8: Resize 40%
6: Resize 40% and 70%/Mirror
16: Resize 50%
23
Highlight your white canvas.
New Raster layer.
Select All.
Copy and paste Paper 8 Into Selection.
Deselect.
Apply the mask.
Merge Group.
Add your copyrights.
Add your name
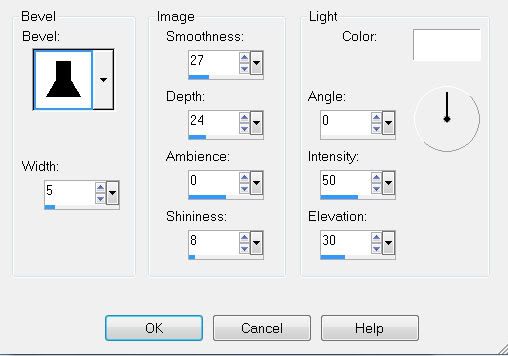
Give it a small Inner Bevel:
Resize all layers 80%.
I hope you enjoyed this tutorial.
I’d love to see your results and show it off in my gallery.
Email me!
Hugs,
Bev
No comments:
Post a Comment