

Clicking on the image will allow you to enlarge for bigger view.
Supplies
1 tube of choice - I used the artwork of Agent Melon which was a free Xmas gift from MPT a couple of years ago. I don’t know where the tube can be found now but when I do I will be sure to put a link in this tutorial.
Font of Choice - I used Chocolate Box here
Gem Mask 21 here
My Template 98 here
Mura’s Meister - Copies
Greg’s Factory Output Vol. II - Pool Shadow
My Supplies which contains word art made by me - here
“Seasons” is a massive collaboration put together by many many designers in the scrapping and tagging community to help with the devastation in New Zealand caused by the tragic earthquake. This collaboration is FTU after a donation of $10 USD to the Salavation Army of NZ is made. Please visit Taggers Together for New Zealand to read more on how these talented designers are helping with this cause and to make your donation. This portion of the collaboration was created by Bluebird Designz. Please visit her blog here.
This tutorial was written assuming you have a working knowledge of PSP.
~♥~ Let’s get started ~♥~
Open up the template.
Shift + D.
Close out the original.
Delete the Credit and Words layers.
Highlight Strips layer.
Click on each shape with your Magic Wand.
New Raster layer.
Open up a glitter color of your choice form the kit.
In your color pallet set it to pattern:
Scale 25.
Flood fill each shape.
Deselect.
Adjust/Sharpness/Sharpen
Sharpen again.
Delete the template layer.
Highlight Rectangle 1 layer.
Click on it with your Magic Wand.
New Raster layer.
Copy and paste Paper 4 Into Selection.
Deselect.
Delete the template layer.
Give it a slight Inner Bevel:
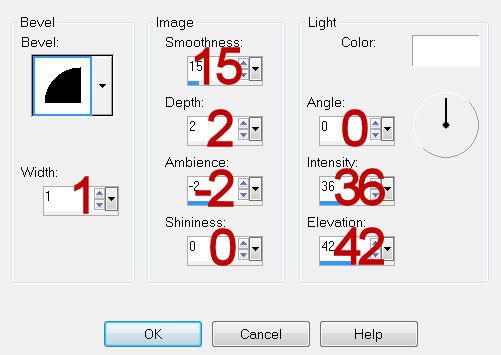
Apply Greg’s Factory Output Vol. II - Pool Shadow:
Default Settings accept slide Intensity to 15
OK
Highlight Rectangle 2 layer.
Click on it with your Magic Wand.
New Raster layer.
Copy and paste Paper 5 Into Selection.
Deselect for now - Rename Rec 2
DO NOT GIVE IT A DROP SHADOW YET.
Delete the template layer.
Apply Greg’s Factory Output Vol. II - Pool Shadow
Same settings.
Highlight Rectangle 3 layer.
Click on it with your Magic Wand.
New Raster layer.
Copy and paste Paper 6 Into Selection.
Deselect for now - Rename Rec 3 layer.
DO NOT GIVE IT A DROP SHADOW YET.
Delete the template layer.
Apply Greg’s Factory Output Vol. II - Pool Shadow
Same settings.
Copy and paste your tube as a new layer.
Move into position.
Duplicate/Position over Rec 2 layer.
In your layers pallet move just above Rec 2 layer.
Highlight Rec 2 layer.
Click anywhere outside of it with your Magic Wand.
Highlight the tube layer just above the rec layer.
Tap the delete key.
Deselect.
Merge Down.
Give it a slight Inner Bevel:
Use same settings.
Duplicate/Change the Opacity to Multiply.
Highlight your original tube layer.
Duplicate/Position over Rec 3 layer.
Repeat the above step.
Make the Beads element active.
Use your Selection Tool to select the white bead.
Copy.
Paste on your working canvas.
Resize 80%
Apply Mura’s Meister - Copes:
Line:
Use default settings accept change Number to 14.
OK
Free rotate Left 90 degrees.
Duplicate/Position each bead line at the left side of each rectangle.
Highlight each rectangle.
Click anywhere outside of it with your Magic Wand.
Highlight the bead line and tap the delete key.
Deselect.
Open up Glass Snowflakes elements.
Chose one you like and use your Selection Tool to section it out.
Copy and paste as a new layer.
Resize 25% and 40%
Apply Mura’s Meister - Copies - Wallpaper (Prospective)
Use Default Settings accept change Number to any number you want.
OK
Erase whatever flakes you don’t want.
Highlight your white background.
New Raster layer.
Select All.
Copy and paste Paper 3 Into Selection.
Deselect.
Apply the mask.
Merge Group.
Add your copyrights.
Add your name.
Resize all layers 80%.
I hope you enjoyed this tutorial.
I’d love to see your results and show it off in my gallery.
Email me!
Hugs,
Bev
No comments:
Post a Comment