

Supplies
2 tubes of choice - I used the artwork of Elias Chatzoudis which can now be purchased from PSP Tubes Emporium. You must have a license to use.
Font of choice - I used Clive Barker here
Wseescotlass mask 249 here
My Template 18 here
Mura’s Meister - Copies
“Honeysuckle & Roses ” is a scrap kit collaboration in both tagger and full size available at TKO Scraps. This entire collaboration has 468 elements, 3 Alpha’s, and 160 Papers. Tagger size is $3. Full size is $10 or free with an $8. This is one sweet deal the store is having and I would highly recommend taking advantage of it. Each designer’s portion is gorgeous! For this tutorial I’m using the portion of Kc’s Scrappin Santuary. You can visit her blog here. Thank you Ann for your amazing portion of this collab!
This tutorial was written assuming you have a working knowledge of PSP.
~♥~ Let’s get started ~♥~
Open up the template.
Shift + D.
Close out the original.
Delete the top 3 layers.
Image/Canvas Size
700 x 600
OK
Flood fill the background layer white.
Highlight Back 1 layer.
Click on it with your Magic Wand.
New Raster layer.
Copy and paste Paper 3 Into Selection.
Deselect.
Delete the template layer.
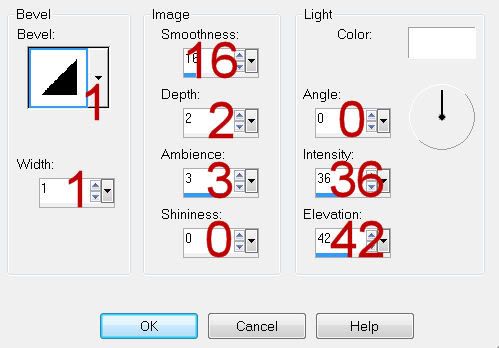
Give it a slight Inner Bevel:
Highlight Back 2 layer.
Repeat the above step accept use Paper 9.
Highlight Back 3 layer.
Repeat the above step accept use Paper 8.
Highlight Frame Back layer.
Click on it with your Magic Wand.
New Raster layer.
Copy and paste Paper 2 Into Selection.
Deselect.
Delete the template layer.
Highlight Frame layer.
Select All/Float/Defloat
New Raster layer.
Copy and paste Paper 7 Into Selection.
Deselect.
Change the Properties to Overlay.
Delete the template layer.
Copy and paste Heart Charm 2 as a new layer.
Click anywhere outside of it with your Magic Wand.
Copy and paste your tube as a new layer and position it over the heart portion of the charm.
Selections/Invert
Selections/Modify/Contract by 10.
OK
Highlight the tube layer.
Selections/Invert
Tap the delete key.
Selections/Modify/Inside Outside Feather:
Both checked
Feather amount: 33
OK
Tap the delete key twice.
Deselect.
Change the Properties to Soft Light.
Duplicate
Merge Visible the heart and both tube layers.
Resize 50%
Copy and paste Bead 3 as a new layer.
Resize 25% and 30%
Apply Mura’s Meister - Copies:
Line - Use Default settings.
OK
Free rotate Left 90 degrees.
Position over the left edge of the rectangle layer.
Erase what overhangs the rectangle.
Open up Flower Butterfly element.
Use your Freehand Selection Tool and circle around the butterfly and trail stitching.
Copy - don’t close this out as we’ll be using it again. Just leave it like it is!
Paste on your working canvas.
Use your Eraser Tool and erase the stitching.
To give it a drop shadow that doesn’t show through the butterfly:
Give it a drop shadow on it’s own layer.
Highlight the butterfly layer.
Click anywhere outside of it with your Magic Wand.
Selections/Invert
Selections/Modify/Contract by 1
Highlight the drop shadow layer.
Tap the delete key.
Deselect.
Make the Flower butterfly element active again.
Selections/Invert
Copy
Make your working canvas active and paste the flower.
How do you like that…didn’t even have to mess with the Free hand selection tool again.
Add your embellishments. I used:
Bubbles 1
Ribbon 1, 2, and 3: Resize 70%/Free rotate Left 90 degrees. Use your Eraser tool and erase the ribbon that sticks out at the bottom of the rectangle.
Highlight your white canvas.
New Raster layer.
Select All.
Copy and paste Paper 7 Into Selection.
Deselect.
Apply the mask.
Resize 120%
Use your Pick Tool to pull the sides out slightly.
Merge Group.
Add your copyrights.
Add your name:
Resize all layers 80%
I hope you enjoyed this tutorial.
I’d love to see your results and show it off in my gallery.
Email me!
Hugs,
Bev
No comments:
Post a Comment