

Supplies
Font of choice - I used Chicken Basket - a pay font
My mask 27 here
“Honeysuckle & Roses ” is a scrap kit collaboration in both tagger and full size available at TKO Scraps. This entire collaboration has 468 elements, 3 Alpha’s, and 160 Papers. Tagger size is $3. Full size is $10 or free with an $8. This is one sweet deal the store is having and I would highly recommend taking advantage of it. Each designer’s portion is gorgeous! For this tutorial I’m using the portion of Digicats (& Dogs). You can visit her blog here. Thank you Dianna for a beachy kit! Love it!
This tutorial was written assuming you have a working knowledge of PSP.
~♥~ Let’s get started ~♥~
Open up a 700 x 700 blank canvas.
Flood fill white.
Copy and paste Frame as a new layer.
Free rotate Left 5 degrees.
Click inside of it with your Magic Wand.
Selections/Modify/Expand by 4.
New Raster layer below the frame.
Copy and paste Paper 5 Into Selection.
Deselect.
Copy and paste Sand Dune as a new layer.
Resize 60%
Duplicate/Mirror
Move both dunes into position.
Give each a drop shadow.
Merge Visible both dunes.
Make your Eraser Tool active, hardness set to about 9 or so.
Erase alone the bottom edge of the dunes to give a sloppy faded look.
Add your embellishments. I used:
Starfish: Resize 60%
Grass: Resize 60% - position in front of the frame.
Grass again: Position behind the frame.
Summer Cutie: Resize 65%
Palm Tree - Position in front of the frame.
Palm Tree again: Mirror/Position behind the frame.
Bucket: Resize 25%/Free rotate Right 10 degrees
Seashell 2: Resize 25% and 40%
Highlight your white canvas.
New Raster layer.
Select All.
Copy and paste Paper 1 Into Selection.
Deselect.
Apply the mask.
Merge Group.
Duplicate
Copy and paste Sun as a new layer just above the mask layer.
Move into position near the top right corner of the mask layer.
Apply the mask.
Merge Group.
Duplicate/Merge Down.
Duplicate
Add your copyrights.
Add your name:
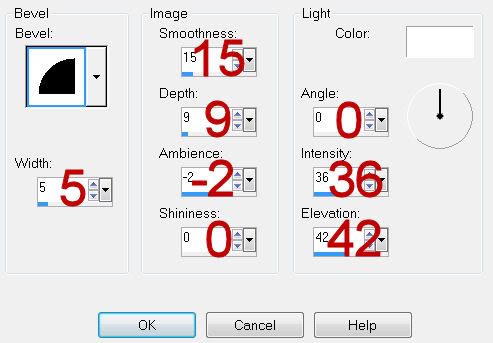
Give it a slight Inner Bevel:
Resize all layers 80%
I hope you enjoyed this tutorial.
I’d love to see your results and show it off in my gallery.
Email me!
Hugs,
Bev
No comments:
Post a Comment