

Supplies
1 tube of choice and 1 Close Up image - I used the artwork of Elias Chatzoudis which you can purchase from PSP Tubes Emporium. You must have a license to use.
Font of choice - I used Luna Bar here
Gem Mask 71 here
Divine Intentionz Template 345 here
Eyecandy 3.1 - Glow
Xerox - Porcelain and Fritillary
“Hot Tropics” is a tagger size scrap kit created by Em of EmJay Scraps and can be purchased from Heartbeatz Creationz. You can visit her blog here. Thank you Aurelie for such a wicked kit!
This tutorial was written assuming you have a working knowledge of PSP.
~♥~ Let’s get started ~♥~
Open up the template.
Shift + D.
Close out the original.
Delete the following layers:
By Missy, Gurlz like 2 rock it 2, Pixel Wording, Yo dj, Circle, Large Circle 2, Glittered Circle 2.
Resize all layers 85%
Image/Canvas size
700 x 550
OK
Flood fill the background layer white.
Highlight Glittered Rectangle layer.
Click anywhere outside of it with your Magic Wand.
Selections/Invert
New Raster layer.
Copy and paste Paper 14 Into Selection.
Adjust/Add Remove Noise/Add Noise:
Gaussian and Monochrome checked
Noise: 35%
OK
Deselect.
Delete the template layer.
Repeat the above step with Glittered Circle 1 and Glittered Rectangle Centre layers.
Highlight Frame layer.
Click on it with your Magic Wand.
New Raster layer.
Paste Paper 14 Into Selection.
Deselect.
Delete the template layer.
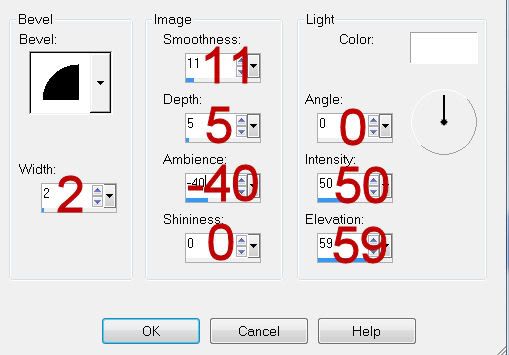
Give it a slight Inner Bevel:
Apply the same Noise effect.
Highlight Dotted Line 2 layer.
Merge Down.
Both dotted line layers should now be on the same layer.
Select All/Float/Defloat
New Raster layer.
Paste Paper 14 Into Selection.
Duplicate.
Deselect.
Delete the template layer.
Highlight Gradient Rectangle layer.
Click anywhere outside of it with your Magic Wand.
New Raster layer.
Copy and paste Paper 11 Into Selection.
Deselect.
Delete the template layer.
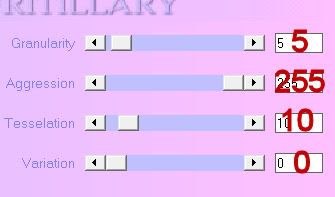
Apply Xerox - Fritillary:
Give it the same slight Inner Bevel.
Highlight Square layer.
Repeat the above step.
Highlight Circle Left layer.
Click on it with your Magic Wand.
New Raster layer.
Copy and paste Paper 4 Into Selection.
Deselect.
Delete the template layer.
Give it the same Inner Bevel.
Apply Eyecandy 3.1 - Glow:
Width: 5
Opacity: 100
Opacity Drop Off: Fat
Color: #df4345
OK
Highlight Circle Right layer.
Repeat the above step.
Highlight Large Circle 1 layer.
Click on it with your Magic Wand.
Copy and paste Paper 3 Into Selection.
Deselect.
Delete the template layer.
Highlight Gradient Rectangle Centre
Click anywhere outside of it with your Magic Wand.
Paste Paper 3 as a new layer above the template layer.
Tap the delete key.
Copy and paste your Close up image as a new layer above the paper layer.
Tap the delete key.
Deselect.
Delete the template layer.
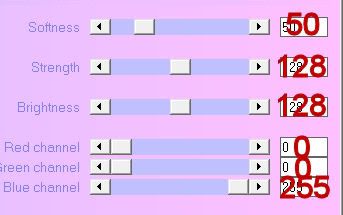
Be sure your tube image is highlighted and apply Xero-Porcelain:
Match your settings to mine:
Change the Properties to Soft Light.
Duplicate.
Highlight Rectangle Centre layer.
Click anywhere outside of it with your Magic Wand.
Selections/Invert
New Raster layer.
Copy and paste Paper 7 Into Selection.
Deselect.
Delete the template layer.
Highlight Thin Rectangle layer.
Click anywhere outside of it with your Magic Wand.
Copy and pate Element 29 as a new layer.
Position the bottom of the element over the template layer.
Tap the delete key.
Deselect.
Delete the template layer.
Give it the same Inner Bevel.
Copy and paste your tube as a new layer.
Add your embellishments. I used:
39
38
3: Resize 70%
20: Resize 30%/Mirror
9: Resize 25%
45: Resize 35%/Mirror
23: Resize 30%
24: Resize 25%
8: Resize 25%
41: Resize 70%
Highlight your white canvas.
New Raster layer.
Select All.
Copy and paste Paper 7 Into Selection.
Deselect.
Apply the mask.
Merge Group.
You can use your Pick Tool to pull the sides out slightly if you like.
You can also use your Target Tool to change the color of this layer as well. I used a green shade from my tube.
Add your copyrights.
Add your name:
Give it the same Inner Bevel.
Resize all layers 80%.
I hope you enjoyed this tutorial.
I’d love to see your results and show it off in my gallery.
Email me!
Hugs,
Bev
No comments:
Post a Comment