

Supplies
1 tube of choice - I used the artwork of Elizabeth Austin which can be purchased at Up Your Art. You must have a license to use.
Font of choice - I used Shit Happens here and Vivaldi which came with my pc
Weescotlass Mask 241 here
Eyecandy 3.1 - Glow
“Old Libery” is a tagger size scrap kit created by Pixie of KissedbyPix Design and can be purchased from her store TKO Scraps. You can visit her blog here.
This tutorial was written assuming you have a working knowledge of PSP.
~♥~ Let’s get started ~♥~
Open a 700 x 700 blank canvas.
Flood fill white.
Copy and paste Patriotic Glass Frame Red as a new layer.
Resize 90%
Use your Magic Wand and click inside the frame.
Selections/Modify/Expand by 4.
New Raster layer below the frame.
Flood fill with #efefef
Copy and paste Patriotic Swag 2 as a new layer below the frame.
Resize 70%
Selections/Invert
Tap the delete key.
Deselect.
Copy and paste your tube as a new layer.
Make your Selections Tool active set on Rectangle.
Make a rectangle approximately 225 x 350 pixels.
New Raster layer.
Copy and paste Glitter Paper 1 Into Selection.
Deselect.
Apply Eyecandy 3.1 - Glow:
Width: 3
Opacity: 100
Opacity Dropoff: Fat
Color: White
OK
Duplicate
Move both rectangles into position - see my tag for reference.
Make your Selection Tool active again set on Circle.
Place your curser in the center of your canvas and pull outward until you have a circle that’s barely outside the rectangles.
New Raster layer.
Copy and paste Stripes Paper Into Selection.
Deselect.
Apply the same Glow effect.
Copy and paste Banner Blue as a new layer.
Color Pallet:
Foreground and Background set to white.
Using the Shit Happens font type out the words “Independence Day”.
Convert to Raster layer.
Use your Pick Tool to angle it over the left side of the banner.
Tip: If you can’t get the angle exact then Free Rotate by 1 degrees until it’s angled the way you want.
Change the font to Vivaldi and type out “1776”.
Move it into position over the right side.
Merge Visible the word layers.
Give them a drop shadow.
Merge down.
Words and ribbon should be one layer.
Resize 70%
Copy and paste Stick Pin 6 as a new layer.
Resize 40%
Mirror
Free rotate Right 25 degrees.
Position over the striped circle layer and erase the bottom half of the pin.
Highlight the striped paper.
Make your Lighten/Darken Brush active
Size 6
Darken the striped paper at the end of the stick pin to give the effect it’s stuck in there.
Add your embellishments. I used:
Bow Red: Resize 25% and 80%/Free rotate Right 10 degrees
Bead String 1: Resize 60%
Silk Flower Blue: Resize 25%
Silk Flower Red: Resize 25% and 70%
Silk Flower White: Resize 25% and 70%
Curly Blue and Red: Resize 25%/Duplicate as many times as you like/Resizing as you like.
Highlight your white canvas.
New Raster layer.
Select All.
Copy and paste Starz Paper Into Selection.
Deselect.
Apply the mask.
Merge Group.
Add your copyrights.
Add your name.
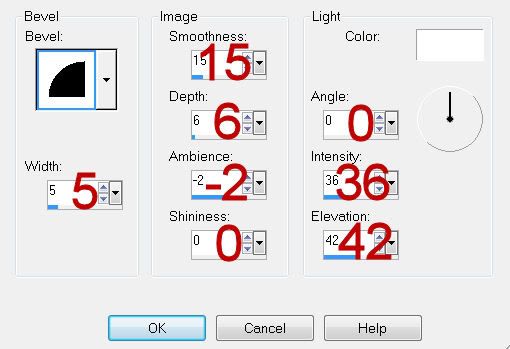
Give it a slight Inner Bevel:
Apply the same Glow Effect.
Resize all layers 80%.
I hope you enjoyed this tutorial.
I’d love to see your results and show it off in my gallery.
Email me!
Hugs,
Bev
No comments:
Post a Comment