Supplies
1 tube of choice - I used the artwork of Nicole Brune and can now be purchased from CDO. You must have a license to use.
Font of choice - I used Oh Lara - a pay font
Gem Mask 166 here
Artmama’s Template 21 here
Plug Ins:
Eyecandy 3.1 - Glow
“Dolphin Dreams” is a tagger size scrap kit created by Stina of Designs by Stina and can be purchased from Twilight Scraps. You can visit her blog here.
Thank you Stina for a fantastic kit!
This tutorial was written assuming you have a working knowledge of PSP.
~♥~ Let’s get started ~♥~
Open up the template.
Shift + D.
Close out the original.
Delete the following layers:
Credit, Dots, Summer, Summer Glitter, Break Break, and Tiny Text
Image/Canvas Size
700 x 550
OK
Highlight Bg layer and flood fill white.
Highlight L. lg. Rectangle layer.
Click anywhere outside of it with your Magic Wand.
Copy and paste Paper 5 as a new layer.
Resize 60%
Move into a position you like.
Tap the delete key.
Deselect.
Delete the template layer.
Apply Eyecandy 3.1 - Glow:
Width: 3
Opacity: 100
Opacity Drop off: Fat
Color: White
OK
Highlight R. lg. Rectangle layer.
Click anywhere outside of it with your Magic Wand.
Copy and paste Paper 2 as a new layer.
Resize 60%
Move into a position you like.
Tap the delete key.
Deselect.
Delete the template layer.
Apply the same Glow effect.
Highlight r. sm. circle layer.
Click anywhere outside of it with your Magic Wand.
Copy and paste Paper 10 as a new layer.
Move into a position you like.
Tap the delete key.
Copy and paste Underwater 01 as a new layer.
Resize 35%
Move into position over the circle paper layer.
Tap the delete key.
Copy and paste Seaweed as a new layer.
Resize 40%
Move into position.
Tap the delete key.
Deselect.
Delete the template layer.
Open up the Sea Turtle element.
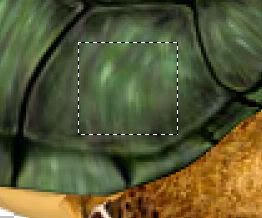
Use your Selection Tool set on Rectangle and section out an area of the turtle shell.

In your color pallet set the foreground to Pattern and look for the turtle shell.
Highlight r. circle frame layer.
Select All/Float/Defloat
New Raster layer.
Flood fill with the shell pattern.
Adjust/Add Remove Noise/Add Noise:
Uniform and Monochrome checked
Noise: 35%
OK
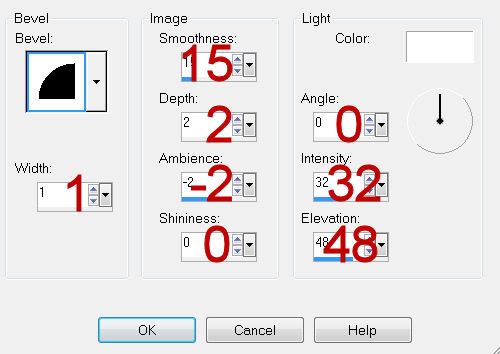
Give it a slight Inner Bevel:

Deselect.
Delete the template layer.
Repeat the above step with:
l. circle frame
Bottom Rectangle Frame
Lg. circle frame
Highlight L. sm. circle layer.
Click anywhere outside of it with your Magic Wand.
Copy and paste Paper 10 as a new layer.
Move into a position you like.
Tap the delete key.
Copy and paste Fish 1 as a new layer.
Resize 25%
Move into position over the circle paper.
Copy and paste Sea Weed as a new layer.
Resize 40%
Move into position.
Tap the delete key.
Deselect.
Delete the template layer.
Highlight Bottom Rectangle layer.
Click anywhere outside of it with your Magic Wand.
Copy and paste Paper 9 as a new layer.
Resize 75%
Move into a position you like.
Tap the delete key.
Copy and paste Starfish 4 as a new layer.
Resize 40%
Move into position over the paper.
Tap the delete key.
Copy and paste Sea Turtle as a new layer.
Resize 50%
Position it over the paper layer.
Tap the delete key.
Deselect.
Delete the template layer.
Highlight lg. circle layer.
Click anywhere outside of it with your Magic Wand.
Copy and paste Paper 9 as a new layer.
Resize 60%
Move into position.
Tap the delete key.
Copy and paste Underwater Scene 07 as a new layer.
Resize 35%
Move into position.
Tap the delete key.
Change the Properties to Luminance.
Deselect.
Delete the template layer.
Copy and paste your tube as a new layer.
Add your embellishments. I used:
Sea Weed: Resize 50%/Duplicate/Mirror
Bottle 2: Resize 40%
Highlight your white canvas.
New Raster layer.
Select All.
Copy and paste Paper 10 Into Selection.
Deselect.
Apply the mask.
Merge Group.
Add your copyrights.
Add your name.
Resize all layers 80%.
I hope you enjoyed this tutorial.
I’d love to see your results and show it off in my gallery.
Email me!
Hugs,
Bev

No comments:
Post a Comment