Supplies
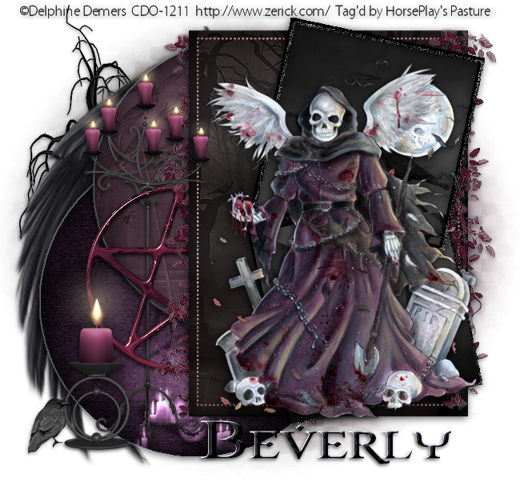
1 tube of choice - I used the artwork of Delphine Demers and can be purchased from CDO. You must have a license to use.
Font of choice - I used Fire of Ysgard Wide here
Weescotlass Mask 208 here
Creative by Nature template 130 here
Plugs Ins:
Eyecandy 3.1 - Glow
“Gothic Angel” is a tagger size scrap kit created by Sandrine of Rebellious Scraps and can be purchased from Butterfly Blush Designs. You can visit her blog here.
Thank you Sandrine for a super terrific kit!!
This tutorial was written assuming you have a working knowledge of PSP.
~♥~ Let’s get started ~♥~
Open up the template.
Shift + D.
Close out the original.
Resize all layers 85%
Image/Canvas Size:
650 x 600
New Raster layer
Send to bottom
Flood fill white.
Delete the top 6 layers.
Highlight 12 layer.
Click on it with your Magic Wand.
New Raster layer.
Copy and paste Paper 4 Into Selection.
Deselect.
Delete the template layer.
Apply Eyecandy 3.1 - Glow:
Width: 3
Opacity: 100
Opacity Drop Off: Fat
Color: #9da3af
OK
Highlight 11 layer.
Repeat the above step accept use Paper 1.
Highlight 10 layer.
Click on it with your Magic Wand.
Copy and paste Paper 2 as a new layer.
Resize 70%
Move into position.
Selections/Invert
Tap the delete key.
Deselect.
Delete the template layer.
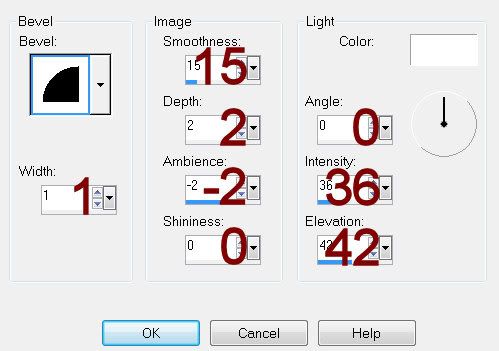
Give it the same slight Inner Bevel:

Highlight 9 layer.
Select All/Float/Defloat
New Raster layer.
Copy and paste Paper 10 Into Selection.
Deselect.
Delete the template layer.
Effects/Edge Effects/Enhance
Highlight 6 layer.
Click on it with your Magic Wand.
Copy and paste Paper 3 as a new layer.
Resize 80%
Position the paper so that it covers both the top and bottom squares.
Highlight 6 layer.
Click on it with your Magic Wand.
In your layers pallet highlight the paper layer.
Right Click
Promote Section to layer.
Deselect.
Highlight 8 layer.
Click on it with your Magic Wand.
In your layers pallet highlight the paper layer.
Right Click.
Promote Section to layer.
Deselect.
You can now delete the resized paper layer as you won’t be using it any more.
Delete template layers 6 & 8.
Highlight 7 layer.
Click on it with your Magic Wand.
New Raster layer.
Copy and paste Paper 12 Into Selection.
Adjust/Add Remove Noise/Add Noise:
Uniform and Monochrome checked
Noise: 73%
OK
Deselect.
Delete the template layer.
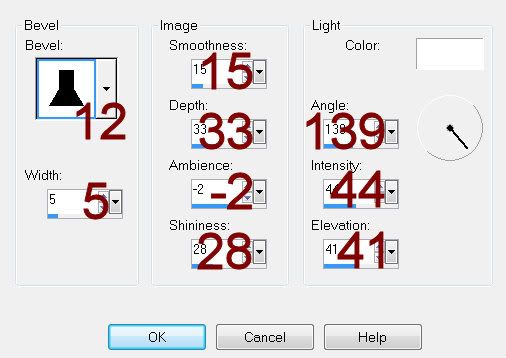
Give it a slight Inner Bevel:

Highlight 5 layer.
Repeat the above step.
Copy and paste your tube as a new layer.
Add your embellishments. I used:
Tree: Resize 70%
Wing 1: Free rotate Right 10 degrees
Sign
Leaves 1: Use your Pick Tool to lengthen it just a little/Duplicate
Candle 1: Resize 70%
Candle 2; Resize 40%
Crow: Resize 30%
Highlight your white canvas.
New Raster layer.
Select All.
Copy and paste Paper 7 Into Selection.
Deselect.
Apply the mask.
Resize 110%
Use your Pick Tool and pull the sides out slightly.
Merge Group.
Add your copyrights.
Add your name.
Foreground: #8f9aa1
Background: #211f22
Make your Text Tool active.
Stroke set at 1.0
Type your name.
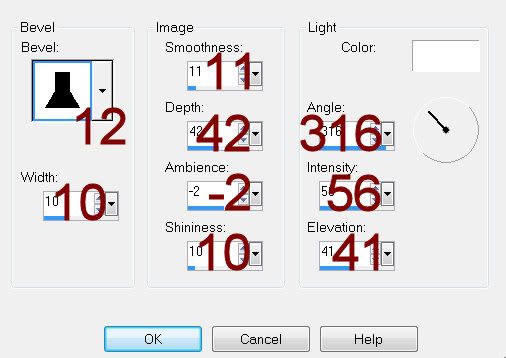
Give it a slight Inner Bevel:

Resize all layers 80%
I hope you enjoyed this tutorial.
I’d love to see your results and show it off in my gallery.
Email me!
Hugs,
Bev

No comments:
Post a Comment