
Supplies
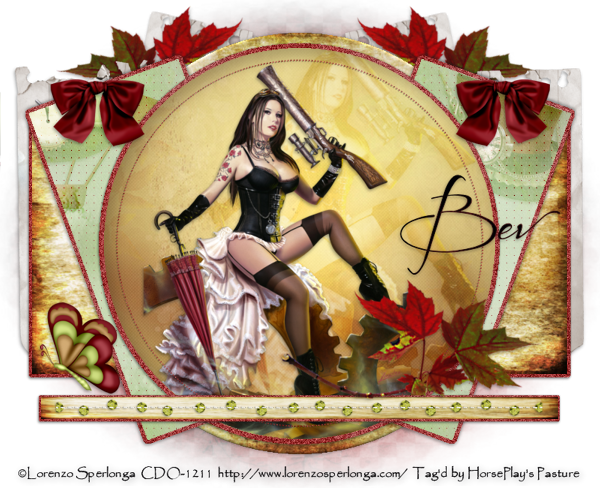
1 tube of choice - I used the beautiful artwork of Lorenzo Sperlonga which can be purchased from CDO. You must have a license to use.
Font of choice - I used Before the Rain here
Weescotlass Mask 208 here
Toxic Desires Template 152 here
“Steampunk Fall” is a tagger size scrap kit created by Jay of Bello Scarto and can be purchased from her store Heartbeatz Creationz. You can visit her blog here.
Thank you Jay for a wonderful Steampunk kit.
This tutorial was written assuming you have a working knowledge of PSP.
~♥~ Let’s get started ~♥~
Open up the template.
Shift + D.
Close out the original.
Image/Canvas Size:
800 x 650
OK
Huge apologies for the canvas being so large. Near the end of creating this tag I needed the room.
Highlight the background layer.
Flood fill white.
Delete the top 10 layers, Pixel Words, and Linear and Sparkle effect layer.
Highlight Circle 1 layer.
Click on it with your Magic Wand.
Copy and paste Paper 4 Into Selection.
Deselect.
Delete the template layer.
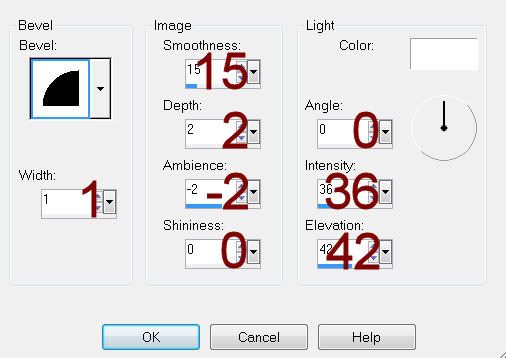
Give it a slight Inner Bevel:
Highlight Rectangle layer.
Repeat the above step but DO NOT give it an inner bevel.
Repeat the above step with Thin Rectangle layer.
Highlight Glitter Rectangle layer.
Click anywhere outside of it with your Magic Wand.
Selections/Invert
New Raster layer.
Copy and paste Paper 5 Into Selection.
Resize 50%
Adjust/Add Remove Noise/Add Noise:
Gaussian and Monochrome checked
Noise: 40%
OK
Deselect.
Delete the template layer.
Repeat the above step with the following layers:
Left Glitter Rectangle
Right Glitter Rectangle
Glitter Circle
Thin Glittered Rectangle
Dotted Rectangle layer
Highlight Left Rectangle layer.
Click on it with your Magic Wand.
New Raster layer.
Copy and paste Paper 2 Into Selection.
Copy and paste Element 1 as a new layer.
Resize 50%/Move into position over the rectangle paper.
Selections/Invert
Tap the delete key.
Deselect.
Delete the template layer.
Change the Properties to Overlay.
Highlight Right Rectangle layer.
Repeat the above step accept use Element 36 and Resize it 80%.
Highlight Circle 2 layer.
Click anywhere outside of it with your Magic Wand.
Copy and paste Paper 3 as a new layer.
Resize 70%
Tap the delete key.
Copy and paste your tube as a new layer.
Tap the delete key.
Paste your tube again.
Resize a little larger and move below and to the right of the other tube layer.
Tap the delete key.
Change the Properties to Soft Light.
Deselect.
Delete the template layer.
Add your embellishments. I used:
13: Resize 25%/Duplicate/Mirror
37: Resize 60%
25: Duplicate/Mirror/Duplicate each element layer/Free rotate Left 10 degrees/Move them into position - see my tag for reference.
6: Resize 30%
21: Resize 60%/Free rotate Right 45 degrees.
Highlight your white canvas.
New Raster layer.
Select All.
Copy and paste Paper 6 Into Selection.
Deselect.
Apply the mask.
Resize 115%
Merge Group.
Add your copyrights.
Add your name.
Resize all layers 75%.
I hope you enjoyed this tutorial.
I’d love to see your results.
Email me!
Hugs,
Bev
No comments:
Post a Comment