

Supplies
Font of choice - I used Clipper Script here
Weescotlass Mask here
Divine Intentionz Template 387 here
Plug Ins:
Eyecandy 3.1 - Glow
“A Precious Christmas” is a tagger size scrap kit created by me, Bev of
HorsePlay’s Pasture Designs and can be downloaded from my designing blog here.
This tutorial was written assuming you have a working knowledge of PSP.
~♥~ Let’s get started ~♥~
Open up the template.
Shift + D.
Close out the original.
Image/Canvas Size:
700 x 550
OK
Highlight and open up the background layer.
Flood fill white.
Delete the top 3 layer, Thin Rectangle, and Dotted Line
Highlight Small Circle layer.
Click on it with your Magic Wand.
New Raster layer.
Copy and paste Paper 5 Into Selection.
Deselect.
Delete the template layer.
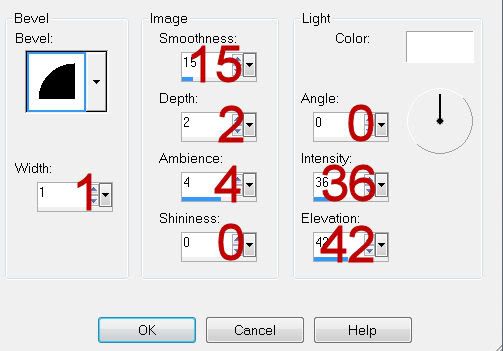
Give it a slight Inner Bevel:
Repeat the above step with the other Small Circle layer.
Make a new canvas: 500 x 500
pixels.
Flood fill with #f86197
Copy
Close it out as you won’t need it any longer.
Make your working canvas active.
You have 2 Dotted circle layer.
Highlight the top one.
Merge down.
Both dotted circle layers should now be on the same layer.
Click anywhere outside of them with your Magic Wand.
Selections/Invert
New Raster layer.
Paste (the pink color) Into Selection.
Deselect.
Delete the template layer.
Highlight Rectangle layer.
Click on it with your Magic Wand.
New Raster layer.
Copy and paste Paper 7 Into Selection.
Deselect.
Delete the template layer.
Give it the same slight Inner Bevel.
Highlight Circle layer.
Click on it with your Magic Wand.
New Raster layer.
Copy and paste Paper 6 Into Selection.
Deselect.
Delete the template layer.
Apply Eyecandy 3.1 – Glow:
Width: 3
Opacity: 100
Opacity Drop off: Fat
Color: white
OK
Highlight Circle 2 layer.
Click on it with your Magic Wand.
New Raster layer.
Copy and paste Paper 1 Into Selection.
Deselect.
Delete the template layer.
Open up Paper 6.
Mirror
Copy
Don’t close it out yet.
Make your working canvas active.
Highlight Copy of Frame Back layer.
Click on it with your Magic Wand.
New Raster layer.
Paste (mirrored Paper 6) Into Selection.
Deselect.
Delete the template layer.
Make Paper 6 active.
Undo – the paper should no longer be mirrored
Copy
Make your working canvas active.
Highlight Frame Back layer.
Click on it with your Magic Wand.
New Raster layer.
Paste (Paper 6) Into Selection.
Deselect.
Delete the template layer.
Highlight Copy of Frame layer.
Adjust/Add Remove Noise/Add Noise:
Monochrome and Gaussian checked
Noise: 42%
OK
Repeat the above step with Frame layer.
Copy and paste 33 as a new layer.
Resize 55%
Move in position over the left frame – see my tag for reference.
Duplicate/Move below the frame.
Highlight the paper layer.
Click anywhere outside of it with your Magic Wand.
Highlight the tree just above the paper layer.
Tap the delete key.
Deselect.
Highlight the tree above the frame.
Use your Eraser Tool and erase whatever you don’t want seen overhanging
the frame.
Copy and paste 34 as a new layer.
Move into position over the Right frame – see my tag for reference.
Duplicate/Move below the frame.
Highlight the paper layer.
Click anywhere outside of it with your Magic Wand.
Highlight the tree just above the paper layer.
Tap the delete key.
Deselect.
Highlight the tree above the frame.
Use your Eraser Tool and erase whatever you don’t want seen overhanging
the frame.
Add your elements. I used:
15: Resize 55%/Duplicate/Mirror/Erase
the base of the tree if you can see it.
16: Resize 55% and
70%/Duplicate/Mirror
24: Resize 50%/Mirror
1: Resize 60/Duplicate/Mirror
2: Resize 60/Duplicate/Mirror
22: Resize 35%/Duplicate/Mirror
36: Resize 50%/Free rotate Right
90 degrees/Duplicate/Mirror
27: Resize 40%/Duplicate/Mirror
23: Resize 40%
18: Resize 25%/Mirror
17: Resize 35%
8 & 9: Resize 30%
Highlight your white canvas.
New Raster layer.
Select All.
Copy and paste Paper 4 Into Selection.
Deselect.
Apply the mask.
Merge Group.
Add your name.
Convert to Raster layer.
Adjust/Add Remove Noise/Add Noise:
Gaussian and Monochrome checked
Noise: 23%
OK
Apply the Eyecandy 3.1 – Glow:
Same settings
Resize all layers 80%
I’d
love to see your results.
Email me!
Hugs,
Bev
Email me!
Hugs,
Bev
what an adorable tag this makes. I truly enjoyed making it. Thanks so much for clear instructions.!
ReplyDeleteArtfulOne Jill
Thanks so much Jill and you're welcome. So glad you enjoyed it!!
ReplyDeleteMerry Christmas :)