

Supplies
1 tube of choice – I used the awesome artwork of VeryMany which can be
purchased from Pics for Design. You must have
a license to use.
Font of choice - I used Inspiration here
Gimptastic Tut – Amy & Leah Mask 2 here
“Fun Fever” is a tagger size
scrap kit created by Krissy of Krissy’s Scraps and can be purchased from her
store ExquisiteScraps. You can visit her blog here.
Thank you Krissy for an awesome kit.
This tutorial was written assuming you have a working knowledge of PSP.
~♥~ Let’s get started ~♥~
Open up a 700 x 700 blank canvas.
Flood fill white.
Copy and paste String Frame 1 as a new layer.
Resize 60%
Click inside of the frame and all the gaps around with your Magic Wand.
Selections/Modify/Expand by 4.
New Raster layer below the frame.
Copy and paste Paper 14 Into Selection.
Deselect.
TIP:
If you see any white gaps that should’ve been filled with the paper,
use your Freehand Selection Tool and circle around the areas.
Be sure your paper layer is highlighted.
Paste the paper Into Selection.
Deselect.
Merge Visible the frame and paper layer.
New Raster layer.
Make your Selection Tool active set on Rectangle.
Create a rectangle approximately 160 x 225 pixels.
Copy and paste Paper 15 Into Selection.
Deselect.
Duplicate 2 times for a total of 3 rectangles.
Move the merged layer and all 3 black rectangles into position – see my
tag for reference.
To each black rectangle:
Highlight the rectangle layer.
Click anywhere outside of it with your Magic Wand.
Selections/Invert
Selections/Modify/Contract by 7
New Raster layer.
Copy and paste Paper 13 Into Selection.
Deselect.
Copy and paste your tube as a new layer over the middle orange
rectangle.
Move into a position you like that looks good over the middle and right
orange rectangles.
Change the Properties to Soft Light.
Duplicate/Move above the right rectangle in your layers pallet.
Highlight the right orange rectangle layer.
Click anywhere outside of it with your Magic Wand.
Highlight the tube above it and tap the delete key.
Highlight the middle orange rectangle layer.
Repeat the above step.
Copy and paste your tube as a new layer.
Move into position in front of the Left orange rectangle layer.
Add your elements. I used:
Wrap 3: Resize 65%
Wrought Iron Doodle 1: Resize
80%
Bottles 1: Resize 80%
Bloom 1: Duplicate 3 times for a
total of 4. Position so that just the tips are showing from behind the wire
frame.
Funky Flower 2: Resize 10%/
Duplicate as many times as you like/Resize as you like.
Paper Flower 2: Resize 10%/Duplicate
as many times as you like.
Highlight your white canvas.
New Raster layer.
Select All.
Copy and paste the 3 Into Selection.
Deselect.
Apply the mask.
Merge Group.
Add your name.
Foreground: #000000
Background: #d62a09
Stroke: 1.5
Type your name.
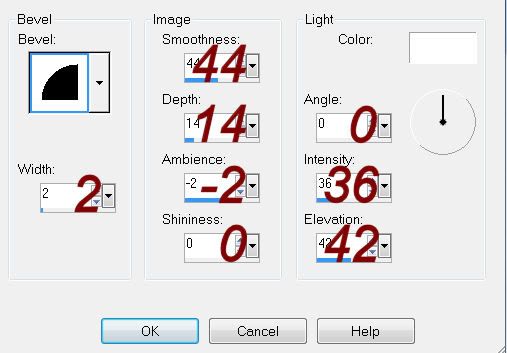
Give it a slight Inner Bevel:
Resize all layers 80%
No comments:
Post a Comment