
Supplies
1 tube of choice – I used the wonderful artwork of Abranda Icle which
can be purchased from Up Your Art. You must have
a license to use.
Font of choice - I used Cardinal Regular here
My Mask 27 here
Plug Ins:
Eyecandy 3.1 – Glow
Greg’s Factory Output Vol. II – Pool Shadodw
“HeartLess” is a tagger size scrap kit created by Becky of Becky’s
Creations and can be purchased from Country Corner
Creations. You can visit her blog here.
Thank you Becky for such an awesome kit.
This tutorial was written assuming you have a working knowledge of PSP.
~♥~ Let’s get started ~♥~
Open up a 700 x 700 blank canvas.
Flood fill white.
Copy and paste Bent Frame as a new layer.
Resize 35%
Click inside of it with your Magic Wand.
Selections/Modify/Expand by 4.
New Raster layer.
Copy and paste Paper 6 Into Selection.
Copy and paste Curtain as a new layer.
Resize 25%/Duplicate
Position both curtains below the frame.
Selections/Invert
Tap the delete key on each curtain layer.
Deselect.
New Raster layer.
Make your Selection Tool active set on Rectangle.
Create a rectangle approximately 225 x 450 pixels.
Copy and paste Paper 5 Into Selection.
Apply Greg’s Factory Output Vol. II – Pool Shadow:
Use Default settings.
Selections/Modify/Contract by 8,
New Raster layer.
Flood fill with #202020
Copy and paste your tube as a new layer.
Move into position over the flood fill layer.
Selections/Invert
Tap the delete key.
Deselect.
Change the Properties of the tube to Soft Light.
Apply Eyecandy 3.1 – Glow to the flood fill layer:
Width: 3
Opacity: 100%
Opacity Drop off: Fat
Color: White
OK
Copy and paste your tube as a new layer.
Give it an exaggerated, thrown crop shadow on its own layer.
Open up Heart Frame.
Shift + D.
Close out the original.
Apply the Pool Shadow effect to it twice.
Copy and paste as a new layer on your working canvas.
Resize 25% and 50% - see my tag for placement.
Duplicate/Mirror
Add your elements. I used:
Flower bunch 1: Resize 25% and
70%
Red Black Bow: Resize 40%
Zipped Heart 1: Resize 15%/Free
rotate Right 30 degrees/Duplicate/Mirror/Resize 70%
Highlight your white canvas.
New Raster layer.
Select All.
Copy and paste Paper 3 Into Selection.
Deselect.
Apply the mask.
Merge Group.
Duplicate
Add your name.
Color Pallet:
Foreground: #202020
Background: #992424
Stroke: 1
Type your name.
Give it a slight Inner Bevel:
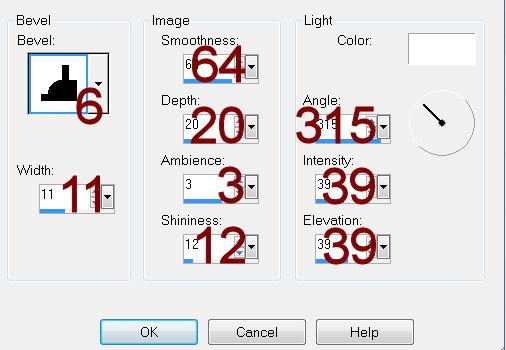
Resize all layers 80%
No comments:
Post a Comment