

Supplies
1 tube of choice – I used the artwork of Dean Yeagle which can be
purchased from CDO. You must have a license to
use.
Font of choice - I used Kristen ITC which came with my program
Becky Mask 22 here
Tracy’s Easter Template #3 here
Plugs Ins used:
Eyecandy 3.1 – Glow
“Colors of Spring” is a tagger size scrap kit created by Em of EmJay
Scraps and can be purchased from Country Corner Creations. You can visit her blog here.
Thank you Em for such a precious Spring kit.
This tutorial was written assuming you have a working knowledge of PSP.
~♥~ Let’s get started ~♥~
Open up the template.
Shift + D.
Close out the original.
Image/Canvas Size
700 x 550
OK
New Raster layer.
Send to bottom.
Flood fill white.
Delete the top 2 layer.
Highlight
Circle 1 layer.
Circle 1 layer.
Click on it with your Magic Wand.
New Raster layer.
Copy and paste Paper 12 Into Selection.
Deselect.
Delete the template layer.
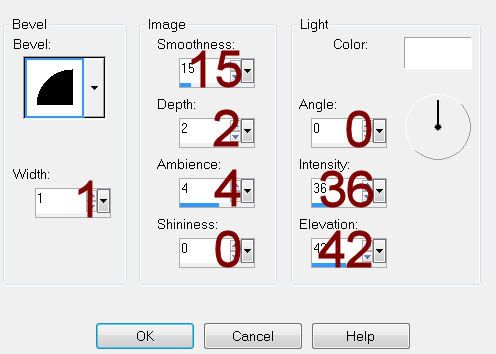
Give it a slight Inner Bevel:
Highlight Rectangle layer.
Click anywhere outside of it with your Magic Wand.
Copy and paste Paper 3 as a new layer.
Resize 60%
Tap the delete key.
Deselect.
Delete the template layer.
Highlight Rectangle 2 layer.
Click anywhere outside of it with your Magic Wand.
Copy and paste Paper 15 as a new layer.
Resize 60%
Tap the delete key.
Deselect.
Delete the template layer.
Highlight Small Rectangle layer.
Click anywhere outside of it with your Magic Wand.
Copy and paste Paper 11 as a new layer.
Resize 80%
Tap the delete key.
Copy and paste Element 21 as a new layer.
Resize 40%
Duplicate 3 times and line the grass up along the rectangle – see my
tag for reference.
Highlight each grass element and tap the delete key.
Deselect.
Delete the template layer.
Highlight Circle 2 layer.
Click anywhere outside of it with your Magic Wand.
Selections/Invert
New Raster layer.
Copy and paste Paper 6 Into Selection.
Copy and paste Element 31 as a new layer.
Position within the circle – see my tag for reference.
Tap the delete key.
Deselect.
Delete the template layer.
Copy and paste your tube as a new layer.
Add your elements. I used:
25: Resize 40%/Duplicate/Mirror/Resize
50%
14: Resize 60%/Duplicate 2x
37: Resize 75%
32: Resize 40%
10: Resize
20%/Duplicate/Flip/Resize 70%
11: Resize 15%/ Duplicate/Flip/Resize
70%
7: Resize 25%
23: Resize 60%/Mirror
19: Resize 50%/Mirror
Highlight your white background.
Select All.
New Raster layer.
Copy and paste Paper 4 Into Selection.
Deselect.
Apply the mask.
Resize 110%
Merge Group.
Add your credits.
Add your name.
Forground and Background: Pattern/Paper 4
Type your name – one letter on a layer of it’s own.
Convert to Raster layer.
Use your Pick Tool to turn each letter this way and that.
Merge Visible all letters.
Apply Eyecandy 3.1 – Glow:
Width: 3
Opacity: 100%
Opacity Drop Off: Fat
Color: #fdfdcf
OK
Resize all layers 80%
No comments:
Post a Comment