

Supplies
1 tube of choice – I used the artwork of PinUpToons which can be
purchased from CDO. You must have
a license to use.
Font of choice - I used Cinnamon Cake here
Weescotlass Mask 220 here
Plug Ins used:
Eyecandy 3.1 - Glow
“Hippity Hop” is a tagger size scrap kit created by Gina of Gina’s Gems
Scraps and can be purchased from Butterfly Blush Designs. You can visit
her blog here.
Thank you Gina for an exceptional kit!!
This tutorial was written assuming you have a working knowledge of PSP.
~♥~ Let’s get started ~♥~
Open up a 700 x 700 blank canvas.
Flood fill white.
Open up Paper 11.
Shift + D.
Close out the original.
Adjust/Blur/Gaussian blur:
15
OK
Copy
Make your working canvas active.
New Raster layer.
Make your Selection Tool active set on Ellipse and create an oval
approximately 575 x 450 pixels.
Paste the paper you copied Into Selection.
Adjust/Add Remove Noise/Add Noise:
Uniform and Monochrome checked
Noise: 485
OK
Deselect.
Center this on your canvas.
Use your Magic Wand and click anywhere outside of the oval.
Selections/Invert
Selections/Modify/Contract by 6.
New Raster layer.
Copy and paste Paper 1 Into Selection.
Deselect.
New Raster layer.
Make your Selection Tool active set on Circle.
Create a circle approximately 450 pixels.
Copy and paste the blurred paper Into Selection.
Apply the same noise effect.
Selections/Invert
Selections/Modify/Contract by 6.
New Raster layer.
Copy and paste Paper 16 Into Selection.
Copy and paste Easter Tree 2 as a new layer.
Resize 60%
Move into position – see my tag for reference.
Selections/Invert
Tap the delete key.
Deselect.
New Raster layer.
With your Selection Tool again, still set on Circle create a circle
approximately 30 pixels.
Copy and paste the blurred paper Into Selection – you can close the
blurred paper out as you won’t be using it any more.
Apply the same noise effect.
Deselect.
Move into position – see my tag for reference.
Click anywhere outside of this small circle with your Magic Wand.
Selections/Invert
New Raster layer.
Copy and paste Paper 22 Into Selection.
Copy and paste Blades of Grass 2 as a new layer.
Resize 25%/Duplicate as many times as you like to position along the
bottom part of the circle – see my tag for reference.
Selections/Invert
Highlight each grass element and tap the delete key.
Copy and paste Duckling 1 as a new layer.
Resize 30%
Move into position.
Tap the delete key.
Deselect.
Copy and paste Frame 5 as a new layer.
Resize 50%
Free rotate Right 5 degrees.
Click inside of it with your Magic Wand.
Selections/Modify/Expand by 4.
New Raster layer below the frame.
Copy and paste Paper 25 Into Selection.
Deselect.
Merge Visible the frame and paper.
Duplicate
Move both merged layers into position – see my tag for reference.
Copy and paste your tube as a new layer.
Add your elements. I used:
Baby Bunny: Resize 45%
Tag 2: Resize 45%
Bow 1: Resize 30%
Daffodil 3 and 5: Resize 25%
Flower String 2: Resize 60%/Flip
Clover Brush: Resize 95%
Butterfly 1: Resize
25%/Duplicate/Mirror/Resize 70%
Bundle of Eggs: Resize 30%
Double Loop Bow 2: Resize
25%/Duplicate/Mirror
Carrot 1: Resize 30%/Duplicate
Flower Branch 1: Resize
50%/Duplicate/Mirror
Highlight your white background.
Select All.
New Raster layer.
Copy and paste Paper 26 Into Selection.
Deselect.
Apply the mask.
Use your Pick Tool to pull the sides out just a little.
Merge Group.
Add your credits.
Add your name.
Foreground and Background: #e0aa44
Type your name.
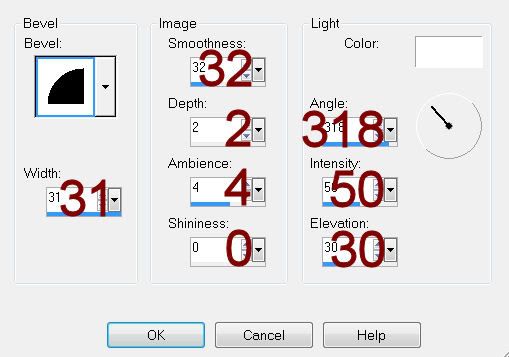
Give it a slight Inner Bevel:
Apply Eyecandy 3.1 – Glow
Width: 3
Width: 3
Opacity: 100%
Opacity Drop Off: Fat
Color: white
OK
Decorate your name with Blades of Grass 2: Resize 10%
Resize all layers 80%
No comments:
Post a Comment