

Supplies
1 tube of choice – I used the awesome artwork of Zlata_M which can be
purchased from Pics for Design. You must generate
a license to use.
Font of choice - I used Tribal here
Mask 71 here
Plugs Ins used:
Brush Strokes – Sprayed Strokes
Greg’s Factory Output Vol. II – Pool Shadow
“Rock On” is a tagger size scrap kit created by Angel of Angel’s
Designz can be purchased from Heartbeatz Creationz. You can visit
her blog here.
Thank you Angel for a fantastic kit.
This tutorial was written assuming you have a working knowledge of PSP.
~♥~ Let’s get started ~♥~
Open up a 700 x 700 blank canvas.
Flood fill white.
Copy and paste Frame 2 as a new layer.
Resize 90%
Free rotate Left 90 degrees.
Click inside of each frame with your Magic Wand.
Selections/Modify/Expand by 4.
New Raster layer below the frame.
Copy and paste Paper 12 Into Selection.
Apply Greg’s Factory Output Vol. II – Pool Shadow:
Use Default Settings accept lower the Intensity bar to about 89.
OK
Deselect for now.
Copy and paste your tube as a new layer.
Resize as you like and position it in front of the center frame.
If you’re using the same tube as I did, resize 70%
Paste your tube again – this time position below the left frame.
Resize your tube to be slightly larger than the other tube layer.
I resized mine 80%.
Duplicate/Move below the right frame.
DO NOT give either tube a drop shadow yet.
Merge Visible both tube layers.
Copy and paste Drums as a new layer.
Position behind the merged tube layer.
Highlight the merged tube layer.
Click anywhere outside of it with your Magic Wand.
Selections/Invert
Selections/Modify/Contract by 1.
Highlight the drums layer.
Tap the delete key.
Deselect.
Give the merged tube layer a drop shadow.
Highlight the paper layer.
Click anywhere outside of it with your Magic Wand.
Highlight the merged tube layer.
Tap the delete key.
Deselect.
Change the Properties to Saturation.
Duplicate/Change the Properties to Soft Light.
Apply Brush Strokes – Sprayed Strokes:
Use Default settings.
Add the elements. I used:
Skull Polish: Resize 50%
Glitter Trail
Chain
Record: Resize 30%/Duplicate
Sparkles 1
Highlight your white background.
Select All.
New Raster layer.
Copy and paste Paper 6 Into Selection.
Deselect.
Adjust/Blur/Gaussian blur:
Radius: 5
OK
Apply the mask.
Resize 105%
Merge Group.
Add your credits.
Add your name.
Foreground: #000000
Background: Pattern/Paper 12
Stroke: 1
Type your name.
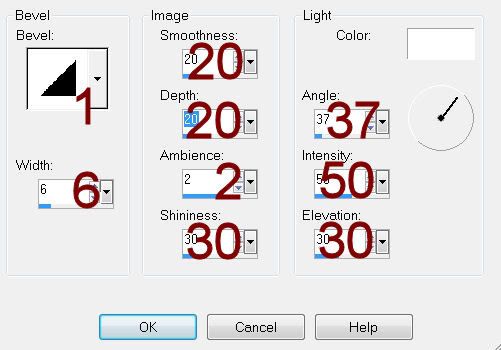
Give it a slight Inner Bevel:
Resize all layers 80%
No comments:
Post a Comment