

Supplies
Font of choice - I used Augusta here
Monti Circular Mask here
My template 56 here
“Beyond Wonderland” is a full size scrap kit created by Lins of Across
the Ponds Designs and can be purchased from Scrappin’Naturally. You can visit her blog here.
Thank you Lins for a really amazing kit!!
This tutorial was written assuming you have a working knowledge of PSP.
~♥~ Let’s get started ~♥~
Open up the template.
Shift + D.
Close out the original.
Delete the top 2 layers.
Highlight Right Stamp Back layer.
Click on it with your Magic Wand.
New Raster layer.
Copy and paste Paper 34 Into Selection.
Deselect.
Delete the template layer.
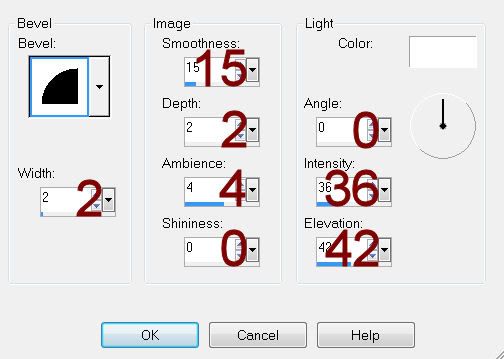
Give it a slight Inner bevel:
Highlight Left Stamp Back layer.
Repeat the above step.
Color Pallet:
Foreground: #c5c5c5
Background: #000000
Highlight Right Stamp Frame layer.
Make your Color Replacer tool active.
Double right click on the frame.
It should have turned black.
Highlight Left Stamp Frame layer.
Repeat the above step.
Highlight Right Stamp Square layer.
Click anywhere outside of it with your Magic Wand.
Copy and paste Paper 25 as a new layer.
Resize 20%
Move into a position you like over the square layer.
Tap the delete key.
Deselect.
Delete the template layer.
Higlight Left Stamp Square layer.
Repeat the above step.
We’re going to add the elements within the stamps – see my tag for reference:
Don’t worry about what overhangs the stamps as we’ll clean that up in a
bit.
Element 35: Resize 10%/Duplicate twice/ mirror one of the trees
Element 20: Resize 10%
Highlight the left square paper.
Click anywhere outside of it with your Magic Wand.
Highlight each elements that’s within it and tap the delete key.
Deselect.
Repeat the above step with the right square paper layer.
Add the rest of your elements. I
used:
35: Resize 10%/Duplicate/Mirror
Element 11: Resize 10%
Element 14: Resize 15% and 40%
Element 2: Resize 25% and 60%
Element 64: Resize 15%
Element 21: Resize
20%/Duplicate/Mirror
Element 29: Resize 10% and 50%
Highlight your white background.
New Raster layer.
Select All.
Copy and paste Paper 25 Into Selection.
Deselect.
Apply the mask.
Merge Group.
Add your credits.
Add your name.
No comments:
Post a Comment