

Supplies
1 tube of choice – I used the beautiful artwork of Rachael Tallamy
which can be purchased from Up Your Art. You must have
a license to use.
“Over the Hill” is a tagger size scrap kit (also available in full
size) created by Liv of Liv Luvs Scraps and is part of the TKO Birthday
Collaboration and can be purchased from TKO Scraps. You can visit Liv’s blog here.
This tutorial was written assuming you have a working knowledge of PSP.
~♥~ Let’s get started ~♥~
Open up a 700 x 700 blank canvas.
Flood fill white.
New Raster layer.
Make your Selection Tool active set on Rectangle.
Create a rectangle approximately 475 x 275 pixels.
Copy and paste Paper Crumple Into Selection.
Deselect.
Center it on your canvas.
Color Pallet:
Foreground: #c0c0c0
Background: #efefef
Set the foreground to gradient:
Style: Linear
Angle: 64
Repeats: 2
Use your Magic Wand and click anywhere outside of the rectangle.
Selections/Invert
Selections/Modify/Contract by 4.
Flood fill with the gradient.
Duplicate
Effects/Text Effects/Mosaic Antique:
Use Default Settings
Duplicate/Change the Properties to Exclusion.
Copy and paste Blingdrops as a new layer above the rectangle.
Selections/Invert
Tap the delete key.
Open up the tube you’ll be using.
Shift + D.
Close out the original.
Use your Freehand Selection Tool set on Point to Point and trace along
the outside of everything on the tube you want to stay colored.
Selections/Invert
Shift + L
Hue and Saturation: 0
OK
Deselect.
Copy.
Make your working canvas active.
Paste as a new layer.
Use your Eraser tool and erase only the area of the tube you don’t want
hanging outside of the rectangle.
Deselect.
Copy and paste Flower Frame as a new layer just above your white
canvas.
Click inside of it with your Magic Wand.
Selections/Modify/Expand by 4.
New Raster layer below the frame.
Copy and paste Random 2 Paper Into Selection.
Selections/Modify/Inside Outside Feather:
Both checked
Feather Amount: 24
OK
Selections/Invert
Tap the delete key twice.
Deselect.
Add your elements. I used:
Candle: Resize 60%
Fabric Flower: Resize
25%/Duplicate/Resize 70%/Duplicate/Duplicate all 3 flowers
Highlight your white background.
New Raster layer.
Select All.
Copy and paste Random Paper Into Selection.
Deselect.
Apply the mask.
Resize 110%
Merge Group.
Add your credits.
Add your name.
Foreground: #000000
Background: #7d2013
Stroke: 1
Type your name.
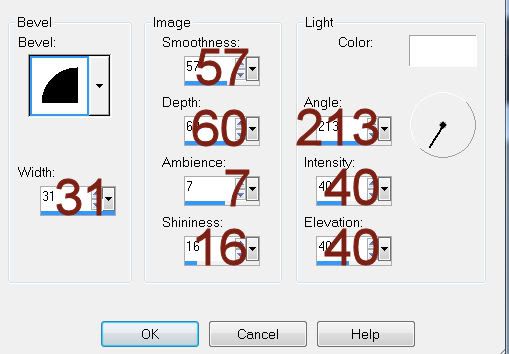
Give it a slight Inner Bevel:
Resize all layers 80%.
No comments:
Post a Comment