

Supplies
1 tube of choice – I used the artwork of Alfadesire which can be
purchased from Pics for Design. You must generate
a license to use.
Font of choice - I used Rat Infested Mailbox here
Plug Ins used:
Brush Strokes – Cross Hatch
Xero - Porcelain
Eyecandy 3.1 – Glow
“Retro Sonic” is a tagger size scrap kit created by Stu of Creative
Crazy Scraps and can be purchased from ExquisiteScraps. You can visit his blog here.
Thank you Stu for a really awesome kit!
This tutorial was written assuming you have a working knowledge of PSP.
~♥~ Let’s get started ~♥~
Open up a 700 x 700 blank canvas.
Flood fill white.
New Raster layer.
Make your Selection Tool active set on Circle.
Create a circle approximately 425 pixels.
Flood fill white.
Adjust/Add Remove Noise/Add Noise:
Gaussian and Monochrome checked
Noise: 50%
OK
Deselect.
Move to the right on your canvas – see my tag for reference.
Click anywhere outside of the circle with your Magic Wand.
Selections/Invert
Selections/Modify/Contract by 5.
New Raster layer.
Flood fill with #202020
Copy and paste your tube as a new layer – position over the flood fill
layer.
Selections/Invert
Tap the delete key.
Deselect.
Change the Properties of the tube to Soft Light.
New Raster layer.
Make your Selection Tool active set on Rectangle.
Create a rectangle approximately 450 x 350 pixels.
Flood fill white.
Apply the same noise effect.
Deselect.
Move the rectangle into position – see my tag for reference.
Click anywhere outside of the rectangle with your Magic Wand.
Selections/Invert
New Raster layer.
Copy and paste Paper 9 Into Selection.
Deselect.
Copy and paste E23 as a new layer.
Resize 120%
Free rotate Left 7 degrees.
Move into position – see my tag for reference.
Click inside of each film frame with your Magic Wand.
Selections/Modify/Expand by 4.
New Raster layer below the frame.
Copy and paste Paper 6 Into Selection.
Apply Brush Strokes – Cross Hatch:
Deselect.
Highlight the film strip.
Click inside the first frame with your Magic Wand.
Selections/Modify/Expand by 4.
Copy and paste your tube as a new layer below the frame.
Move into a position you like.
Selections/Invert
Tap the delete key.
Deselect.
Repeat the above step with the remaining film frames positioning your
tube in a different position for each frame.
Merge Visible the tube layers that are below the film frames.
Apply Xero – Porcelain:
Use Default settings.
Change the Properties to Lighten.
Copy and paste your tube as a new layer.
Add your elements. I used:
E34
E17: Duplicate 2x’s
E27: Resize 60%
E6
E19: Resize 60%/Duplicate/Mirror
E12: Resize 70%
Highlight your white background.
New Raster layer.
Select All.
Copy and paste Paper 5 Into Selection.
Deselect.
Apply the mask.
Merge Group.
Duplicate
Add your credits.
Add your name.
Convert to Raster layer.
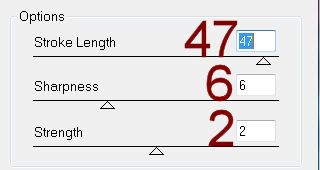
Apply Eyecandy 3.1 – Glow:
Width: 3
Opacity: 100%
Opacity Drop Off: Fat
Color: #f47e5e
OK
Resize all layers 80%.
No comments:
Post a Comment